FoneDog Screen Recorder FoneDog Screen Recorder
Special Offer Special Offer
Only Only
$4.49 $4.49
to get a ONE-month license to get a ONE-month license
Sale ends in xx days Sale ends in xx days
Buy Now
sale

Word Doc Recovery Methods: How to Salvage Your Documents

By Nathan E. Malpass, Last updated: November 16, 2023

Losing a valuable Word document can be a heart-wrenching experience, especially if it contains crucial information or hours of hard work. Whether your Word doc disappeared due to an accidental close without saving, a sudden system crash, or a corrupted file, the good news is that you're not alone in this predicament, and there are numerous methods available for Word doc recovery.

In this article, we will explore a range of Word document recovery methods, from quick and simple techniques to more advanced solutions, to ensure that you have the best chance of retrieving your precious files. So, let's dive into the world of document rescue and learn how to salvage your Word documents with ease.

Part #1: Word Doc Recovery Methods for MacPart #2: Word Doc Recovery Methods for WindowsPart #3: Best Tool for Word Doc Recovery on Mac And Windows: FoneDog Data RecoverySummary

Part #1: Word Doc Recovery Methods for Mac

Method #1: Using the Trash

If you're a Mac user, there's a good chance that your accidentally deleted Word document might still be residing in the Trash. Here's how you can use this method to recover your precious file:

  1. Locate and Open the Trash: Click on the Trash icon in your Mac's dock. It looks like a waste bin.
  2. Search for Your Document: In the Trash, you'll find a list of deleted files. Use the search bar in the top right corner to search for your Word document by name, if you remember it.
  3. Restore Your Document: Once you've located your document, right-click on it or drag it to your desktop. This action will restore the file to its original location.
  4. Check the Original Location: Go to the folder where your Word document was originally stored, and you should find it there once again.

Using the Trash is a quick and simple method for Word document recovery on your Mac, provided you haven't emptied the Trash after deleting the file. However, if you can't find your document in the Trash, or if it's been removed from there, don't worry, as there are more methods to explore for recovering your lost Word files.

Method #2: Using Time Machine

Time Machine, a built-in backup feature on macOS, can be a lifesaver when it comes to recovering lost or deleted Word documents. Here's how to use Time Machine for Word doc recovery on your Mac:

  1. Connect Your Backup Drive: Ensure that your external backup drive, where Time Machine archives are stored, is connected to your Mac.
  2. Activate Time Machine: Click the Apple logo in the top-left corner of your screen and select "System Preferences". In the System Preferences window, click on "Time Machine".
  3. Select "Enter Time Machine": In the Time Machine preferences, click on the "Select Backup Disk" button and choose your backup drive. Then, click "Use Disk".
  4. Navigate Through Time: Once Time Machine is set up, click on the Time Machine icon in your menu bar and select "Enter Time Machine". This will allow you to navigate through your backups in chronological order.
  5. Locate and Restore Your Document: Use the timeline on the right to navigate to the date when your Word document was last available. When you find the version of the document you want, select it and click "Restore".
  6. Save the Restored Document: The restored Word document will be placed in the same location it was in on the date you selected. Save it to your desired location.

Word Doc Recovery Methods for Mac: Using Time Machine

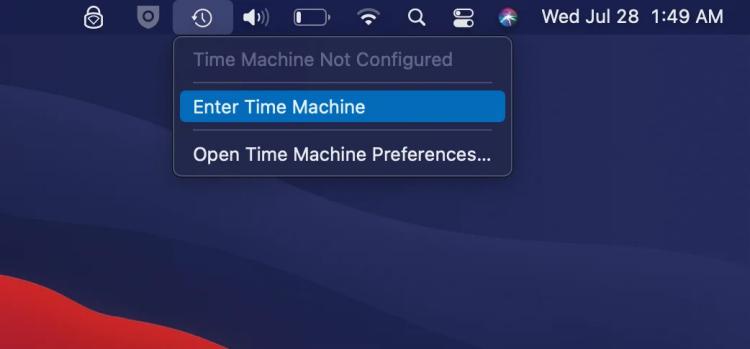
Time Machine keeps multiple versions of your files, making it a powerful tool for recovering older versions of Word documents, especially when you're unsure when the document was deleted or lost. Be patient while using Time Machine, as it may take some time to find the specific version you need.

Method #3: Using the Terminal

If you're comfortable with using the Terminal on your Mac, you can employ command-line techniques to attempt Word document recovery. Keep in mind that this method is more advanced and should be used with caution. Here's how to do it:

  1. Open Terminal: You can find Terminal in the Utilities folder within the Applications folder, or you can search for it using Spotlight.
  1. Navigate to the Trash: Use the cd command to navigate to the Trash folder. You can do this by typing:

cd ~/.Trash

  1. List Files: To view the contents of the Trash folder, use the ls. This will display a list of all files in the Trash.
  1. Recover Your Word Document: If you see your Word document in the list, you can use the mv command to move it to another location. Replace docx with the actual name of your file and /path/to/restore/location with the path where you want to restore the file. This will move the file to the specified location. For example:

mv your_document.docx /path/to/restore/location

Using the Terminal is a powerful method for those familiar with command-line interfaces, but it's important to exercise caution. Mistakes in the Terminal can lead to data loss or system instability, so make sure you understand the commands you're using and back up your data if possible before attempting this method.

Part #2: Word Doc Recovery Methods for Windows

Method #1: Using Recycle Bin

If you're a Windows user, the Recycle Bin can be your first line of defense in recovering deleted Word documents. Here's how to use this method for Word doc recovery :

  1. Open the Recycle Bin: Locate the Recycle Bin icon on your desktop and double-click it to open.
  2. Search for Your Document: In the Recycle Bin, you'll see a list of recently deleted files. You can scroll through the list or use the search bar in the top-right corner to search for your Word document by name or file type.
  3. Recover Your Document: Once you've located your Word document, right-click on it and select "Restore". This action will move the file back to its original location on your computer.
  4. Check the Original Location: Go to the folder where your Word document was originally stored, and you should find it there once again.

Using the Recycle Bin is a straightforward and effective method for recovering recently deleted Word documents on a Windows computer. However, if you can't find your document in the Recycle Bin or if it has been permanently deleted, don't worry; there are more methods to get back data from the Recycle Bin after emptying it.

Method #2: Using AutoRecover Feature

Microsoft Word, the popular word processing software for Windows, has an AutoRecover feature that can help you recover unsaved or lost documents. Here's how to use this method:

  1. Open Microsoft Word: Launch Microsoft Word on your computer.
  2. Go to the "File" Menu: Click on the "File" tab in the upper left corner of the Word window.
  3. Select "Open": In the menu, click on "Open" to open the File Explorer.
  4. Navigate to AutoRecover Files: In the File Explorer, navigate to the following location. Replace "YourUserName" with your actual Windows username:

C:\Users\YourUserName\AppData\Roaming\Microsoft\Word

  1. Search for Your Document: In the "Word" folder, look for files with the ".asd" extension. These are AutoRecover files. You can use the search bar in the top-right corner of the File Explorer window to search for your document by name.
  2. Recover Your Document: Once you've located the AutoRecover file that corresponds to your lost document, double-click on it to open it in Microsoft Word.
  3. Save the Recovered Document: After opening the AutoRecover file, save it immediately to a new location to ensure you don't lose it again.

Word Doc Recovery Methods: Using AutoRecover Feature

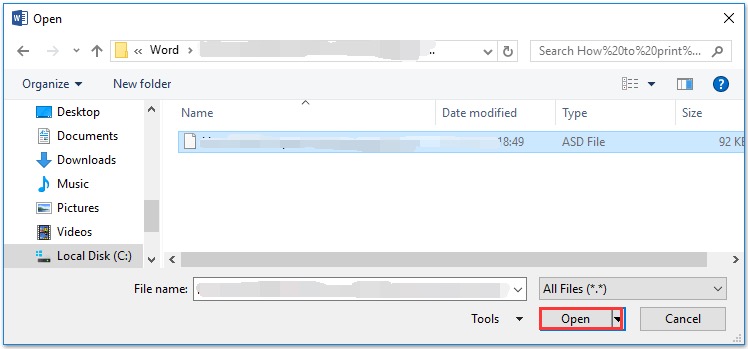
The AutoRecover feature in Microsoft Word is a valuable tool for recovering unsaved or lost documents due to software crashes or unexpected shutdowns. It periodically saves backup copies of your work, providing a safety net for accidental data loss.

Method #3: Using Command Prompt

In Windows, you can also use Command Prompt to attempt the recovery of Word documents, especially if you're dealing with lost files or files that have become inaccessible. Here's how to use Command for Word doc recovery:

  1. Open Command Prompt: Press Windows + X, and select "Windows Terminal" or "Command Prompt" (in older versions, you can choose "Command Prompt (Admin)"). This will open the Command Prompt window.
  2. Navigate to the Drive: You'll need to navigate to the drive where your lost Word document was located. Use the cd command followed by the drive letter. Replace "D" with the appropriate drive letter. For example:

cd D:

  1. Use the dir Command: Once you're in the correct drive, use the dir command to list the files and directories in the current location. You can also navigate to specific directories using the cd
  2. Recover the Document: If you know the name of the lost Word document or part of it, you can use the copy command to try and recover it. For example:

copy /b filename.docx destination

Replace "filename.docx" with the actual name of your Word document and "destination" with the location where you want to copy the file.

If the file was deleted or is corrupted, this method may not always work, but it's worth a try.

Using Command Prompt is a more advanced method and should be used with caution. Ensure you have a good understanding of the commands you're using, and always make a backup of important files before attempting any file recovery operations.

Method #4: Using Previous Versions Feature

Windows has a feature called "Previous Versions" that can be a valuable tool for recovering older versions of Word documents. Here's how to use this method:

  1. Right-Click on the Document: Navigate to the folder where your Word document was located. Right-click on the folder or the specific document you want to recover.
  2. Select "Restore Previous Versions": In the context menu that appears after right-clicking, choose "Restore previous versions". This will open the "Previous Versions" tab in the folder's properties window.
  3. Select a Previous Version: In the "Previous Versions" tab, you'll see a list of previous versions of the folder or file. Select a version that you believe contains the Word document you want to recover.
  4. Click "Restore": After selecting a previous version, click the "Restore" button. This will replace the current version of the folder or file with the selected previous version.
  5. Check the Restored Document: Navigate to the location of your Word document, and you should find the older version of your file restored.

Word Doc Recovery Methods: Restore Previous Versions

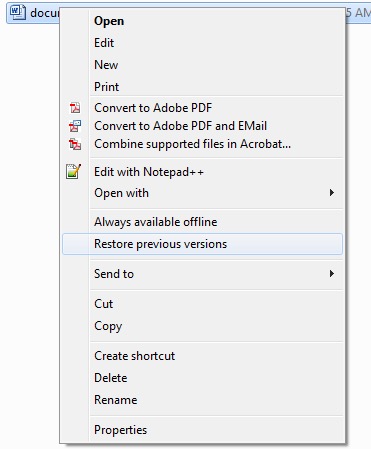
The "Previous Versions" feature in Windows is especially useful for recovering earlier iterations of your Word document, and it works well if you have System Restore enabled. However, this method may not be as effective for very recent changes or if you haven't configured the system to create previous versions of files.

Part #3: Best Tool for Word Doc Recovery on Mac And Windows: FoneDog Data Recovery

FoneDog Data Recovery is a versatile and reliable data recovery tool that works seamlessly on both Mac and Windows systems. It's an excellent choice for recovering Word documents and various other file types that have been deleted, lost, or corrupted due to various reasons.

Data Recovery Recover deleted image, document, audio and more files. Get deleted data back from computer (including Recycle Bin) and hard drives. Recover loss data caused by disk accident, operation system crushes and other reasons. Free Download Free Download FoneDog Data Recovery

Here's an overview of its features and steps to recover your Word documents:

Key Features:

  1. Cross-Platform Compatibility: FoneDog Data Recovery is available for both Mac and Windows, making it a versatile solution for users on different platforms.
  2. Document Recovery: This tool specializes in recovering various file types, including Word documents (DOC and DOCX), Excel spreadsheets, PDFs, and more.
  3. Multiple Recovery Modes: FoneDog offers various recovery modes, such as "Deleted Files Recovery", "Partition Recovery", and "Raw File Recovery", to cater to different data loss scenarios.
  4. Preview Before Recovery: You can preview recoverable files before restoring them, helping you ensure you're recovering the correct documents.
  5. Selective Recovery: You have the flexibility to select specific Word documents to recover, rather than restoring all files at once.
  6. User-Friendly Interface: FoneDog's user-friendly interface makes the recovery process straightforward, even for users with limited technical expertise.

Steps to Recover Word Documents with FoneDog Data Recovery:

Here's a step-by-step guide on how to use FoneDog Data Recovery for Word doc recovery on both Mac and Windows systems:

For Mac:

  1. Download and Install FoneDog Data Recovery for Mac: Start by downloading and installing the software on your Mac computer.
  2. Launch the Software: Open FoneDog Data Recovery by clicking its icon in the Applications folder.
  3. Select Recovery Mode: You'll be presented with recovery mode options. Choose the appropriate mode depending on your data loss scenario (e.g., "Deleted Files Recovery").
  4. Choose the Drive or Location: Select the drive or location where your Word documents were stored.
  5. Scan for Lost Documents: Click the "Scan" button to initiate the scanning process. The software will search for lost or deleted Word documents.
  6. Preview and Select Files: After the scan is complete, you can preview the recoverable files. Select the Word documents you want to recover.
  7. Recover Word Documents: Click the "Recover" button, choose a location to save the recovered documents, and confirm the recovery.

For Windows:

  1. Download and Install FoneDog Data Recovery for Windows: Download and install the software on your Windows computer.
  2. Launch the Software: Run FoneDog Data Recovery by double-clicking the desktop shortcut or from the Start menu.
  3. Choose Recovery Mode: Select an appropriate recovery mode that matches your data loss scenario (e.g., "Deleted Files Recovery").
  4. Select the Drive or Location: Choose the drive or location where your Word documents were located.
  5. Start the Scan: Click the "Scan" button to start scanning for lost or deleted Word documents.
  6. Preview and Select Files: Once the scan is complete, you can preview the recoverable files. Choose the Word documents you wish to recover.
  7. Recover Word Documents: Click the "Recover" button, specify a location to save the recovered files, and confirm the recovery process.

Best Tool for Word Doc Recovery: FoneDog Data Recovery

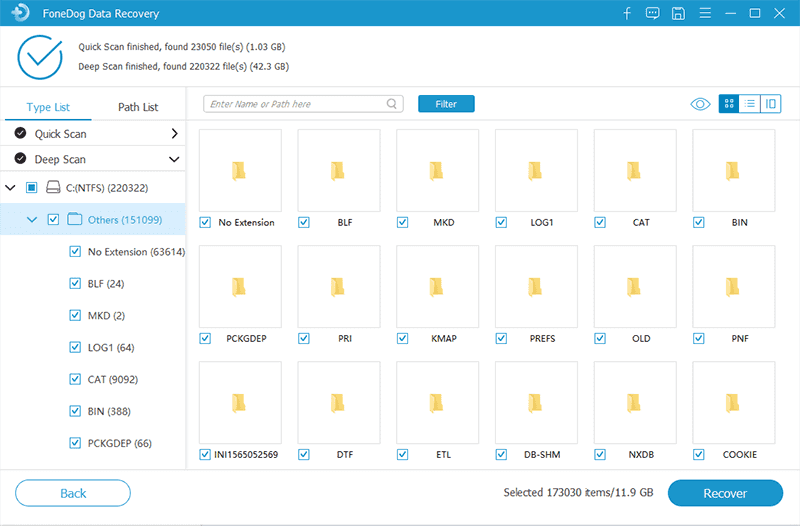
FoneDog Data Recovery simplifies the Word document recovery process, making it accessible to users of all skill levels. Its comprehensive features and compatibility with both Mac and Windows systems make it a top choice for retrieving important documents that may have been accidentally deleted or lost.

People Also ReadHow to Recover Data from Damaged Hard Disk4 Powerful Ways on How to Recover Lost File on Mac

Summary

Word doc recovery is a common need for both Mac and Windows users. In this article, we explored various Word document recovery methods for both platforms. Here's a summary of the methods discussed. While these methods can be effective, they may have limitations, such as the need for recent backups or limitations in recovering overwritten files.

For a comprehensive and user-friendly solution, you can consider using third-party data recovery software like FoneDog Data Recovery, which is compatible with both Mac and Windows. This software offers advanced features, including selective file recovery and preview, making it a reliable choice for retrieving lost or deleted Word documents and various other file types.

Choose the method that suits your specific situation and technical expertise to increase your chances of successful Word document recovery.

Leave a Comment

Comment

Comment ()
author image

Nathan E. Malpass

iPhone/Android Devices’ Maintenance Expert

Staying home, listening to music, writing tech articles

Many people asked me to repair their mobile phones so I have a lot of experience in mobile phone repair, and I know a lot about Android or Apple phones.

Data Recovery logo

Data Recovery

FoneDog Data Recovery recovers the deleted photos, videos, audios, emails, and more from your Windows, Mac, hard drive, memory card, flash drive, etc.

Free Download Free Download

How Do You Like This Article?

Check icon/ Check icon

INTERESTINGDULL

Check icon/ Check icon

SIMPLEDIFFICULT

Thank you! Here' re your choices:

Rate This Article: Excellent

Rating: 4.8 / 5 (based on 93 ratings)

Data Recovery logo

Data Recovery

FoneDog Data Recovery recovers the deleted photos, videos, audios, emails, and more from your Windows, Mac, hard drive, memory card, flash drive, etc.

Free Download Free Download

FoneDog uses cookies to ensure you get the best experience on our website. Click here to learn more.