FoneDog Screen Recorder
FoneDog Screen Recorder
Special Offer
Special Offer


By Gina Barrow, Last updated: September 11, 2021
New to Mac and was quite confused about how things are going and suddenly you deleted an important file only to realize days after that you needed it the most. What are you going to do? How are you supposed to recover lost file on Mac?
This can happen to you at any time and anywhere. Data loss happens at unexpected times and worst, with time constraints. Good thing, you can easily recover lost file on Mac with and without software. Today, let’s talk about Mac's recovery. Here are the 4 powerful ways on how to get your files back.
Part 1. Use Time Machine to Recover A Lost FilePart 2. Recover A Lost File on Mac by Using TerminalPart 3. How to Use the Undo Options to Restore a FilePart 4. Recover A Lost File on Mac with Professional Software Part 5. Conclusion
Time Machine is a useful backup option whenever you need to recover files, or when your system fails, or startup disk is damaged.
To recover lost file on Mac, Spotlight is of big help. It initiates a search of Time Machine to recover lost or deleted files.
Follow these instructions on how to restore your file via Time Machine:
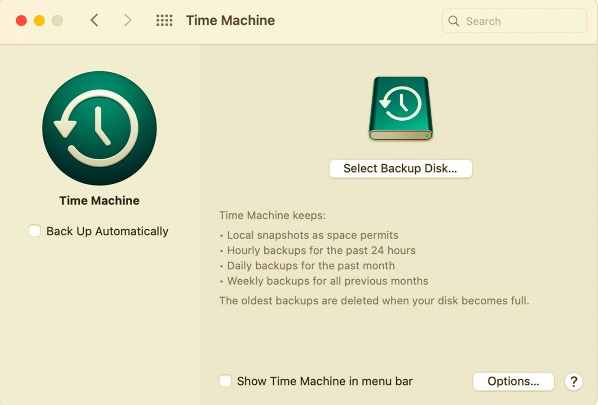
You need to repeat the process if the files you need are located in a different folder. Time Machine is helpful in scenarios like these, however, it must require that you first enable the Time Machine Backup to copy all your files.
Another compelling option that you can use to recover lost file on Mac is by using the Terminal command. The terminal is a command-line system that assists you to promptly take charge of the operating system and make certain adjustments.
The terminal command is totally distinct from the usual things you see on your Mac. It uses a different language, where each letter you type plays a crucial role. You have to familiarize yourself with the environment or carefully follow the steps of any troubleshooting methods you do.
Let’s say you deleted a file and you no longer remember when it happened. You were unable to scan through the Trash folder and now you are using Terminal to restore the files.
Simply use the Spotlight search to find the Terminal Command on your Mac or go to Applications, and then select Utilities. Follow the steps below to restore your file via Terminal:
cd .Trash" and hit Return ls -al ~/.Trash and hit Enter to view the content of the Trash foldermv name ../" (Replace the name with the complete file name you used) and click Return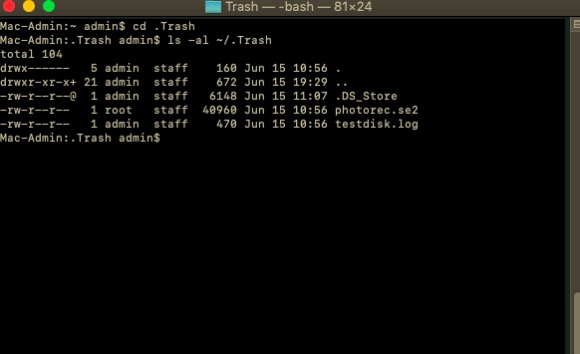
Use the Spotlight search and type the restored file name. It will show up on the list by this time and you’ll get the chance to access it again.
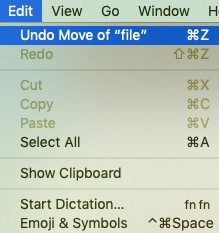
There is another way to quickly get back your file on Mac and this is by using the Undo or Redo options. Usually, when you work on something, your device saves your last action.
You can only use this option if you haven’t done any changes after deleting or losing a file. To use this method, go to the home screen and click on Edit, click the first option which is Undo + the last action made. This will then restore whatever file you have lost or deleted.
The undo and redo options are great but can only be used immediately. If you need to recover lost file on Mac that’s been hiding for a long time now, then the last method is for you.
The best thing that a third-party tool can do is to recover lost file on Mac regardless of the situation and condition. These programs are equipped with efficient tools for recovery.
FoneDog- Data Recovery is one of the most ideal software when it comes to data retrieval on whatever operating system you have. It can recover photos, documents, videos, music, and many more.
Not only does this software recover files from the computer but it can also help you restore data from a flash drive, memory card, and other internal or external drives. There is a free download of this software if want to learn more about how to get your files back in a minute.
To learn how FoneDog- Data Recovery will restore your file, follow these:
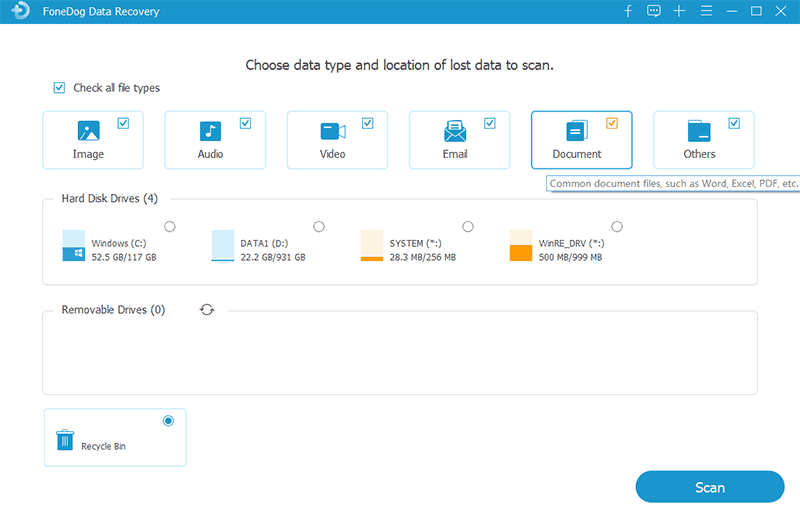
After you have completed the installation on your Mac, launch the program and select the type of file you need for recovery. You can tick all the choices, or you can just mark a single option.
Below is the storage location. You have to set where the software will concentrate its recovery. You can set it to be in your drives or an external, or the Trash folder. Click Next to proceed.
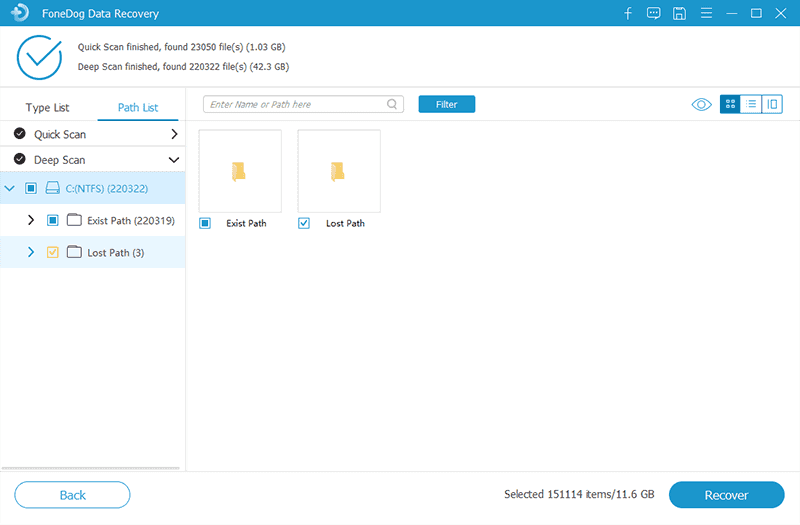
There are two options for data scanning to recover lost file on Mac, quick and deep scans. Now the scanning depends on the amount of data you need to recover plus the depth of the storage you have selected.
While scanning, the software will slowly display all the restored files on your screen. Wait for it to complete the scan before you continue with the next step.
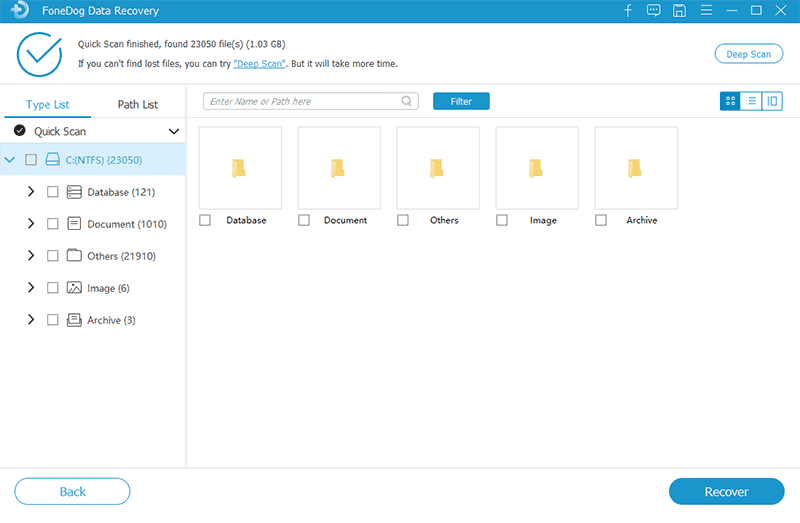
At this point, the scanning has stopped and all files are displayed onscreen according to their category, file type, and paths. You can now preview the recovered items and select those you need.
Before you can download or save the recovered file, you have to first set the destination folder. You may opt to recover them all or to choose a few files only.
What’s best with using software like FoneDog- Data Recovery is that you have the flexibility of the files to recover and restore from, and of course, the selective recovery option and preview.
People Also Read4 Best Ways to Restore Deleted Downloads Folder Mac for FreeA Complete Guide On How to Recover Files Deleted by Avast Antivirus
The next time you encounter this situation, know that there are 4 powerful ways on how to recover lost file on Mac. Unless you have taken backups, then Time Machine is the quickest way to restore a lost or deleted file.
Together with the Undo/redo options, you can easily retrieve the files that are hiding somewhere on the computer. But, in any case, the Terminal is a great tool that gives you full control to modify or make necessary adjustments to your operating system and this includes data recovery.
But navigating the Terminal command is tricky, especially for beginners. The safest and highly recommended method of all is using FoneDog- Data Recovery. It is convenient, safe, guaranteed results in just 3 steps.
Leave a Comment
Comment

Technical/Creative Writer
Kitchen, my safe space; black, my favorite color
Was a Technical Specialist for a while, troubleshooting Smartphone and Software-related issues until a writing stint caught my attention.
Data Recovery
FoneDog Data Recovery recovers the deleted photos, videos, audios, emails, and more from your Windows, Mac, hard drive, memory card, flash drive, etc.
Free Download Free DownloadHot Articles
 /
/
INTERESTINGDULL
/
SIMPLEDIFFICULT
Thank you! Here' re your choices:
Excellent
Rating: 4.6 / 5 (based on 87 ratings)
