FoneDog Screen Recorder
FoneDog Screen Recorder
Special Offer
Special Offer


By Nathan E. Malpass, Last updated: September 30, 2023
In the world of digital information, accidental file deletions can feel like the modern-day equivalent of misplacing a valuable item. Fortunately, the recycling bin, present on most operating systems, offers a safety net, allowing us to restore deleted files with a simple drag-and-drop.
But what if you've taken the ultimate step – emptying the recycle bin – only to realize that among the discarded files were some you desperately need? It might seem like all hope is lost, but fear not. With the right approach and tools, you can still recover files from recycle bin after empty process is done.
In this article, we will delve into the world of file recovery beyond the typical "undelete" scenario. We'll explore the methods, software, and precautions that can increase your chances of successful disk retrieval. From understanding the technical aspects of how deleted files are managed to utilizing specialized recovery software, we'll equip you with the knowledge to become a digital file recovery master.
So, whether you're a casual computer user who inadvertently lost an important document or a professional dealing with the aftermath of an unintentional mass deletion, this guide will empower you to tackle the challenge of recovering files from the recycle bin after it has been emptied. Let's dive into the art and science of file rescue, and ensure that no digital loss remains irreversible.
Part #1: How to Recover Files from Recycle Bin after Emptying ItPart #2: Best Method to Recover Files from Recycle Bin after Emptying It: FoneDog Data Recovery ToolConclusion
In the digital age, our reliance on cloud storage services has become paramount. These services not only provide convenient access to our files from anywhere but also offer an additional layer of data protection. If you've accidentally emptied your recycle bin and lost critical files, your cloud storage might just be the key to recovery.
When you delete a file from your local system and subsequently empty the recycle bin, the file isn't immediately eradicated. Instead, the space it occupies is marked as available for reuse, and the file's record is removed from the file system index. However, until new data overwrites the space, the actual content of the file remains intact.
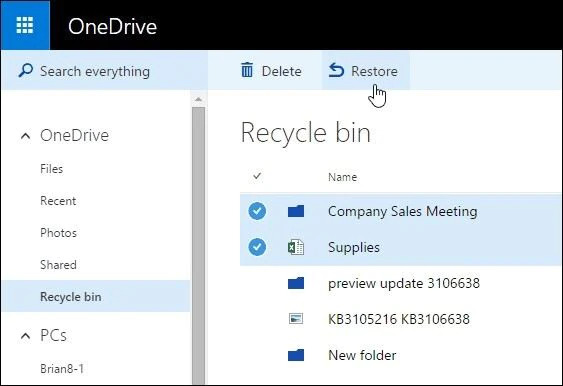
Cloud storage services often synchronize files between your local system and their servers. This means that even if you delete a file from your computer and empty the recycle bin, a copy might still exist in your cloud storage. Many services, like Google Drive, Dropbox, and OneDrive, offer a "trash" or "bin" feature where deleted files are retained for a certain period, usually around 30 days, before permanent deletion.
Steps to recover files from recycle bin after empty using Cloud Storage:
Leveraging cloud storage services is a smart way to recover files from the recycle bin after it's been emptied. With a little luck and prompt action, you can reclaim lost files and avert potential data disasters.
However, if your cloud storage didn't save the day, don't worry – we'll explore more file recovery methods in the upcoming sections to ensure you have a comprehensive arsenal of techniques at your disposal.
When you delete a file and empty the recycle bin, the file system marks the space as available for use, but the actual data might still be recoverable until it gets overwritten. The Command Prompt lets you bypass the graphical interfaces and execute commands to interact directly with the file system, potentially revealing deleted files that are still recoverable.
Steps to Recover Files Using Command Prompt:
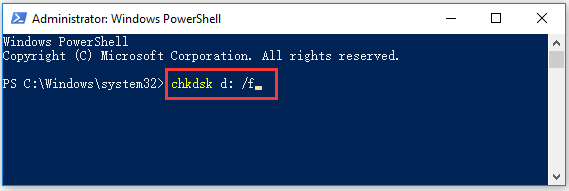
The Command Prompt provides a more technical approach to recovering files from the recycle bin after emptying it. By interacting directly with the file system, you can potentially salvage files that would otherwise be considered lost.
However, due to its complexity and risks, this method is best suited for users who are comfortable with command-line interfaces and have a basic understanding of file systems. If you're not comfortable with using the Command Prompt, don't worry – there are more user-friendly methods to explore in our quest to rescue lost files.
The Windows File Recovery tool is specifically designed for scenarios where data loss has occurred. It can help recover files from various locations, including local drives, external storage devices, and even SD cards. It utilizes advanced algorithms to identify and restore deleted files, offering a user-friendly alternative to more technical methods like using the Command Prompt.
Steps to Recover Files Using Windows File Recovery Tool:
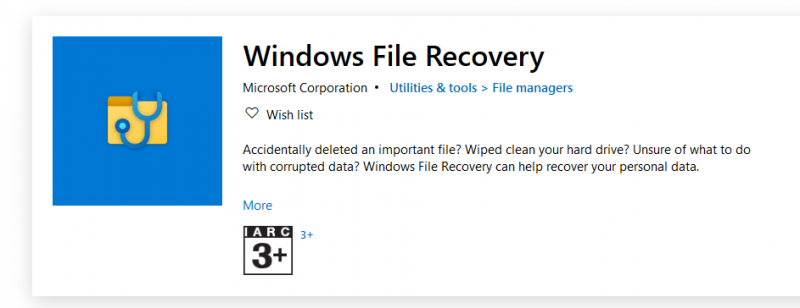
The Windows File Recovery tool provides an accessible and straightforward way to recover files from recycle bin after empty. Its user-friendly interface makes it a great choice for those who are not comfortable with command-line interfaces, yet still want a reliable method to retrieve their lost data.
As we continue our exploration of file recovery methods, remember that having multiple strategies at your disposal increases your chances of successfully rescuing your valuable files.
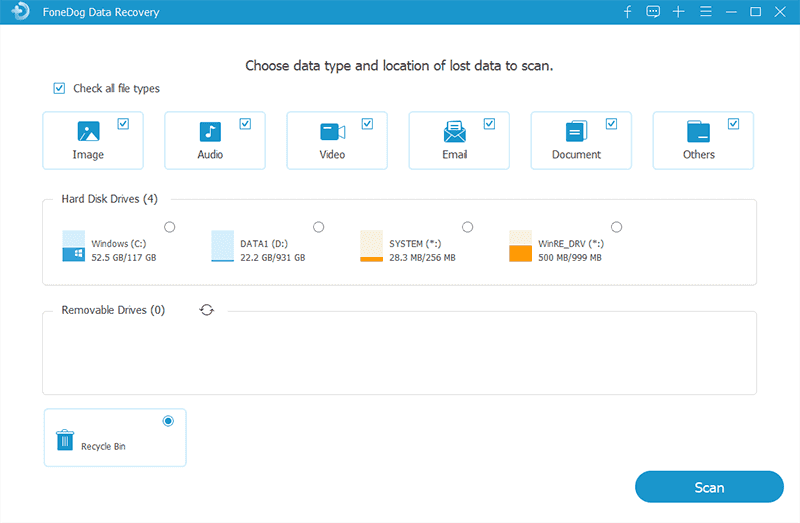
Losing important files due to an emptied recycle bin can be a harrowing experience, but fear not – advanced data recovery tools are here to save the day. Among these, the FoneDog Data Recovery Tool stands out as a powerful and user-friendly solution to help you retrieve your precious files even when they seem lost forever.
Data Recovery
Recover deleted image, document, audio and more files.
Get deleted data back from computer (including Recycle Bin) and hard drives.
Recover loss data caused by disk accident, operation system crushes and other reasons.
Free Download
Free Download

The FoneDog Data Recovery Tool is designed with simplicity and effectiveness in mind. It's comprehensive software that can recover a wide range of file types from various storage devices, including hard drives, memory cards, USB drives, and more. Whether your files were deleted, lost due to formatting, or emptied from the recycle bin, this tool boasts a high success rate in restoring them.
Key Features and Benefits:
Steps to recover files from recycle bin after empty using one of the best recovery software for Windows 10:
When it comes to choosing the best method to recover files from the recycle bin after emptying it, the FoneDog Data Recovery Tool proves to be a standout solution. Its user-friendly interface, versatile recovery modes, and high success rate make it an ideal choice for both casual users and those dealing with more complex data loss scenarios.
By using this tool, you can restore your lost files and gain peace of mind knowing that your valuable data is never truly beyond reach.
People Also ReadHow Do I Recover Deleted Files from My XD Card?exFAT Data Recovery: How to Process It in 2023?
In the digital landscape, the nightmare of losing files from an emptied recycle bin can be mitigated by employing effective recovery methods. Whether through cloud storage services, Command Prompt techniques, built-in tools like Windows File Recovery, or specialized software like the FoneDog Data Recovery Tool, there's a solution for every level of technical expertise. Act promptly, choose the method that aligns with your comfort level, and rest assured that recover files from recycle bin after empty.
Leave a Comment
Comment

iPhone/Android Devices’ Maintenance Expert
Staying home, listening to music, writing tech articles
Many people asked me to repair their mobile phones so I have a lot of experience in mobile phone repair, and I know a lot about Android or Apple phones.
Data Recovery
FoneDog Data Recovery recovers the deleted photos, videos, audios, emails, and more from your Windows, Mac, hard drive, memory card, flash drive, etc.
Free Download Free DownloadHot Articles
 /
/
INTERESTINGDULL
/
SIMPLEDIFFICULT
Thank you! Here' re your choices:
Excellent
Rating: 4.7 / 5 (based on 61 ratings)
