FoneDog Screen Recorder
FoneDog Screen Recorder
Special Offer
Special Offer


By Vernon Roderick, Last updated: July 29, 2020
Windows 10/11 is perhaps one of the best creations of the Microsoft Incorporation. However, it is still far from being flawless. As always, you will eventually encounter errors as you continue to use the operating system. Nevertheless, developers keep on creating ways for us to have a better user experience. One of the most useful features that they’ve developed is the Windows 10 recovery partition.
Despite that, there are many people who don’t know about it. What is a Windows 10 recovery partition? How does it work? How can I use it? Without the answers to these questions, it would be no more than a useless function. So today, we’re going to delve deeper into this topic.
After several years of writing programs for computers, we've created a powerful tool for everyone.
Here is a tip: Download FoneDog Data Recovery to retrieve a lost Windows 10/11 recovery partition. It can easily and safely recover your lost data from a Windows computer.
Data Recovery
Recover deleted image, document, audio and more files.
Get deleted data back from computer (including Recycle Bin) and hard drives.
Recover loss data caused by disk accident, operation system crushes and other reasons.
Free Download
Free Download

If you do not need to retrieve the recovery partition, read below to know more about Windows 10/11 recovery partition.
Part 1. An Overview of Windows 10/11 Recovery PartitionPart 2. How to Retrieve a Lost Windows 10/11 Recovery PartitionPart 3. How to Create a Windows 10/11 Recovery PartitionPart 4. How to Delete a Windows 10/11 Recovery PartitionPart 5. How to Reset Windows from Recovery PartitionPart 6. Wrapping Up
The first question a Windows user will have about Windows 10/11 recovery partition is its definition.
A recovery partition can be defined in many ways. Firstly, it not only helps us fix errors, but it also allows us to make our job easier by offering a quick and easy-to-follow way to restore our Windows 10.
When you buy a computer, you will often see an operating system already preinstalled. In the case of Windows 10/11, or even Windows 8, you will always notice that there’s a recovery partition stored in the system. Although it may not have a drive letter or any functions, in the beginning, you will find its uses in the future when the need arises.
What is a recovery partition? A recovery partition, regardless of whether it is from a Windows 8 or Windows 10/11 operating system, is a portion of your disk drive that is set aside by the manufacturer to hold an image of your system before it was shipped from the factory. Recovery partition contains the files of system backup image and files that guide system restoration.
Since it holds the configurations of the operating system from when it was manufactured, you can already assume that it can be used to factory reset your Windows OS. Thus, a Windows 10/11 recovery partition is often used when the user encounters an error and in the need of a factory reset.
The Recovery Partition is an essential part of the installation of Windows system , it may be used to restore the operating system if issues are encountered. One of the main issues associated with the Recovery Partition on Windows was that it was often placed at the very beginning of the disk.
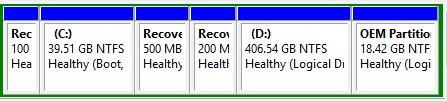
It is important to remember that there are not one, but two types of recovery partitions. The first one is a Windows recovery partition, which is our main topic, while the second one is the OEM recovery partition. The Windows recovery partition contains the default settings of the manufacturer, while the OEM recovery partition contains the default settings of the supplier.
For this reason, the OEM recovery partition usually has a larger size than the Windows recovery partition. Since the manufacturer is more credible, using the Windows 10/11 recovery partition is more preferable. As previously mentioned, it doesn’t have any drive letter so it won’t easily get lost. So what if you lose it?
Due to its utmost importance, a Windows 10/11 recovery partition should always be used in case of emergencies. But in some cases, users somehow tend to lose them due to various reasons. Regardless of that reason, if this happens, your priority should be to retrieve that lost Windows recovery partition, which takes us to the next topic.
We’ve said over and over that a recovery partition is very important, and that’s exactly why you can’t just use a simple recovery tool to recover partition windows 10 once it is lost. There are security features that you will need to bypass. That is why we recommend using FoneDog Data Recovery to retrieve your lost Windows 10/11 recovery partition.
Data Recovery
Recover deleted image, document, audio and more files.
Get deleted data back from computer (including Recycle Bin) and hard drives.
Recover loss data caused by disk accident, operation system crushes and other reasons.
Free Download
Free Download
FoneDog Data Recovery is a specialized software that can retrieve all sorts of files, including lost partitions, which is a pretty rare feature for a recovery tool. You can also retrieve partitions regardless of how it was lost, be it due to accidental deletion, formatting, improper cloning, virus attack, disk errors, and more. Lastly, you won’t have to worry about losing data as it specializes in accurate recovery.
Fortunately, despite its generous functions, you don’t have to go through a lot just to use it. You will only need your computer, nothing else, and just follow these simple steps:
The next window will show the different File Types you can recover and Drives you can recover from.
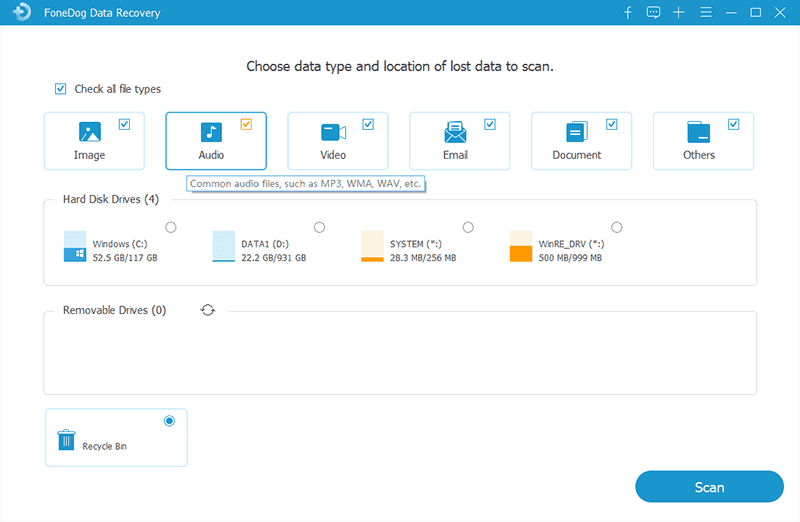
This is because you don’t know what kind of files Windows 10/11 recovery partition must-have.
The WinRE_DRV stands for the Windows 10 recovery partition.
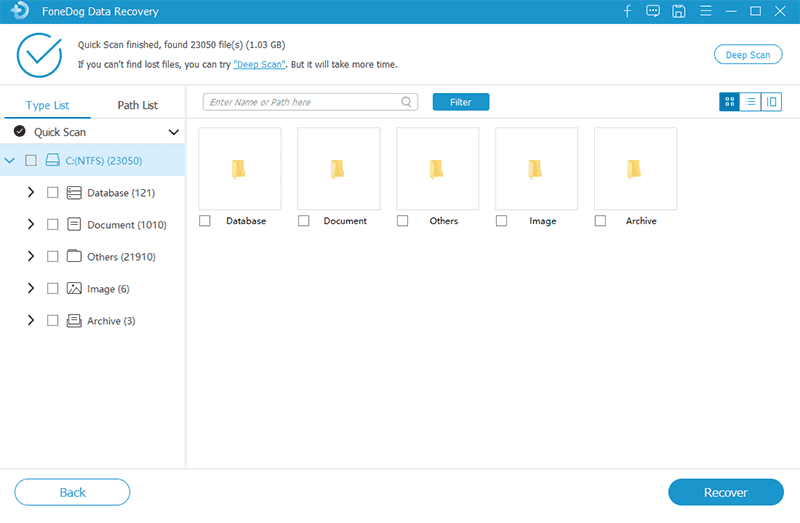
Wait for the scanning process to finish. Once it does, you will see a list of files.
At this point, all you have to do is to wait for the process to complete. With this, you’ll be able to recover the Windows 10/11 recovery partition that you lost. Now, what if you don’t have anything to recover, but you need an extra Windows 10/11 recovery partition?
Recovery tools can only recover files that were lost. However, for files that are hidden, you have to find them yourself in order to use them. Unfortunately, Windows 10/11 recovery partitions tend to be hidden.
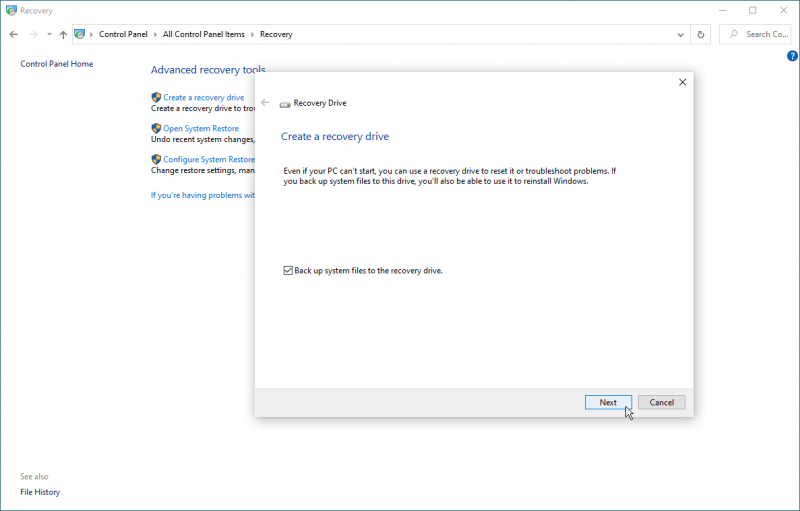
Although it may take up to a few GBs of your storage space, it would be worth it as long as you have a quick way to restore your PC to its best condition in case of an abnormality. Regardless, you will have to know how to create a Windows 10/11 recovery partition. However, remember that it won’t be as easy as creating a normal partition.
Recovery partitions are special cases and you will have to utilize utmost cautiousness.
Remember that this will only show up on Windows 10/11 and not on other versions.
You should see a pop-up window at this point.
With that, you’ll be able to create as many Windows 10/11 recovery partitions as you want, as long as you have enough space. Now, what if your disk space is already full?
When the time comes for you to delete some files to store new ones, you’ll ask yourself, “Can I delete Windows 10/11 recovery partition? Fortunately, the answer to that is a big YES. In addition to that, it is also fine to delete a Windows 10/11 recovery partition. There won’t be any severe damage to your system.
However, that is only assuming that you don’t plan on doing a factory reset for a while. Additionally, please note that this cannot be done by simple means. Nevertheless, Windows still has a way for you to delete Windows 10/11 recovery partitions without spending a dime. You just have to use the Command Prompt and follow these steps:
By following these steps, you will be able to delete any partition you like, even if it is not a recovery partition. Though in case you need the Windows 10/11 recovery partition, you should know how to use it before you delete it.
The main function of a recovery partition is to reset your Windows system. This can be due to various reasons, such as the appearance of errors or abnormalities. Either way, a recovery partition plays an important role in keeping your system safe. Regardless, it would be pointless if you don’t know how to use it.
And so, here are the steps you need to follow to reset windows from a recovery partition:
You will be taken to another window.
Compared to deleting or creating a Windows 10/11 recovery partition, using it is actually easier. This might also be because deleting or creating a recovery partition can lead to significant changes in your system. This is the main reason why it is more difficult to accomplish.
Either way, now that you know how to create, delete or use Windows 10/11 recovery partition, you should be able to solve any errors that will occur to your device.
Data Recovery
Recover deleted image, document, audio and more files.
Get deleted data back from computer (including Recycle Bin) and hard drives.
Recover loss data caused by disk accident, operation system crushes and other reasons.
Free Download
Free Download
No matter how amazing a system is, there will always be a flaw. For Windows products, one of the most common flaws is the occurrence of errors. But the important thing is that there is a way to solve these issues.
One of the most helpful features that were introduced to us is the development of Windows 10/11 recovery partitions. It allows you to recover your Windows system, on top of solving your errors for you. The bottom line is, you don’t have to worry about encountering some major errors, but at the same time, you should always be prepared for them.
Leave a Comment
Comment

Technical Expertise for PC/Website Optimization
One of my passion is to develop software of my own
I write articles to share knowledge about IT technology and some experience in developing my own software, and developing my own software is one of my passions for work.
Data Recovery
FoneDog Data Recovery recovers the deleted photos, videos, audios, emails, and more from your Windows, Mac, hard drive, memory card, flash drive, etc.
Free Download Free DownloadHot Articles
 /
/
INTERESTINGDULL
/
SIMPLEDIFFICULT
Thank you! Here' re your choices:
Excellent
Rating: 4.6 / 5 (based on 74 ratings)
