FoneDog Screen Recorder
FoneDog Screen Recorder
Special Offer
Special Offer


By Vernon Roderick, Last updated: May 19, 2021
An audio file encodes audio data in diverse means, in different compression, types, and sizes. Such common music file formats are MP3, WAV, WMA, AIFF, FLAC, etc. But you would not expect it – possible circumstances would happen such as your music files becoming lost, missing, or deleted from your device. So what we need to do is perform music recovery.
The possible causes of missing or deleted music files are: your computer may have done a scan and formatted your drives; malicious software or malware that deleted your songs; your anti-virus software deleted your audio files after a scan and infection removal process without any notifications; you have accidentally deleted the files by pressing the delete or shift and delete buttons or emptied the Recycle Bin, and many more.
That is why this article is created to help you quickly solve the problem of missing or deleted music files. Different methods are provided below to guide you on music recovery, may it be in Windows or Macintosh computer system. A data recovery program is also introduced to allow you to easily and securely do it without any hassle.
Why choose FoneDog Data Recovery for your music recovery needs? FoneDog Data Recovery is a reliable, quick, and easy-to-use professional data recovery program that helps you to safely recover your deleted files, in any data type, any device, and in any situation. This includes the important music files that you wish to restore to your devices. You are assured that your data is secured with high success and without any data loss. Continue to read the guidelines below.
A professional data recovery wizard that allows you to quickly and safely recover your deleted files including audios, FoneDog Data Recovery is a reliable and easy-to-use toolkit that does quick and deep scans of your files with a high success rate and is 100% secure for your data. You can preview your data files before recovery and restore them. You are assured that no data is lost with this convenient to use data recovery program.
You can recover from any device such as computers including Recycle Bin, hard drive, USB, memory cards, digital camera, and removable drives in different supported file systems. It can restore any data type such as image, video, audio, email, archive, and documents and in any situation such as file recovery, hard drive recovery, memory card recovery, flash drive recovery, crashed Windows or Macintosh recovery, and partition recovery.
A free trial of the application is available that if you purchase it, you are offered a 30-day money-back guarantee. You have the option to download the software according to your computer’s operating system (OS): Windows or Macintosh.
No need to worry, you only need three steps to recover your deleted music files using the Fonedog data recovery software: launch, scan, and restore. Presented below are the instructions on how to use the FoneDog Data Recovery program and an answer to your question on how to do music recovery.
When you have downloaded and installed the FoneDog Data Recovery software, launch the installed application. Double-click its shortcut icon located on your desktop or you can click its pinned icon on your taskbar (if a shortcut is created or the application is pinned to the taskbar). You can also find the FoneDog Data Recovery application by going to the Start menu and then search it from the Programs list.
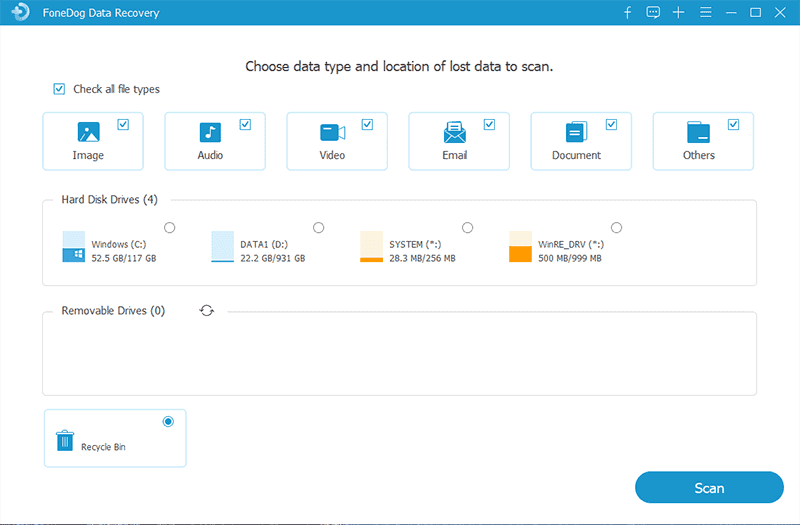
On the main screen, select “Audio” in the file types to recover and the drives (hard disk drive or removable drive) where you want to retrieve the deleted music files. Press the “Scan” button to start scanning the data files.
It is important to note that while doing the music recovery, you need to have a good connection between your computer and your removable devices to ensure a seamless data scan and recovery. There are also other data types in the FoneDog Data Recovery application that you can choose to restore and you can retrieve these files from any device. It can be an image, video, email, document, audio, and others.
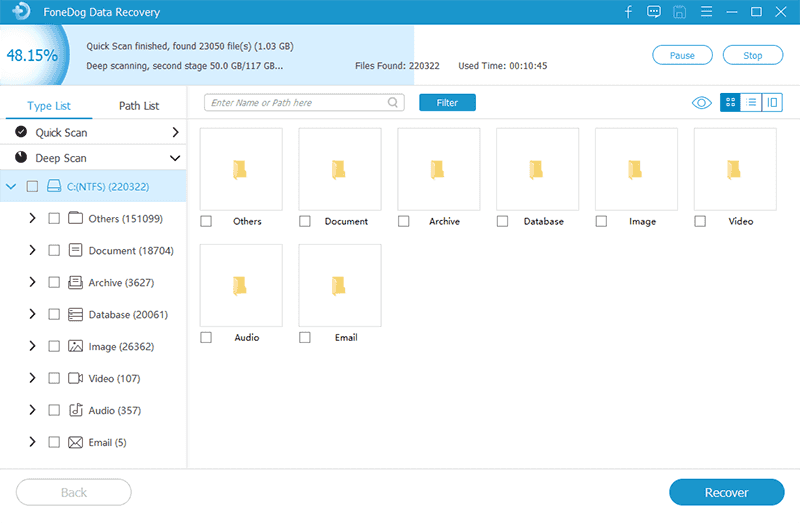
Two scans are available to display the results. You can choose either Quick Scan or Deep Scan. The first scan will work at a faster speed while the latter will display more results but will take a longer time to scan. After FoneDog Data Recovery is finished scanning your computer, the results will be returned based on your selected options.
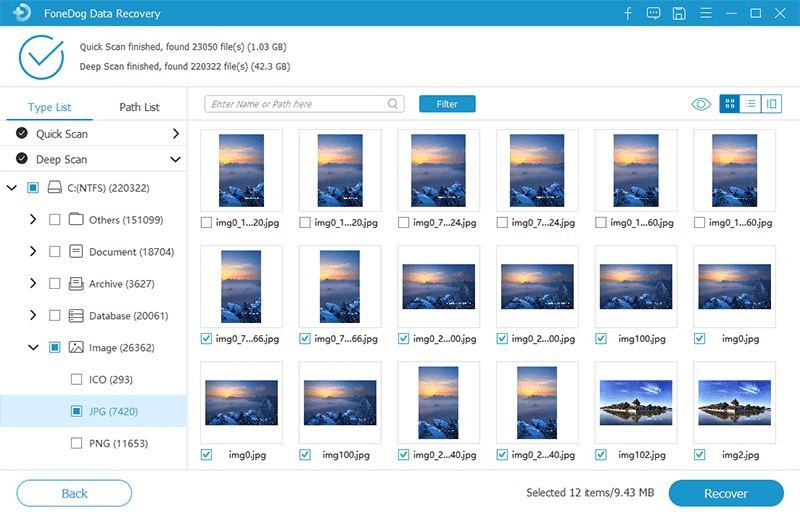
The results are displayed by type or by path after the data scan. Choose the deleted music files that you want to restore. The specific data files can be located quickly by entering the name or path values in the search box, then hit Filter. After selecting the deleted audio files that you want to recover, click the Recover button to recover the music files.
This simple process provides the step by step instructions on how to recover your lost music files in your computer that may have been deleted and stored in the Recycle Bin in Windows.
Step 01: Launch the “Recycle Bin” located on your desktop.
Step 02: Go through the list to check your music file. Alternatively, you can search it using the Search box in the Recycle Bin window.
Step 03: This step is to restore the music file to its original location. Take note of the Original Location of the audio file, then right-click on the file and select “Restore”.
Step 04: Locate and review the music file by going to its original location. Alternatively, you can go to “Quick Access” found on the left panel of the Recycle Bin window and search for the music file in the “Recent Files”.
If you cannot find the music files and you have accidentally emptied your Recycle Bin, the audio files will be permanently deleted. So it is recommended for you to utilize a reliable data recovery program such as FoneDog Data Recovery to retrieve and restore the deleted audio files. Follow the steps that are listed in Part 1.
This is a simple process that will guide you on what to do to quickly carry out the music recovery by restoring previous versions in Windows. This may work for the music files that are recently deleted or there are not many deletions of the files done on your computer.
Step 01: Go to the Start menu.
Step 02: Select Computer. Or you can go to This PC or My Computer on your desktop.
Step 03: Find the folder location where your deleted music files are previously saved. Right-click the folder and select “Restore the previous version”.
Step 04: The list of previous versions of the folder will be shown on the list with the date and time. Double-click on the previous version of the folder which you think contains the deleted audio files that you wish to restore.
Step 05: Drag the music folder that you want to restore to the location where you want it to be saved after the recovery.
This simple method will guide you on how to recover your deleted music files that may have been accidentally deleted from your computer. The solution is by using backup and restore in Windows. Make sure that the media drive where you have backed up your music files is connected to the computer before you do the backup and restore.
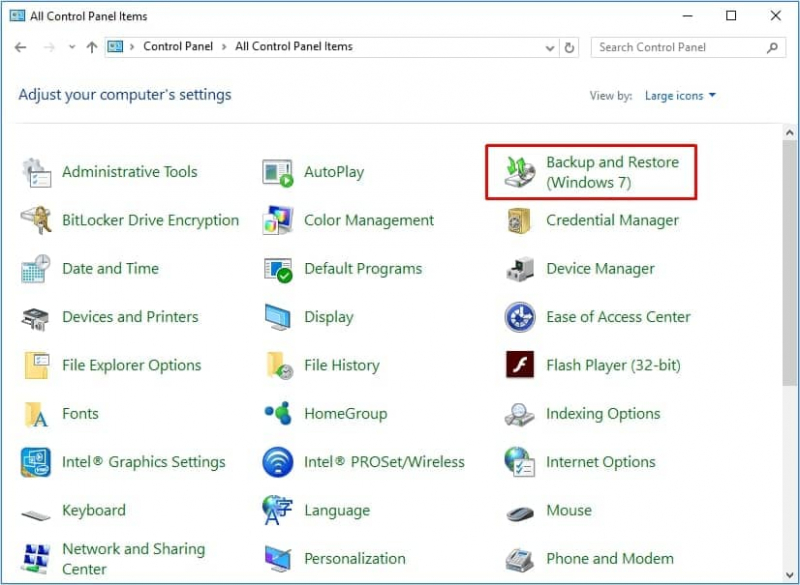
Step 01: Go to Control Panel. Click the Start menu and select “Control Panel” from the results.
Step 02: Click “System and Maintenance”.
Step 03: Select “Backup and Restore”.
Step 04: Click “Restore My Files”.
Step 05: A wizard window appears. Follow the steps specified in the wizard tool until the data restore is completed.
This is a simple method to easily do music recovery if you have made a backup in your iCloud and Google Drive even after a factory reset.
Recover from Google Drive backup to your computer:
Step 01: Log on to your “Google Drive”via the App or Web Browser.
Step 02: On the left pane, go to the folder where you saved your audios. Review the music files that you need to retrieve.
Step 03: Select the audio files that you need to download and restore, then click “Done”.
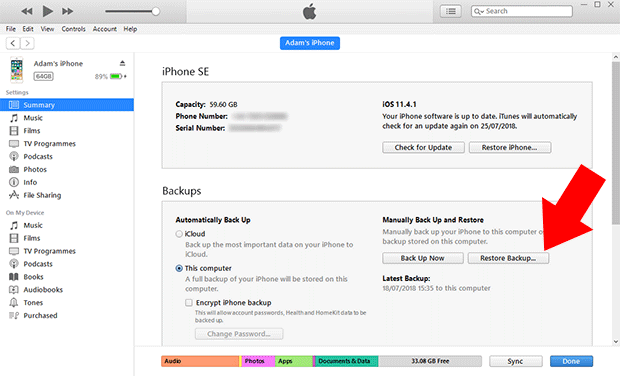
Recover from iTunes backup to your computer:
Step 01: Launch iTunes on your computer. Make sure it is in the latest version.
Step 02: Click “Purchases”, then “Songs or Albums”.
Step 03: Click “Not in My Library”.
Step 04: Click the “’iCloud” button to download the audio files to iTunes. Wait for the download process to complete.
Tip: If you want to get iTunes music legally for free, then you can click on the link provided above.
Recover from iCloud backup to your computer:
Step 01: Launch your web browser and log on to “iCloud.com” using your Apple ID and password.
Step 02: On the main screen, click “Settings”, then select “Restore Files” under “Advanced”.
Step 03: Select the files that you want to restore.
Step 04: Click “Restore” and confirm to restore. Wait for the restore process to finish.
This simple process will guide you on how to recover your deleted music files in Macintosh that may have been accidentally deleted from your computer by using Undo options. This method is to be used immediately after deleting a file or a folder. This cannot be done if the trash can is already emptied or permanently cleared.
Step 01: Go to Finder.
Step 02: Click “Edit”.
Step 03: Select “Undo Move of <file name>” to undo the options.
This is a basic method that will guide you on how to recover your deleted music files in Macintosh that may have been accidentally deleted from your computer and moved to the Trash can.
Step 01: Go to Finder.
Step 02: Click on the Trash can icon in the dock. The deleted audio files are listed here.
Step 03: To find the target music files, drag them to your desktop. You can also right-click and then click “Put back” to restore the deleted music files from the Trash can.
What if you cannot find the music file and accidentally emptied your Trash can? Take note that once you empty your Trash Can, the files will be permanently deleted. It is recommended that you use a reliable professional data recovery program like FoneDog Data Recovery to retrieve and restore the deleted audio files. Follow the steps listed above in Part 1.
People Also Read3 ways to Restore iPhone from iCloud or iTunes Backup3 Ways to Backup Contacts on iPhone
Music is an important part of a human’s life. You can express your ideas, thoughts, and emotions through music. You can listen to music to get comforted, to relieve yourself from stress or to ease the pain, or to express the joys. Music is a powerful tool that moves humans and provokes the senses.
Music can be recorded and saved in various audio formats depending on the type, compression, and size. The digital audio files can be easily accessed and are readily available to listen to across different devices. Unexpectedly though, the music files that you have downloaded or purchased may suddenly go missing, lost, or deleted which is disappointing on your part.
This tutorial guide is created to provide various methods to help you in restoring your data files such as songs and other forms of music files. There is a faster and safer alternative that is highly recommended in retrieving and restoring your lost and deleted music files by using a reliable and professional data recovery wizard called FoneDog Data Recovery.
It is an easy-to-use software that assists you in recovering your important audio files. Just three clicks to do the music recovery in FoneDog Data Recovery: Launch, Scan, and Restore.
Leave a Comment
Comment

Technical Expertise for PC/Website Optimization
One of my passion is to develop software of my own
I write articles to share knowledge about IT technology and some experience in developing my own software, and developing my own software is one of my passions for work.
Data Recovery
FoneDog Data Recovery recovers the deleted photos, videos, audios, emails, and more from your Windows, Mac, hard drive, memory card, flash drive, etc.
Free Download Free DownloadHot Articles
 /
/
INTERESTINGDULL
/
SIMPLEDIFFICULT
Thank you! Here' re your choices:
Excellent
Rating: 4.6 / 5 (based on 87 ratings)
