FoneDog Screen Recorder
FoneDog Screen Recorder
Special Offer
Special Offer


By Vernon Roderick, Last updated: July 14, 2021
This article presents several methods on how to delete the files permanently or format the storage devices such that the data cannot be recovered. These processes provide step-by-step instructions on how to make sure deleted files can’t be recovered in Windows and Mac operating systems.
Take note that this is permanently wiping out the data in your devices so make sure you choose the correct files and drives to format. If you want to test if the files are indeed deleted and cannot be recovered, you can use a data recovery software such as FoneDog Data Recovery and see if the method works for you.
In case of accidental deletion of the files that you need to restore, try using FoneDog Data Recovery if you can still recover the important files. For example, recover deleted files from Mac.
Part 1. How To Make Sure Deleted Files Can't Be Recovered Using A Best SoftwarePart 2. How To Make Sure Deleted Files Can't Be Recovered in Mac TrashPart 3. How To Make Sure Deleted Files Can't Be Recovered by Mac FormatPart 4. How To Make Sure Deleted Files Can't Be Recovered by Windows FormatPart 5. How To Make Sure Deleted Files Can't Be Recovered Using DBANPart 6. How To Make Sure Deleted Files Can’t Be Recovered Using Eraser
A highly recommended reliable and professional toolkit for your data recovery needs, FoneDog Data Recovery software is a free downloadable tool that you can utilize should you need to recover your deleted or missing data from different storage devices.
It can recover any sort of data such as documents, email, archive, audio, video, photo, and any other file format from any type of device. With its simple and easy-to-use interface wizard, it supports data recovery in all situations. Both available for Windows and Mac OS.
The FoneDog Data Recovery tool also supports different file systems such as NTFS and FAT. The tool can do both quick and deep scans of your devices and return the results by path or by file list. You can choose to preview the files and select the files that you wish to recover.
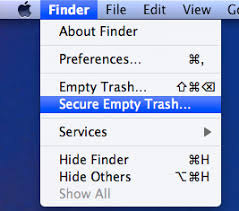
This basic method provides detailed steps on how to make sure deleted files can't be recovered by permanently deleting the files that are moved to Trash using the Secure Empty Trash feature in Mac.
Step 01: On your Mac computer, delete the files by moving to Trash. You can do this by dragging the files to the Trash, use the shortcut Command + Delete keys, or right-click on the file and click Move to Trash.
Step 02: Open the Trash to see the deleted files are there.
Step 03: Go to Finder.
Step 04: Next, click the Finder menu, select Secure Empty Trash. A popup dialog will appear with a message “Are you sure you want to erase the items in the Trash permanently using Secure Empty Trash?”
Step 05: Click OK. Wait until the deletion of Trash files is done which will depend on the number of files in the Trash.
This basic method provides the step by step instructions on how to make sure deleted files can't be recovered by formatting the drive on your computer using the Disk Utility feature in Mac.
Note: This method will delete all files in the chosen storage drive that you want to be formatted. Formatting will wipe out all the files that are stored in the drive.
Step 01: Restart your Mac computer.
Step 02: On the startup upon hearing the chime, press the Command + R keys right away to launch the Mac OS recovery. Restart again your Mac computer if it boots to desktop and press again the Command + R keys on the startup.
Step 03: Disk Utility window will appear. Click on the Disk Utility menu.
Step 04: Click Continue and select the drive that you wish to format.
Note: Make sure that the drive you have selected is the correct drive that you wish to format.
Step 05: Click the Erase tab found on top of the screen.
Step 06: On the Format field, select Mac OS Extended (Journaled) from the dropdown list.
Step 07: On the Name field, provide a new name for the drive.
Step 08: Click the Security Options button.
Step 09: In the Secure Erase options, move the slider to the right on the Secure Most label option. This option will specify on how to erase the selected volume and how to make sure deleted files can't be recovered as Secure Erase overwrites the data accessible.
Step 10: Click OK.
Step 11: Click the Erase button. This will begin the formatting of the drive on your Mac computer. Wait until the format process is completed. Do not shut down or restart your computer while the format process is going on. Once the format is complete, your Mac computer will boot up to the desktop.

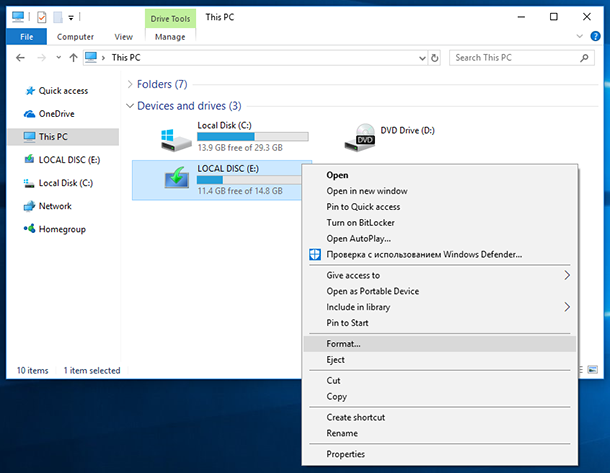
This section provides the step by step instructions on how to make sure deleted files can't be recovered by formatting the data in a storage media, partition, or hard drive.
Note: This method will delete all files in the chosen storage drive that you want to be formatted. Formatting will wipe out all the files that are stored in the drive.
Step 01: If the files are stored in a removable drive, connect the device to the computer with a proper connection.
Step 02: Launch the File Explorer. Press Windows logo + E keys as a shortcut.
Step 03: Right-click on the drive that you want to wipe out and select Format.
Note: Make sure that the drive you have selected is the correct drive that you wish to format.
Step 04: Specify the File system and enter the Volume label name.
Step 05: Tick the Format options if you want to do quick formatting of the drive. Un-tick the box if you want advanced formatting of the drive which will take longer to complete.
Step 06: Click the Start button to begin formatting the chosen drive. This will begin the formatting of the drive-in on your Windows computer. Wait until the format process is completed. Do not shut down or restart your computer while the format process is going on.
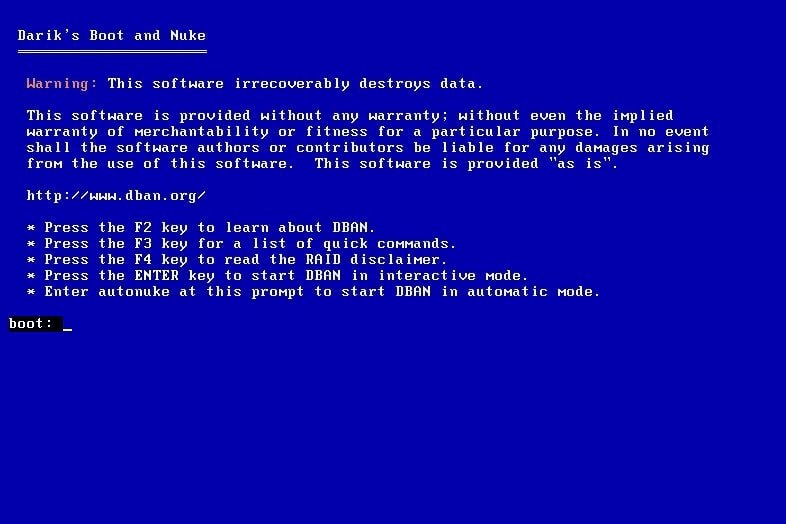
This section provides advanced step-by-step instructions on how to make sure deleted files can't be recovered by formatting the drive in Windows using the DBAN method. DBAN (Darik’s Boot and Nuke) is a freeware tool that you can use to wipe out the entire drive in Windows operating system.
Note: This method will destroy all data in your computer drives that you want to be formatted. DBAN will wipe out all the files that are stored in the drive. If you are not confident to use this advanced method, you can ask for assistance from an expert.
Step 01: Secure a Windows installation disc should you need to reinstall the operating system on your computer after the DBAN process is completed.
Step 02: Download a third-party data wiping tool called DBAN from the web. It is a free erasure software that wipes out the data in your drive completely. The downloaded file is an ISO image. If it is in zipped or in compressed format, extract first the contents of the file.
Step 03: Burn the DBAN ISO image to a CD or DVD.
Step 04: Once the CD or DVD burn is done, insert the CD or DVD which contains the DBAN tool to the computer CD/DVD drive.
Step 05: Restart your Windows computer.
Step 06: Windows will boot to the DBAN disk.
Step 07: Press the Enter key to start DBAN in the Interactive Mode. For troubleshooting hints, you can press the F4 key should you need it. Use the arrow up and down keys to highlight your selection.
Step 08: Press the space bar key to select the drive to be formatted. Note: Make sure that the drive you have selected is the correct drive that you wish to format.
Step 09: Press the M key to select the method of wiping.
Step 10: Press the F10 key to begin the delete process. Wait until the DBAN process is completed. This will depend on the size of your drive. Do not shut down or restart your computer while the wipe-out process is going on. The remaining time is shown on the top right of the screen.

Step 11: When you see the word “Pass”, you can now eject the DBAN disk. This means that the wipe-out process is complete. Shut down your computer after.
Step 12: If you need to reuse the drive and reinstall the OS, insert the Windows installation disk from Step 01.
Step 13: Restart your computer to boot to the Windows installation disk. This will let you reinstall the Windows operating system. Follow the on-screen instructions to proceed to the next steps.
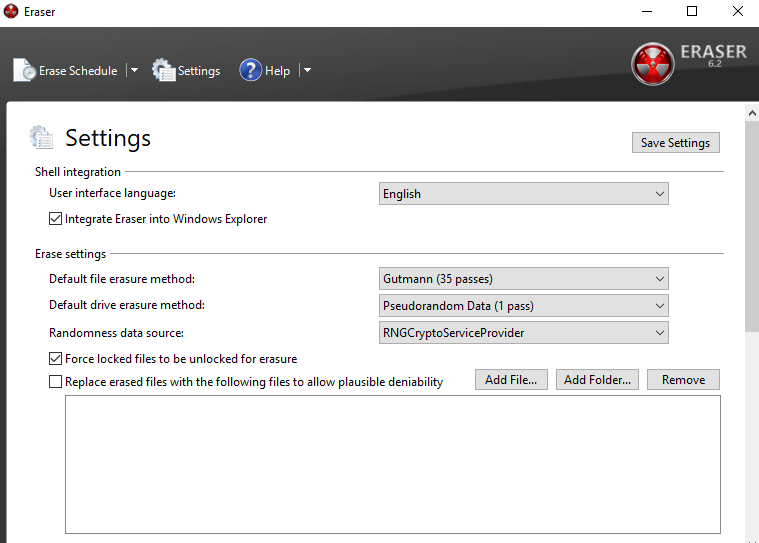
This section provides advanced step-by-step instructions on how to make sure deleted files can't be recovered by using a third-party tool you can download from the web. A common file erasure tool you can use is called Eraser which will only work on Windows operating systems. Eraser is a freeware disk wiper tool that you can use to delete and overwrite files.
Step 01: Download a free third-party data wiping tool called Eraser from the web. Install the tool on your Windows computer.
Step 02: Open Windows File Explorer. Press and hold the Windows logo + E keys to open it.
Step 03: Find the files or folders that you want to permanently delete. Select the files and folders.
Step 04: Right-click on the files and folders and select Eraser.
Step 05: Then, select Erase. This will begin deleting permanently the selected files and folders without moving them to the Recycle Bin. Wait while the delete process is going on. Time to complete will depend on how large the files are.
You can also use the Eraser tool to permanently erase the files that you have deleted in the past.
Step 01: Launch the Eraser program.
Step 02: Go to Settings and select US Army or AirForce values for the Default file erasure method and Default unused space erasure method.
Step 03: Click the Save Settings button.
Step 04: Click the arrow beside Erase Schedule and select New Task from the dropdown.
Step 05: On the Task Type, click Run manually.
Step 06: Click Add Data then select Unused Disk Space.
Step 07: Choose the main drive from the list and click OK.
Step 08: Right-click on Erase Schedule. Click the task you created and click Run Now.
People Also ReadGuide: Know About Outlook Email Recovery Software Free DownloadHow to Fix When Your SSD Not Showing Up In Disk Management
Certain situations require you to delete files completely and make them irrecoverable. Examples of these files are confidential documents that contain sensitive and private information. This involves a permanent wipe-out of these data from the storage devices that should not be accessible to unauthorized users.
For this matter, this article guide presents several methods on how to make sure deleted files can't be recovered which are available for both Windows and Mac operating systems. This also involves reliable third-party tools that you can use for a complete wipe-out of data. Some of the methods may or may not work for you depending on the scenario.
If you want to test that your files can no longer be recovered, try using a highly recommended data recovery software such as FoneDog Data Recovery which allows retrieval of files in all formats. You can recover the data from any storage device and in any type of situation. When you need to recover files that are deleted or lost, try using this professional toolkit. Here is also an article to recovery screenshots on computers for your reference, so that you can better use FoneDog Data Recovery.
Leave a Comment
Comment

Technical Expertise for PC/Website Optimization
One of my passion is to develop software of my own
I write articles to share knowledge about IT technology and some experience in developing my own software, and developing my own software is one of my passions for work.
Data Recovery
FoneDog Data Recovery recovers the deleted photos, videos, audios, emails, and more from your Windows, Mac, hard drive, memory card, flash drive, etc.
Free Download Free DownloadHot Articles
 /
/
INTERESTINGDULL
/
SIMPLEDIFFICULT
Thank you! Here' re your choices:
Excellent
Rating: 4.7 / 5 (based on 58 ratings)
