FoneDog Screen Recorder
FoneDog Screen Recorder
Special Offer
Special Offer


By Nathan E. Malpass, Last updated: June 12, 2025
Email communication is an indispensable part of our personal and professional lives. Microsoft Outlook, one of the most widely used email clients, stores its data in PST (Personal Storage Table) files. These files contain crucial information such as emails, contacts, calendar events, and more. However, PST files can become corrupted or damaged due to various reasons, including software crashes, hardware issues, or accidental deletion.
The fear of losing this valuable data can be daunting, but fear not – this article is here to guide you through the process of PST file recovery methods. We will explore the most effective techniques and strategies to help you retrieve your important Outlook data and get your email communication back on track. Whether you're a novice or an experienced user, this comprehensive guide will provide you with the knowledge you need to ensure a successful PST file recovery. Let's dive into the world of PST file recovery methods and regain control of your digital communication.
Part 1. How to Recover PST File on Mac?Part 2. How to Recover PST File on Windows?Part 3. Best Way to Recover PST File Recovery
If you're a Mac user who relies on Microsoft Outlook, you might wonder what options are available to recover PST files if the unexpected happens. One of the most convenient and built-in methods for PST file recovery on Mac computers is by utilizing the Time Machine feature. Time Machine is a backup utility that comes with macOS, designed to help users recover lost or corrupted files. Here's how to use it for PST file recovery:
Time Machine makes it relatively straightforward to recover lost or damaged PST files on a Mac. However, it's essential to maintain regular Time Machine backups to ensure you have access to recent versions of your files. This method is effective for retrieving PST files, but if you encounter difficulties or don't have Time Machine backups, we'll explore alternative methods in the following sections of this guide.
If you're faced with PST file recovery on your Mac and don't have Time Machine backups, or if you prefer a more hands-on approach, you can use the Terminal to attempt recovery. Keep in mind that this method is more advanced and requires a good understanding of Terminal commands. Here's how to use the Terminal for PST file recovery:
cd ~/Documents
cp YourPSTFileName.pst YourBackupFileName.pst
/Applications/Microsoft\ Office\ 2011/Office/Outlook\ Backup\ Tools/scanpst YourPSTFileName.pst
Replace "YourPSTFileName.pst" with the actual name of your PST file.
Using the Terminal for PST file recovery on a Mac is a more advanced method and should be approached with caution. It's essential to create a backup before attempting any repairs to avoid data loss. If this method doesn't yield successful results, you might want to consider using third-party PST file recovery software or professional services.
Sometimes, the simplest solutions can be the most effective. If you've accidentally deleted a PST file or suspect it might have been moved to the trash, checking the Trash on your Mac is a quick and easy method for PST file recovery. Here's how to do it:
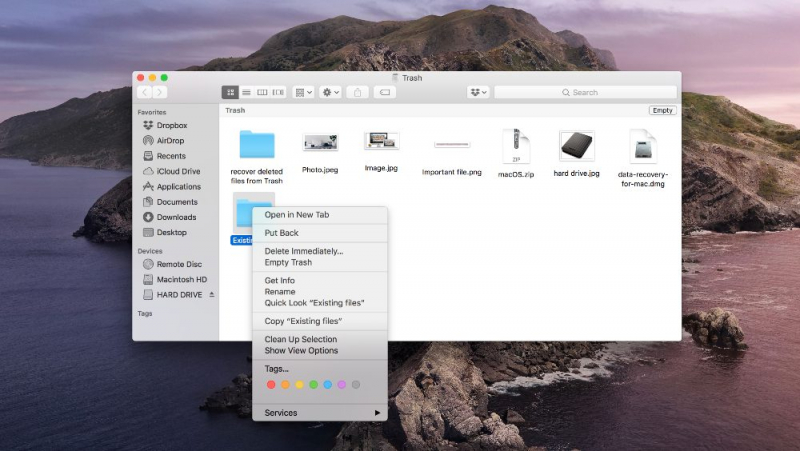
It's important to act promptly when recovering deleted files from the Trash because the Trash is usually automatically emptied after a specified period or when it becomes too full. If you don't find your PST file in the Trash or if it has been permanently deleted from there, you may need to consider other PST file recovery methods, such as those mentioned earlier in this guide.
If you've lost or accidentally deleted a PST file on a Windows computer, your first and most straightforward method for recovery is to check the Recycle Bin. The Recycle Bin temporarily stores deleted files, providing an easy way to recover them. Here's how to use the Recycle Bin for PST file recovery on Windows:
The Recycle Bin is a user-friendly feature on Windows that can be a lifesaver when it comes to recovering accidentally deleted files. However, keep in mind that the Recycle Bin has a size limit, and once it reaches that limit, older files may be automatically deleted to make room for new ones.
So, it's important to act quickly if you've lost a PST file to prevent it from being permanently deleted from the Recycle Bin. If you don't find your PST file in the Recycle Bin or it's been permanently deleted from there, we'll explore other PST file recovery methods in the following sections.
If you've lost a PST file on your Windows computer and it's not in the Recycle Bin or if the Recycle Bin has been emptied, you can attempt PST file recovery using Command Prompt. Command Prompt provides a way to recover deleted files through the command line. Here's how to use Command Prompt for PST file recovery:
cd C:\Users\YourUsername\Documents\Outlook Files
copy YourPSTFileName.pst D:\Recovered
Using Command Prompt for PST file recovery can be a more advanced method, and it's important to proceed with caution. Ensure that you have administrative privileges and use the correct directory paths and file names to avoid unintended data loss or overwriting. If this method does not successfully recover your PST file, you may need to explore third-party recovery tools or professional data recovery services.
Windows operating systems have a useful feature called "Previous Versions" that can help you recover previous versions of files, including PST files. This feature is particularly handy when you need to retrieve a PST file that has been modified, deleted, or become corrupted. Here are the steps to recover a PST file using the Previous Versions feature:
Step 1: Open File Explorer
Open File Explorer by pressing Win + E or by searching for "File Explorer" in the Start menu.
Step 2: Navigate to the Folder Containing Your PST File
Use File Explorer to navigate to the folder that used to contain your PST file. It's essential to go to the specific folder where the file was located, as the Previous Versions feature works at the folder level.
Step 3: Right-Click on the Folder
Right-click on the folder that contained your PST file and select "Restore previous versions" from the context menu.
Step 4: View the Previous Versions
A new window will open, showing you a list of previous versions of the folder. These versions are snapshots taken by the Windows operating system at different points in time.
Step 5: Select a Previous Version
Select a previous version that contains the PST file you want to recover. You can choose a version based on the date it was created. Click on the version to highlight it.
Step 6: Restore the PST File
Click the "Restore" button to recover the entire folder as it existed in that previous version. This will restore your PST file to its original location.
Step 7: Verify the Recovery
Open Microsoft Outlook to confirm that the recovered PST file is intact and contains your email data. You should be able to access your emails, contacts, calendar events, and other information.
The Previous Versions feature is a valuable built-in tool in Windows that allows you to retrieve earlier versions of files and folders, including PST files.
However, it's important to note that this feature depends on system restore points and file history settings. If you don't see any previous versions, it's possible that there are no available snapshots to restore from. To maximize the effectiveness of this method, consider configuring and enabling the File History or System Restore feature on your Windows computer in advance.
FoneDog Data Recovery is a powerful and user-friendly data recovery tool available for both Mac and Windows systems. It is designed to help users recover a wide range of file types, including PST files, which are commonly used for Microsoft Outlook data. Whether you've accidentally deleted or lost your PST files due to hardware failure, software issues, or other reasons, FoneDog Data Recovery offers a reliable solution for their recovery. Not only PST files, FoneDog can also do music recovery.
Here are the steps to use this Microsoft Outlook repair tool:
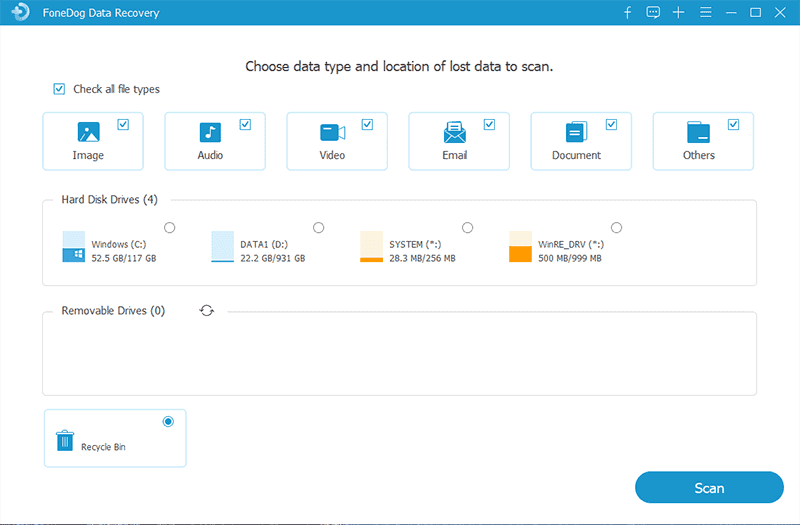
FoneDog Data Recovery offers a convenient and comprehensive solution for PST file recovery, whether you're using a Mac or a Windows computer. It's a versatile tool that can help you retrieve your valuable email data in a user-friendly manner.
Leave a Comment
Comment

iPhone/Android Devices’ Maintenance Expert
Staying home, listening to music, writing tech articles
Many people asked me to repair their mobile phones so I have a lot of experience in mobile phone repair, and I know a lot about Android or Apple phones.
Data Recovery
FoneDog Data Recovery recovers the deleted photos, videos, audios, emails, and more from your Windows, Mac, hard drive, memory card, flash drive, etc.
Free Download Free DownloadHot Articles
 /
/
INTERESTINGDULL
/
SIMPLEDIFFICULT
Thank you! Here' re your choices:
Excellent
Rating: 4.5 / 5 (based on 99 ratings)
