FoneDog Screen Recorder
FoneDog Screen Recorder
Special Offer
Special Offer


By Nathan E. Malpass, Last updated: November 14, 2023
Among the plethora of data stored on our iPhones, the Notes app often holds critical personal and professional notes, from passwords and financial details to cherished memories and creative ideas. But what happens when you find yourself locked out of these notes, unable to access the information you need?
Whether it's due to a forgotten password, a software glitch, or iPhone notes vanished by itself, the frustration of not being able to access your own notes can be overwhelming. Fear not, for in this article, we'll walk you through the process of how to recover locked notes on iPhone, ensuring that your valuable information is never out of reach again. So, let's dive into the world of iPhone note recovery and regain access to your locked treasures.
Part #1: Methods on How to Recover Locked Notes on iPhonePart #2: Top Tool on How to Recover Locked Notes on iPhone: FoneDog iOS Data RecoverySummary
One of the most reliable ways to recover locked notes on your iPhone is by utilizing iCloud backup. iCloud serves as a secure storage solution for your device, allowing you to retrieve your locked notes from a previous backup. Here's a step-by-step guide on how to do it:
Step #1: Ensure iCloud Notes Sync is Enabled
Before you proceed, make sure that iCloud Notes sync is enabled on your iPhone. To do this, go to "Settings" > [Your Name] > "iCloud" and ensure that the toggle switch next to "Notes" is turned on.
Step #2: Restore from iCloud Backup
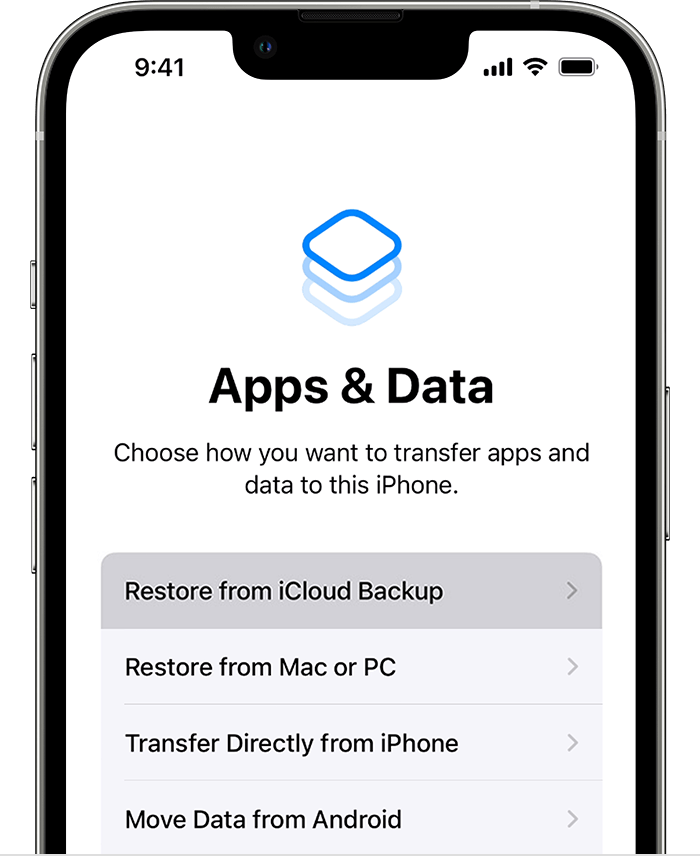
It's important to note that this method will replace all data on your device with the data from the selected iCloud backup. Make sure you have a recent backup that includes the locked notes you want to recover.
Using iCloud backup is a simple and effective way to regain access to locked notes on your iPhone, provided you have a backup that includes the notes in question. If you don't have a recent backup or if this method doesn't work for you, don't worry; we have more methods to explore in the following sections.
If you've been diligently backing up your iPhone using iTunes, you can also recover locked notes by restoring from an iTunes backup. Here's how to recover locked notes on iPhone using iTunes:
Step #1: Connect Your iPhone to Your Computer
Using a USB cable, connect your iPhone to a computer that has iTunes installed. Launch iTunes if it doesn't open automatically.
Step #2: Trust This Computer
If you haven't connected your iPhone to this computer before, a message will pop up on your iPhone asking whether you trust this computer. Tap "Trust" to continue.
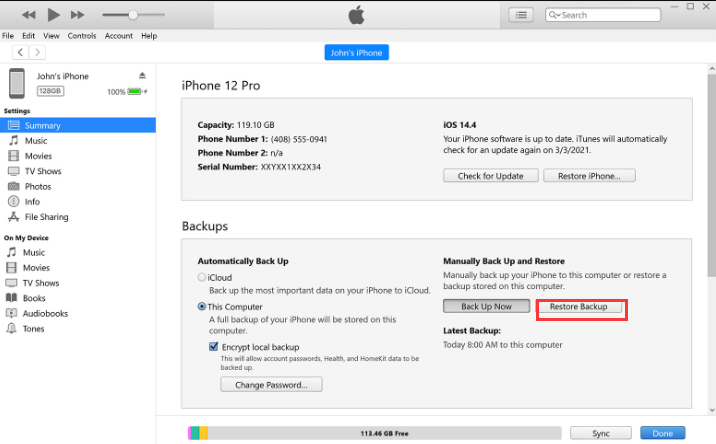
Step #3: Select Your Device
In iTunes, click on the device icon that appears in the upper-left corner of the iTunes window. This will take you to your iPhone's summary page.
Step #4: Choose "Restore Backup..."
Under the "Backups" section, you'll see an option labeled "Restore Backup..." Click on this option.
Step #5: Select the Relevant iTunes Backup
A list of your iTunes backups will appear. Choose the backup that contains the locked notes you want to recover. Be sure to select a backup created before the notes are locked.
Step #6: Restore Your iPhone
Click the "Restore" button, and iTunes will begin the process of restoring your iPhone from the selected backup. This process may take some time, depending on the size of the backup.
Step #7: Wait for the Restore to Finish
Once the restore is complete, your iPhone will restart. After the restart, your locked notes should be accessible.
It's worth noting that using iTunes to restore your iPhone from a backup will replace all data on your device with the data from the selected backup. Therefore, ensure you have a recent iTunes backup that includes the locked notes you want to recover.
This method is particularly useful if you prefer using iTunes for backups or if you don't have access to a stable internet connection for iCloud backup restoration. However, if you don't have an iTunes backup or if this method doesn't work for you, continue reading for alternative solutions.
If you have a Mac running macOS Catalina or later, you can use Finder to recover locked notes from your iPhone. This method doesn't require iTunes, and it's a handy option if you're using a Mac. Here's how to do it:
Step #1: Connect Your iPhone to Your Mac
Using a USB cable, connect your iPhone to your Mac. Make sure your iPhone is unlocked, and you may need to enter your device passcode.
Step #2: Open Finder
On your Mac, open a Finder window. You can do this by clicking on the Finder icon in your dock or pressing Command + N.
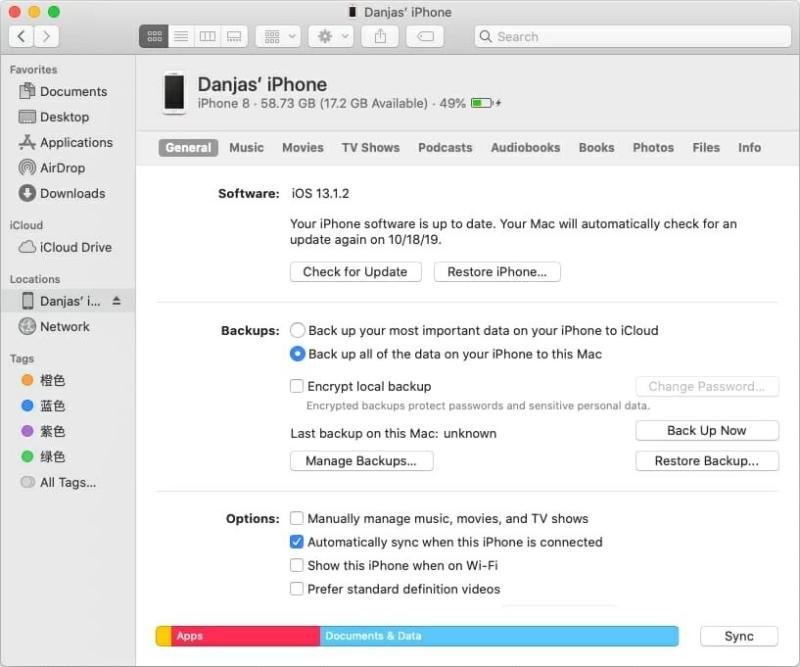
Step #3: Locate Your iPhone in Finder
In the Finder window, you'll see your iPhone listed in the left sidebar under "Locations". Click on your iPhone to select it.
Step #4: Choose "Restore Backup..."
In the right pane, you'll see information about your iPhone. Under the "General" tab, you'll find a section labeled "Backups". Click on "Restore Backup..."
Step #5: Select the Relevant Backup
A window will pop up showing your available backups. Choose the backup that contains the locked notes you want to recover. Make sure it's a backup created before the notes are locked.
Step #6: Restore Your iPhone
Click the "Restore" button, and Finder will begin the process of restoring your iPhone from the selected backup. This may take some time, depending on the size of the backup.
Step #7: Wait for the Restore to Finish
Once the restore is complete, your iPhone will restart. After the restart, your locked notes should be accessible.
Using Finder on a Mac provides a straightforward method for recovering locked notes on your iPhone without relying on iTunes. Just ensure that you have a recent backup containing the notes you need before proceeding with this method. If you don't have a suitable backup or if you encounter any issues, there are still more methods to explore for note recovery.
When all else fails, and you need a reliable and efficient way to recover locked notes on your iPhone, FoneDog iOS Data Recovery is your go-to solution. This powerful software specializes in data recovery for iOS devices and can help you retrieve locked notes with ease.
iOS Data Recovery
Recover photos, videos, contacts, messages, call logs, WhatsApp data, and more.
Recover data from iPhone, iTunes and iCloud.
Compatible with latest iPhone and iOS.
Free Download
Free Download

Here's an overview of how to recover locked notes on iPhone using the iPhone 15-supported FoneDog iOS Data Recovery:
Begin by downloading and installing FoneDog iOS Data Recovery on your computer. It's available for both Windows and Mac. Once installed, launch the program.
Using a USB cable, connect your locked iPhone to the computer. Ensure that you have a secure connection, and your iPhone is recognized by the software.
In the FoneDog iOS Data Recovery interface, you'll see several recovery options. Choose "Recover from iOS Device" to start the process.
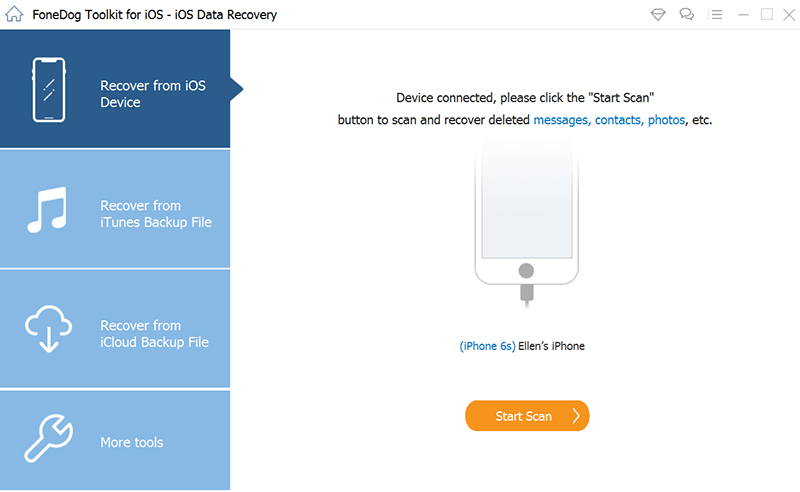
Click the "Start Scan" button to allow FoneDog iOS Data Recovery to scan your iPhone for lost or deleted data, including your locked notes.
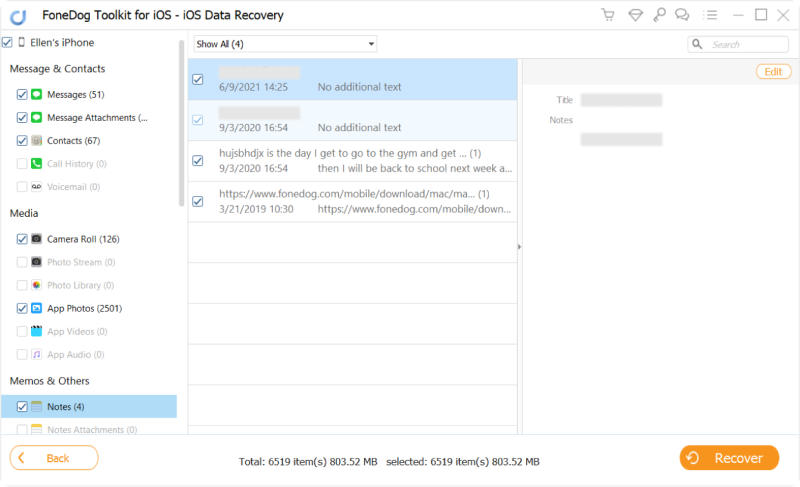
After the scan is complete, you'll see a list of recoverable data categories on the left side of the screen. Click on "Notes" to view the notes found on your device. You can preview them to ensure they're the ones you want to recover.
Select the locked notes you wish to recover, then click the "Recover" button. Choose a location on your computer to save the recovered notes.
Once the recovery process is finished, you can access your locked notes on your computer. They'll be saved in the location you specified in the previous step.
FoneDog iOS Data Recovery is a reliable tool that can help you recover deleted notes on your iPhone with no backup files. Whether your notes were locked due to a forgotten password or any other reason, this software simplifies the recovery process and ensures you can access your important information once again.
People Also Read[Solved] How to Fix iCloud Notes Not Syncing in 2023How to Recover Lost Notes on iPhone 7/ 7 Plus/8/8 Plus/X/11
Losing access to your locked notes on an iPhone can be a frustrating experience, but there are several effective methods and tools to help you recover them. In this guide, we've explored various approaches on how to recover locked notes on iPhone.
No matter how you've lost access to your notes, these methods and tools provide solutions for retrieving your important information. Whether you prefer using iCloud, iTunes, Finder on Mac, or a specialized tool like FoneDog iOS Data Recovery, you have options to recover locked notes on your iPhone and ensure that your valuable data is never permanently inaccessible.
Leave a Comment
Comment

iPhone/Android Devices’ Maintenance Expert
Staying home, listening to music, writing tech articles
Many people asked me to repair their mobile phones so I have a lot of experience in mobile phone repair, and I know a lot about Android or Apple phones.
iOS Data Recovery
3 Methods to recover your deleted data from iPhone or iPad.
Free Download Free DownloadHot Articles
 /
/
INTERESTINGDULL
/
SIMPLEDIFFICULT
Thank you! Here' re your choices:
Excellent
Rating: 4.5 / 5 (based on 84 ratings)
