FoneDog Screen Recorder
FoneDog Screen Recorder
Special Offer
Special Offer


By Nathan E. Malpass, Last updated: October 5, 2023
Screen recordings, in particular, have become a valuable tool for preserving noteworthy moments on our iPhones, whether it's a hilarious video call with friends, a tutorial, or an important presentation. However, the convenience of modern technology sometimes comes with the risk of accidental deletions, and the heart-sinking feeling that follows when you realize you've lost something precious.
In this article, we will explore various methods and tools to help you recover deleted screen recording iPhone and give you the best chances of unlocking the past. Whether you're using the latest iPhone model or an older version, these techniques are designed to assist you in retrieving your lost data even from a damage phone and restoring those cherished memories. Let's dive into the world of data recovery and bring back those irreplaceable screen recordings to relive those special moments once more.
Part #1: How to Recover Deleted Screen Recording (iPhone): Runner-Up MethodsPart #2: Best Method to Recover Deleted Screen Recording (iPhone): FoneDog iOS Data Recovery
When it comes to recovering recently deleted screen recordings on your iPhone, one of the first places you should check is the "Recently Deleted" album. This feature was introduced by Apple to help users get out recently deleted photos without much hassle. Follow these simple steps to recover your deleted screen recordings:
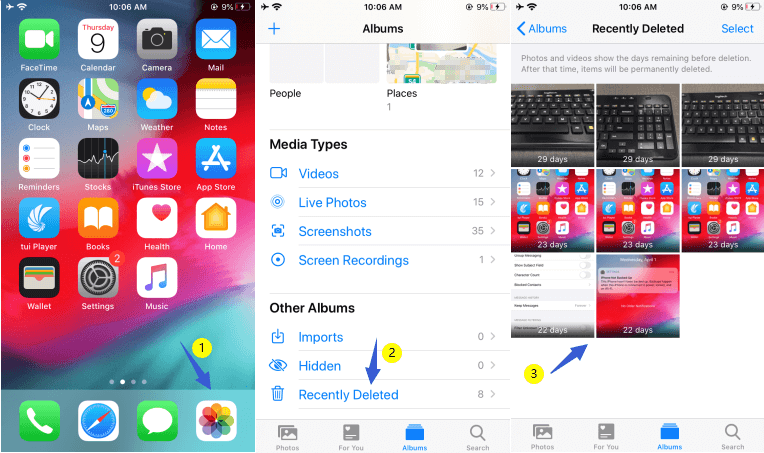
Note: Keep in mind that screen recordings in the "Recently Deleted" album are only retained for 30 days. After this period, they will be permanently deleted and cannot be recovered through this method. If you don't find your desired screen recording in the "Recently Deleted" album, don't worry! There are other methods to explore in our quest to retrieve lost data. Let's move on to the next runner-up method.
If you regularly back up your iPhone to iCloud, there's a good chance that your deleted screen recordings are still recoverable through this method. iCloud provides a convenient way to store your device data in the cloud, including media files, app data, settings, and more. Follow these steps to recover deleted screen recordings using iCloud backups:
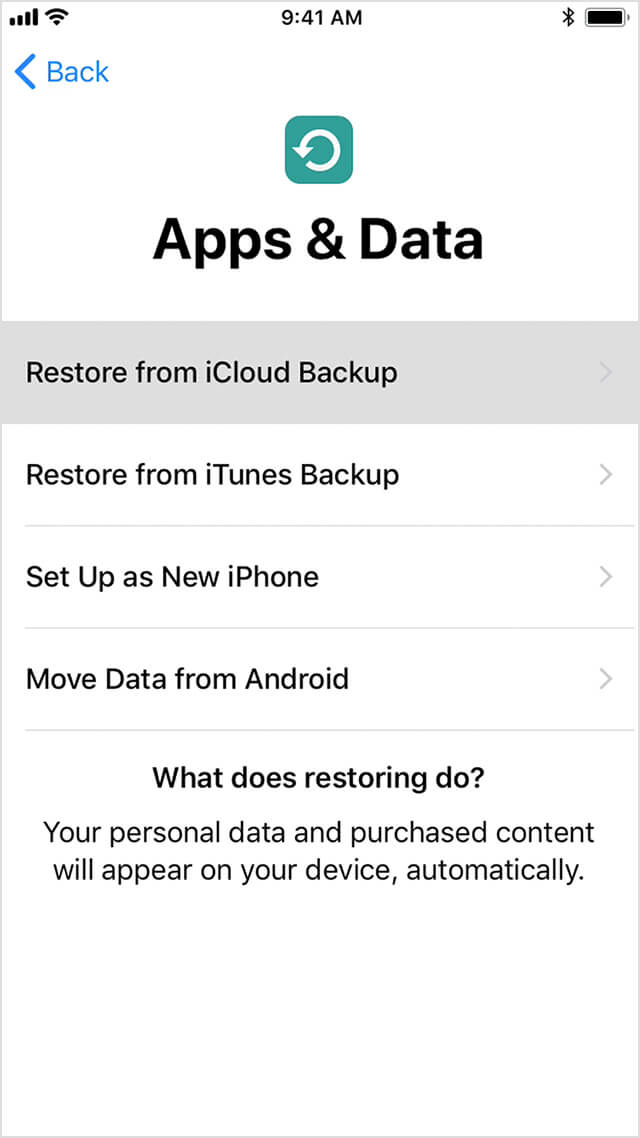
Important Note: Restoring your iPhone from an iCloud backup will replace all current data on your device with the data from the backup. Any data created or modified after the selected backup date will be lost. Exercise caution when performing this method, and make sure to back up your current data before proceeding.
Remember that having a recent iCloud backup is crucial for successful data recovery. Regularly backing up your iPhone to iCloud ensures that you have a safety net to fall back on in case of accidental deletions or device issues.
If you've been diligent in backing up your iPhone using iTunes on your computer, you may be able to recover your deleted screen recordings from the iTunes backup files. iTunes provides a locally stored backup of your iPhone's data, including media files and settings. Follow these steps to attempt the recovery of your deleted screen recordings using iTunes backup:
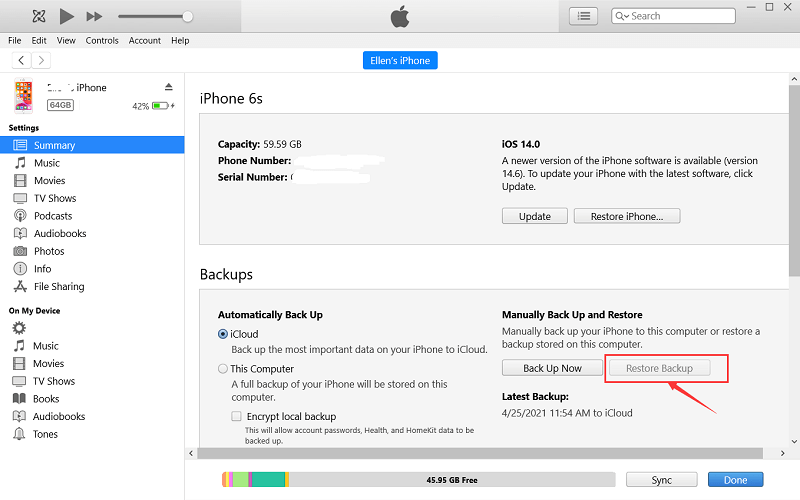
Important Note: Just like with the iCloud backup method, restoring your iPhone from an iTunes backup will replace all current data on your device with the data from the backup. Data created or modified after the backup date will be lost. Ensure you have backed up your current data before proceeding with this method.
Regularly creating iTunes backups is a wise practice to ensure you have a secure backup of your iPhone's data. However, keep in mind that restoring from an iTunes backup means you need access to the computer where the backup was created.
If you own a Mac with macOS Catalina or later, or a Mac with macOS Mojave or earlier, you can use Finder to recover deleted screen recordings from your iPhone. Follow these steps to attempt a recovery using Finder:
Important Note: As with previous methods, restoring your iPhone from a backup will replace all current data on your device with the data from the backup. Back up your current data before proceeding.
Using Finder to create backups and potentially extract data can be a helpful method for recovering deleted screen recordings, especially if you prefer to have local backups on your Mac. However, always exercise caution and use reputable software tools for data extraction to avoid any potential data loss or security risks.
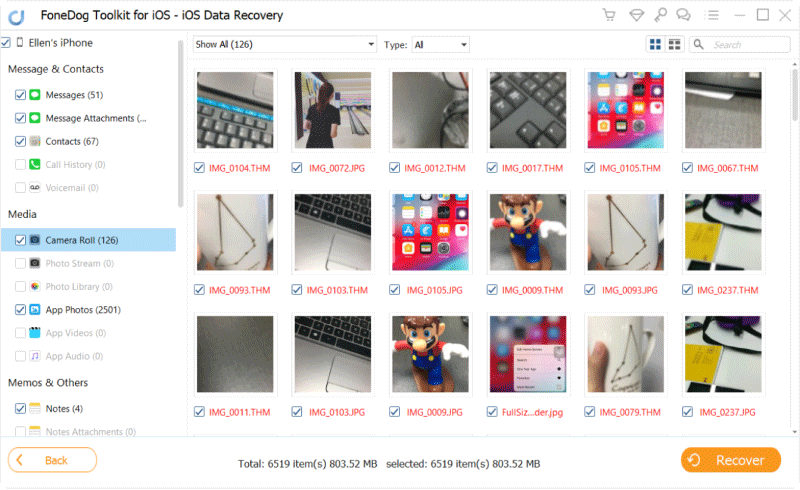
When it comes to efficiently recovering deleted screen recordings on your iPhone, one of the most reliable and user-friendly tools available is FoneDog iOS Data Recovery. This powerful software is specifically designed to help iOS users retrieve lost or deleted data from their iPhones, iPads, and iPod Touch devices.
iOS Data Recovery
Recover photos, videos, contacts, messages, call logs, WhatsApp data, and more.
Recover data from iPhone, iTunes and iCloud.
Compatible with latest iPhone and iOS.
Free Download
Free Download

Whether your screen recording was accidentally deleted, lost due to a software update, or vanished under mysterious circumstances, FoneDog iOS Data Recovery offers a seamless solution to bring back your valuable memories. Let's explore the steps to recover deleted screen recording iPhone using FoneDog iOS Data Recovery:
Step #1: Install and Launch FoneDog iOS Data Recovery
Download and install FoneDog iOS Data Recovery on your computer from the official website. Launch the software once the installation is complete.
Step #2: Connect Your iPhone to the Computer
Use a USB cable to connect your iPhone to the computer where FoneDog iOS Data Recovery is installed. Trust the computer on your iPhone if prompted.
Step #3: Select "Recover from iOS Device" Mode
In the FoneDog iOS Data Recovery interface, choose the "Recover from iOS Device" mode from the left-side menu. The software will detect your connected iPhone automatically.
Step #4: Scan Your iPhone for Deleted Screen Recordings
Click on the "Start Scan" button to initiate a thorough scan of your iPhone's storage. FoneDog iOS Data Recovery will comb through the device to locate both existing and deleted data, including your lost screen recordings.
Step #5: Preview and Select the Screen Recordings for Recovery
Once the scanning process is complete, you will be presented with a list of recoverable data. Browse through the files and locate the deleted screen recordings you want to recover. You can use the search function or filter options to find specific files quickly.
Step #6: Recover Deleted Screen Recordings
After selecting the desired screen recordings, click on the "Recover" button. FoneDog iOS Data Recovery will prompt you to choose a destination folder on your computer to save the recovered files. Select the folder and let the software work its magic.
Step #7: Complete the Recovery Process
Once the recovery process is finished, you will receive a confirmation message. Now you can navigate to the destination folder you selected earlier to access your successfully recovered screen recordings.
FoneDog iOS Data Recovery offers an efficient, secure, and comprehensive method to retrieve deleted screen recordings directly from your iOS device. Its user-friendly interface, coupled with powerful data recovery capabilities, ensures a smooth experience for users looking to reclaim their lost data.
People Also ReadHow to Recover Permanently Deleted Videos from iPhone?[2023]Full Set Down List of Free iPhone Video Recovery Tool in 2023!
Whether you're a tech-savvy individual or a novice, FoneDog iOS Data Recovery simplifies the recovery process and increases your chances of getting back those precious screen recordings that hold sentimental value.
With FoneDog iOS Data Recovery by your side, the memories captured in your deleted screen recordings need not be lost forever. Try it out today and rediscover your cherished moments!
Leave a Comment
Comment

iPhone/Android Devices’ Maintenance Expert
Staying home, listening to music, writing tech articles
Many people asked me to repair their mobile phones so I have a lot of experience in mobile phone repair, and I know a lot about Android or Apple phones.
iOS Data Recovery
3 Methods to recover your deleted data from iPhone or iPad.
Free Download Free DownloadHot Articles
 /
/
INTERESTINGDULL
/
SIMPLEDIFFICULT
Thank you! Here' re your choices:
Excellent
Rating: 4.5 / 5 (based on 103 ratings)
