FoneDog Screen Recorder
FoneDog Screen Recorder
Special Offer
Special Offer


By Nathan E. Malpass, Last updated: August 15, 2023
iPhone photo vault apps have emerged as a popular solution, allowing users to securely store their private photos away from prying eyes. These vaults offer an extra layer of protection through passcodes, Touch ID, or Face ID, ensuring that our memories remain hidden.
However, what happens when we accidentally lose access to these? Whether it's a forgotten password, a software glitch, or an unfortunate device mishap, the thought of permanently losing those cherished photos can be distressing.
But fear not! This article is here to guide you through the process of iPhone photo vault recovery, helping you safeguard and restore your hidden memories. We will explore essential techniques, recommended tools, and expert tips that will empower you to regain access to your photo vault, allowing you to relive those precious moments once again. Join us on this journey as we unravel the secrets to effortless iPhone photos vault recovery.
Part #1: Runner-Up iPhone Photo Vault Recovery MethodsPart #2: Best Method to iPhone Photo Vault Recovery: FoneDog iOS Data RecoveryConclusion
Losing access to your iPhone photo vault can be a disheartening experience. However, before delving into more advanced recovery methods, it's worth exploring some runner-up techniques that might help you recover your hidden photos. One such method involves utilizing the "Recently Deleted" album on your iPhone, which can sometimes hold the key to restoring your precious memories.
When you delete photos from your iPhone photo vault, they often get transferred to the "Recently Deleted" album. This album acts as a temporary storage space, giving you a chance to retrieve accidentally deleted photos before they are permanently erased. Here's how you can use this feature for potential photo vault recovery:
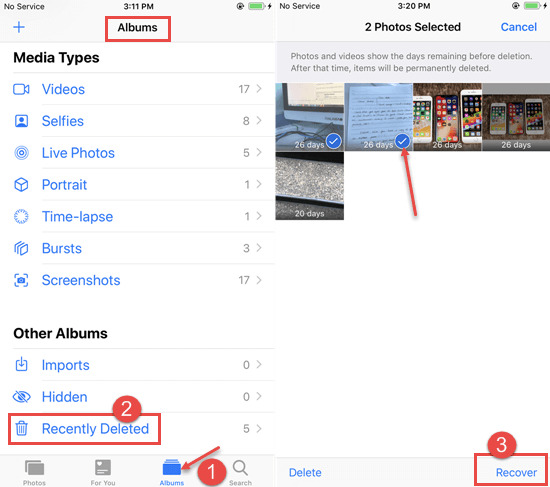
Step #1: Open the Photos app on your iPhone.
Step #2: Tap on the "Albums" tab located at the bottom of the screen.
Step #3: Scroll down and locate the "Recently Deleted" album.
Step #4: Open the "Recently Deleted" album to view its contents.
Step #5: Browse through the photos and look for any hidden or deleted photos that you want to recover.
Step #6: Once you find the desired photos, select them by tapping on the "Select" button.
Step #7: After selecting the photos, tap on the "Recover" option to restore them to your main photo library.
It's important to note that the photos stored in the "Recently Deleted" album have a limited lifespan. Typically, they are automatically deleted after 30 days. Therefore, it's crucial to act promptly and retrieve your photos as soon as possible.
While this method might not always guarantee the recovery of photos from your iPhone photo vault, it serves as a quick and straightforward option worth exploring. In the following sections, we will explore additional methods that can help you recover your hidden photos in case the "Recently Deleted" album doesn't provide the desired results.
If you've been using the built-in "Hidden" album feature on your iPhone, there's a chance that your hidden photos may still be accessible through this album. The "Hidden" album provides a convenient way to hide specific photos from your main camera roll without the need for third-party photo vault apps. Here's how you can find hidden photos on your iPhone and potentially recover them:
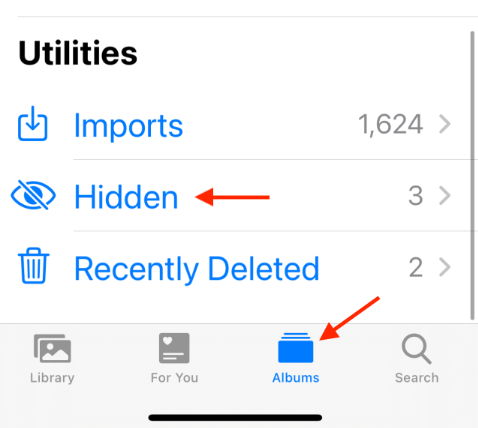
Step #1: Open the Photos app on your iPhone.
Step #2: Navigate to the "Albums" tab located at the bottom of the screen.
Step #3: Scroll down until you find the "Hidden" album.
Step #4: Tap on the "Hidden" album to access its contents.
Step #5: Browse through the photos in the "Hidden" album and look for any photos that you want to recover.
Step #6: Once you find the desired photos, select them by tapping on the "Select" button.
Step #7: After selecting the photos, tap on the "Share" button, which resembles an upward arrow.
Step #8: Choose the desired destination for the recovered photos, such as saving them to your main camera roll or sending them to another app or cloud storage service.
By utilizing the "Hidden" album feature, you might be able to retrieve photos that were intentionally hidden but not encrypted or protected by a password. However, keep in mind that this method may not be applicable if you've used a separate third-party photo vault app that employs its own hidden album functionality.
If you have enabled iCloud Backup on your iPhone, there's a good chance that your hidden photos stored in the photo vault can be recovered through this backup. iCloud Backup creates a copy of your device's data, including photos and app data, which can be used to restore your iPhone to a previous state. Here's how you can utilize iCloud Backup for photo vault recovery:
Step #1: Ensure that you have an iCloud backup containing the desired photo vault data. To check this, go to “Settings” on your iPhone, tap on your name at the top, select “iCloud”, then “Manage Storage”, and finally “Backups”. Verify that there’s a recent backup available that includes your photo vault app.
Step #2: If you have a backup, ensure that your iPhone is connected to a stable Wi-Fi network. Also, ensure that you have enough available storage on your device to restore the backup.
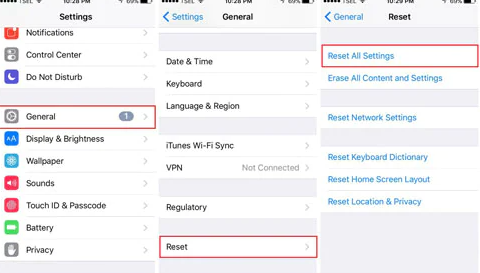
Step #3: On your iPhone, go to “Settings”, tap on your name at the top, select “General”, and then “Reset”.
Step #4: In the “Reset” menu, choose “Erase All Content and Settings”. This will erase all data on your iPhone.
Step #5: Follow the on-screen instructions to set up your iPhone as a new device.
Step #6: During the setup process, you will reach the “Apps & Data” screen. Select “Restore from iCloud Backup”.
Step #7: Sign in to your iCloud account using your Apple ID and password.
Step #8: Choose the most recent iCloud backup that contains your photo vault data.
Step #9: Allow the restoration process to complete. Your iPhone will restart and begin downloading your backup from iCloud.
Step #10: Once the restoration is finished, check your photo vault app to see if your hidden photos have been recovered.
It's important to note that using iCloud Backup for photos vault recovery restores your entire device to the state captured in the backup. This means that any data or changes made after the backup will be lost. Additionally, this method requires a stable internet connection and sufficient iCloud storage space.
If you regularly back up your iPhone using iTunes on your computer, you can get into your iTunes backup files vault and use those backups to potentially recover your photos from the photo vault. iTunes backups store a copy of your device's data, including app data, which can be used to restore your iPhone to a previous state. Here's how you can use an iTunes backup for photo vault recovery:
Step #1: Connect your iPhone to the computer that you use for iTunes backups.
Step #2: Launch iTunes on your computer. If prompted, enter your device passcode or choose to “Trust This Computer” on your iPhone.
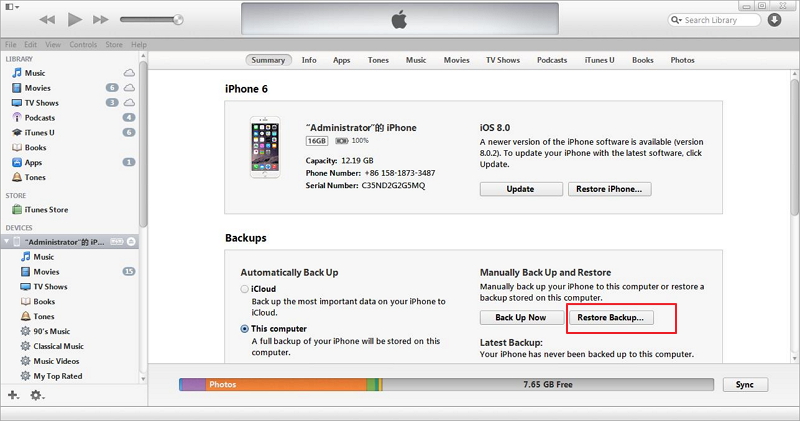
Step #3: In iTunes, locate your device icon at the top left corner of the window and click on it.
Step #4: In the Summary tab, under the “Backups” section, select “Restore Backup”.
Step #5: Choose the most relevant iTunes backup that contains your photo vault data. Consider selecting the backup with the closest date to when you last had access to your hidden photos.
Step #6: Click on “Restore” and wait for the restoration process to complete. Your iPhone will restart during this process.
Step #7: After the restoration is finished, check your photo vault app to see if your hidden photos have been recovered.
Using an iTunes backup for photos vault recovery restores your entire device to the state captured in the backup. Keep in mind that any data or changes made after the backup will be lost. Also, note that this method requires a computer with the latest version of iTunes installed and an up-to-date backup.
While the previous methods offer potential solutions for iPhone photo vault recovery, they may not always guarantee success. If you're still unable to retrieve your hidden photos, it's time to turn to specialized third-party tools. One highly recommended tool for iPhone photos vault recovery is FoneDog iOS Data Recovery.
iOS Data Recovery
Recover photos, videos, contacts, messages, call logs, WhatsApp data, and more.
Recover data from iPhone, iTunes and iCloud.
Compatible with latest iPhone and iOS.
Free Download
Free Download

FoneDog iOS Data Recovery is a reliable and powerful software designed to recover various types of data from iOS devices, including photos, videos, messages, contacts, and more. Here's how you can use FoneDog iOS Data Recovery to recover your photos from the iPhone photo vault:
Step #1: Download and install FoneDog iOS Data Recovery on your computer. Ensure that you choose the appropriate version for your operating system.
Step #2: Launch the software and connect your iPhone to the computer using a USB cable. Follow the on-screen prompts to establish a successful connection.
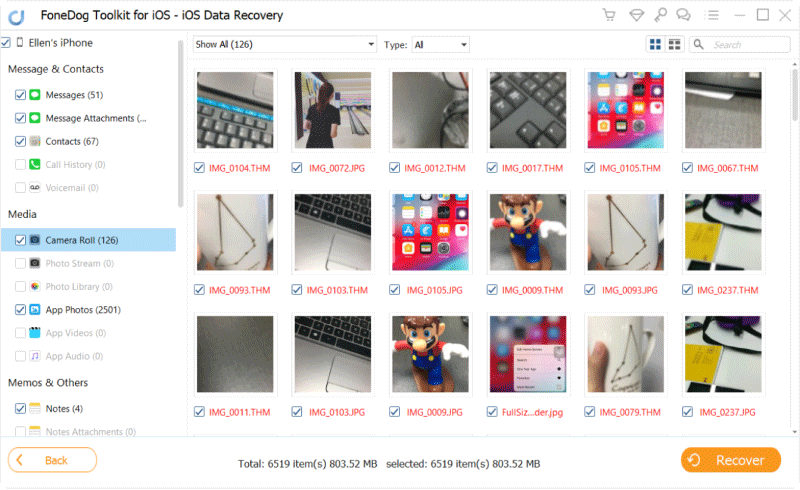
Step #3: Once your iPhone is detected by FoneDog iOS Data Recovery, select the “Recover from iOS Device” option from the main interface.
Step #4: Choose the desired file types you want to recover. In this case, select “Photos” or any other relevant options related to your photo vault app.
Step #5: Click on the “Start Scan” button to initiate the scanning process. The software will thoroughly scan your iPhone for the selected file types.
Step #6: After the scan is complete, you can preview the recoverable photos within the FoneDog iOS Data Recovery interface. Browse through the results and select the hidden photos you want to recover.
Step #7: Click on the “Recover” button, and FoneDog iOS Data Recovery will start the recovery process. Choose a location on your computer to save the recovered photos.
Step #8: Once the recovery is finished, navigate to the chosen location on your computer to access the recovered photos.
FoneDog iOS Data Recovery offers a high success rate in recovering lost or hidden photos from iPhone photo vaults. It provides a user-friendly interface, advanced scanning algorithms, and comprehensive data recovery capabilities.
Remember to stop using your iPhone's photo vault app immediately after losing access to prevent potential data overwriting. The sooner you initiate the recovery process with FoneDog iOS Data Recovery, the higher the chances of successfully recovering your hidden photos.
People Also ReadTroubleshooting Guide: Fixing iCloud Photos Updating StuckResolve The Issue: Photos Disappeared from iPhone 2023
In conclusion, if the previous methods haven't yielded the desired results, FoneDog iOS Data Recovery stands as a reliable and effective solution for iPhone photo vault recovery.
Leave a Comment
Comment

iPhone/Android Devices’ Maintenance Expert
Staying home, listening to music, writing tech articles
Many people asked me to repair their mobile phones so I have a lot of experience in mobile phone repair, and I know a lot about Android or Apple phones.
iOS Data Recovery
3 Methods to recover your deleted data from iPhone or iPad.
Free Download Free DownloadHot Articles
 /
/
INTERESTINGDULL
/
SIMPLEDIFFICULT
Thank you! Here' re your choices:
Excellent
Rating: 4.7 / 5 (based on 78 ratings)
