FoneDog Screen Recorder
FoneDog Screen Recorder
Special Offer
Special Offer


By Nathan E. Malpass, Last updated: March 28, 2024
Smartphones have become the primary vault for cherished memories captured through the lens of our cameras. However, what if you find yourself in a situation where your photos seem to have vanished, especially from an unexpected place like the Calculator app on your iPhone?
Fear not, as we embark on a journey to unveil the secrets of photo recovery, guiding you through the intricacies of retrieving those seemingly lost snapshots. Join us as we explore the methods and tools on how to recover photos from Calculator app (iPhone), ensuring that your precious memories are not only preserved but easily accessible once again.
Part 1. Can I Still Recovery My Lost Calculator App Photos on iPhone?Part 2. 5 Common Ways on How to Recover Photos from Calculator App (iPhone)Part 3. How to Recover Photos from Calculator App (iPhone) - Most EffectivePart 4. How to Avoid Losing Photos and Screenshots from iPhone Apps
While the loss of photos from the Calculator app on your iPhone may be distressing, there is a possibility of recovery. Fortunately, iPhones often have built-in mechanisms, and third-party tools are available that can help retrieve lost or deleted photos.
It's important to act promptly, as the chances of successful recovery may decrease over time due to potential overwrites or changes in storage. Whether through backups, iCloud services, or specialized recovery tools, exploring these avenues may offer a solution to restore your lost Calculator app photos on your iPhone.
If you've accidentally deleted photos from the Calculator app on your iPhone, the first method to explore is the "Recently Deleted" album. This feature acts as a safety net, giving you a chance to retrieve mistakenly deleted photos before they are permanently erased.
Launch the Photos app on your iPhone. This app is your gateway to all the images stored on your device.
Scroll down to find the "Albums" tab at the bottom of the screen. Tap on it and look for the "Recently Deleted" album. This album contains photos that have been deleted within the last 30 days.

Once inside the "Recently Deleted" album, you'll see a list of deleted photos. Tap on the photos you want to recover. To select multiple photos, use the "Select" option in the upper right corner. After selecting, tap on "Recover" to restore the photos to your main photo library.
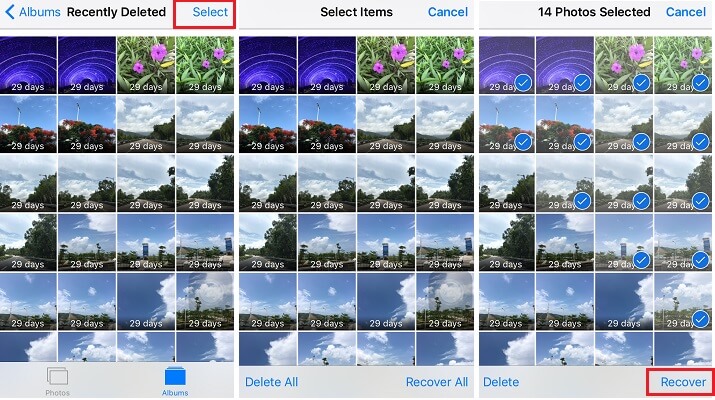
Now that you've recovered the photos, check the Calculator app to see if they are restored. Sometimes, photos may appear in unexpected locations, and this method ensures you've covered the basics of photo retrieval within the iPhone ecosystem.
This straightforward method can often resolve accidental deletions, but if your photos are not found in the "Recently Deleted" album, fear not – there are additional techniques to explore in the next parts of our comprehensive guide. Stay tuned to continue your journey towards photo recovery on your iPhone's Calculator app.
In scenarios where the photos from your Calculator app have been lost due to a device malfunction, software update, or other unforeseen circumstances, restoring from an iTunes backup can be a reliable solution. Follow these steps to recover your photos from Calculator app:
Connect your iPhone to the computer that you use to sync with iTunes. Launch iTunes if it doesn't open automatically.
Once connected, locate and select your iPhone icon within iTunes. This is usually found in the upper-left corner of the iTunes window.
Under the "Summary" tab, you'll find the "Backups" section. Select "Restore Backup..." This will prompt you to choose from a list of available backups. Opt for the most recent backup that contains the photos you wish to recover.
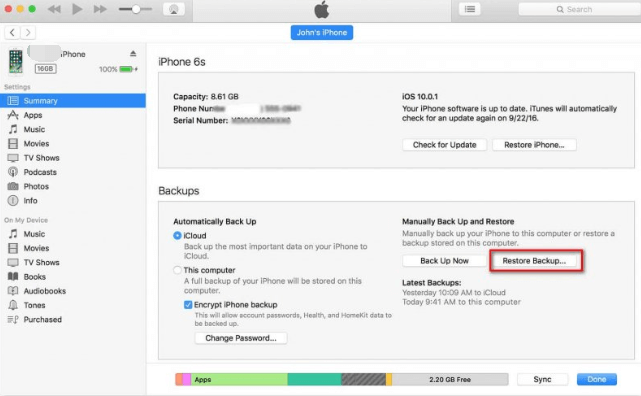
Click "Restore" and wait for the process to complete. This may take some time depending on the size of the backup and the speed of your internet connection.
Once the restoration is finished, your iPhone will restart. Check the Calculator app to see if your lost photos are now restored. It's crucial to note that this method replaces all current data on your device with the data from the selected backup.
While this method effectively recovers lost data, it's essential to perform regular backups to ensure you have the latest version of your data stored. In the next sections of our guide, we'll explore additional methods to cater to different scenarios of photo loss from the Calculator app on your iPhone. Stay with us as we unravel more techniques for comprehensive photo recovery.
if you have been diligent in backing up your iPhone to iCloud, you can leverage this cloud service to recover lost photos from the Calculator app. Follow these steps:
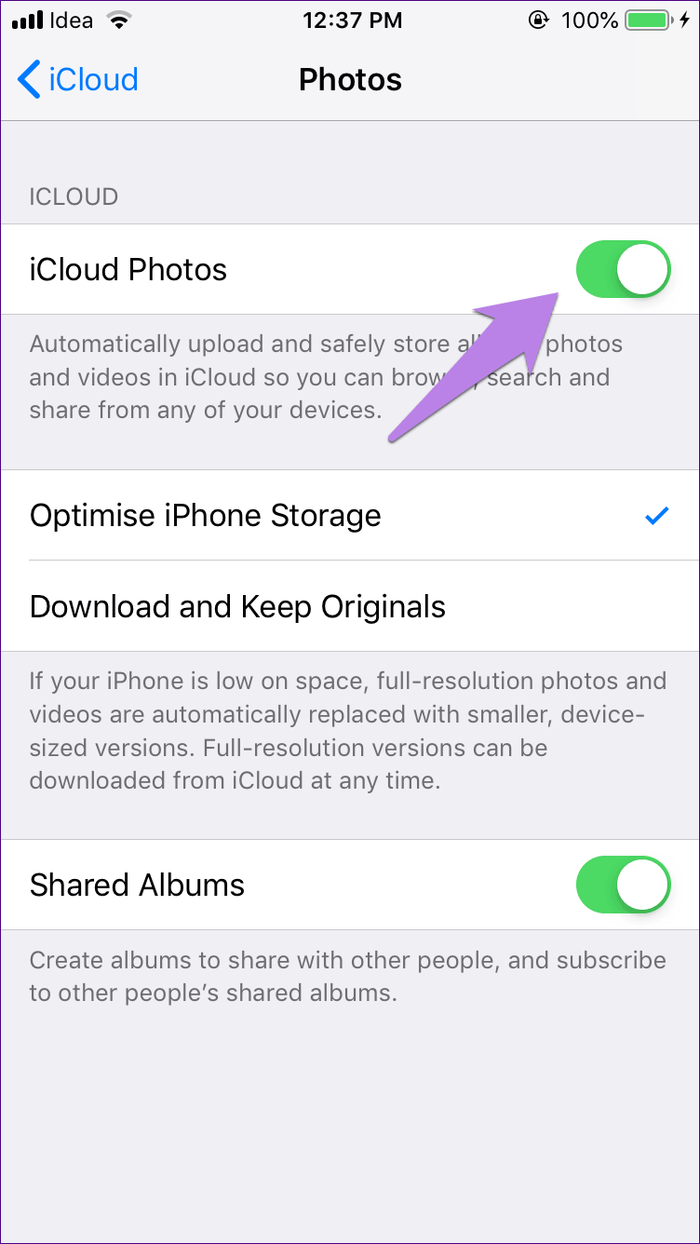
Ensure that your iPhone has been backed up to iCloud. Navigate to "Settings" on your iPhone, tap on your Apple ID, then go to "iCloud" and select "Photos". Make sure "iCloud Photos" is turned on.
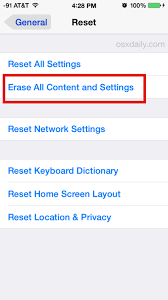
Before initiating the iCloud backup restoration, it's advisable to perform a factory reset to eliminate any potential glitches. Go to "Settings", tap on "General", choose "Reset", and select "Erase All Content and Settings".
After the factory reset, your iPhone will restart. Follow the on-screen instructions to set up your device. When prompted, select "Restore from iCloud Backup".
Sign in to your iCloud account and choose the backup that contains the photos you want to recover. Be sure to pick the most recent backup that predates the loss of your photos.
Allow your iPhone to complete the restoration process. This may take some time depending on your internet connection speed and the size of the backup.
Once the restoration is finished, check the Calculator app on your iPhone to confirm whether your lost photos have been successfully recovered. iCloud backup restoration is an effective method, especially if you regularly back up your device to the cloud.
Stay tuned for more insights and methods as we delve deeper into the world of iPhone photo recovery from the Calculator app. Our journey to unlock and restore your cherished memories continues.
If you sync your iPhone with a Mac, the Finder utility can be a powerful tool for recovering lost photos from the Calculator app. Follow these steps:
Use a USB cable to connect your iPhone to your Mac. Open the Finder application on your Mac.
In the Finder sidebar, locate and click on your iPhone under the "Locations" section. If prompted, unlock your iPhone and trust the computer.
Within your iPhone's interface in Finder, explore the different sections, especially "Files" and "Applications". The Calculator app might store photos in a separate section within these categories.
Utilize the search bar in Finder to look for specific photo filenames or types. This can help you pinpoint the location of the lost photos within the Finder structure.
Once you've identified the photos you wish to recover, manually copy them to a location on your Mac. This provides an additional layer of security for your retrieved photos.
After copying the photos, check the Calculator app on your iPhone to ensure that the recovered images are now visible.
Using the Finder utility on a Mac can be particularly useful if you want a more hands-on approach to locating and recovering specific files. This method allows you to navigate through your iPhone's file structure and retrieve lost photos with precision.
Our guide to recovering photos from the Calculator app on your iPhone is far from over. Join us in the next section as we explore more advanced techniques to ensure no memory is left behind.
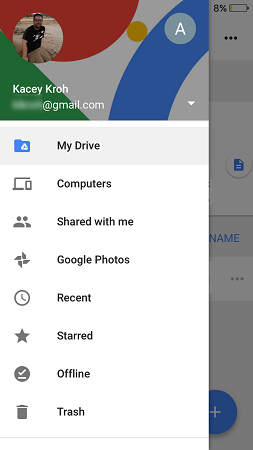
If you've integrated Google Drive into your iPhone workflow, it can serve as an excellent platform for photo recovery. Follow these steps:
Ensure that your photos are set to sync with Google Drive. Open the Google Drive app on your iPhone, tap on the three horizontal lines in the top-left corner, go to "Settings", and ensure "Photos" is toggled on.
Access Google Drive on your computer through a web browser. Sign in with the same Google account linked to your iPhone.
In Google Drive, locate and click on "Google Photos" in the left sidebar. This is where your synced iPhone photos are stored.
Use the search bar in Google Drive to look for specific photos. Google Photos automatically organizes your pictures, making it easier to find them. Once located, download the photos to your computer.
After downloading the photos to your computer, transfer them back to your iPhone using methods such as email, messaging apps, or cloud services like iCloud.
Verify that the recovered photos now appear in the Calculator app on your iPhone.
Utilizing Google Drive for photo recovery is beneficial if you prefer cloud-based solutions. It also provides an additional layer of backup for your precious memories.
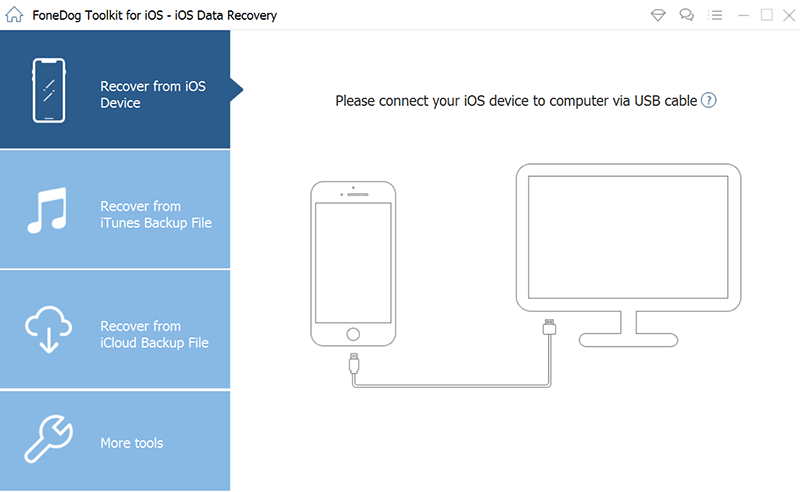
FoneDog iOS Data Recovery is a professional iPhone 15-supported software solution designed to recover a wide range of data types, including photos, messages, contacts, and more, directly from your iPhone or from iTunes/iCloud backups. Its intuitive interface and advanced features make it a go-to choice for users seeking a reliable solution to recover lost data.
iOS Data Recovery
Recover photos, videos, contacts, messages, call logs, WhatsApp data, and more.
Recover data from iPhone, iTunes and iCloud.
Compatible with latest iPhone and iOS.
Free Download
Free Download

Here are the steps to use it:
Visit the FoneDog official website, download the software, and follow the on-screen instructions to install it on your computer.
Launch FoneDog iOS Data Recovery and connect your iPhone to the computer using a USB cable. The software will detect your device automatically.
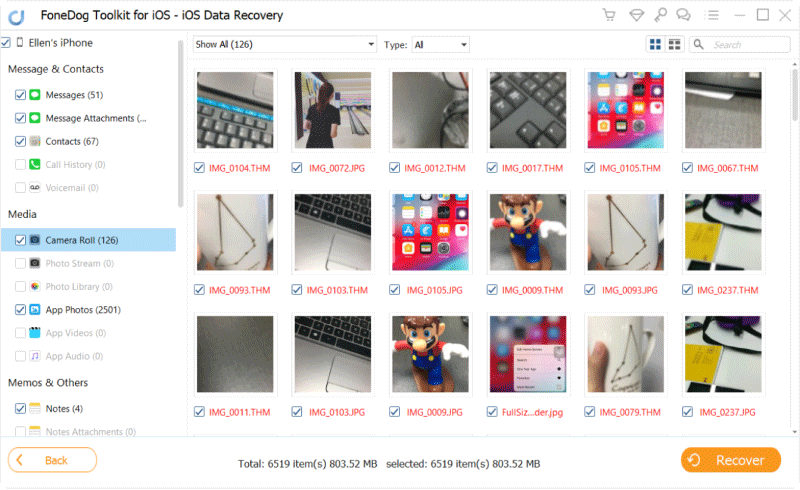
Choose "Photos" as the data type to recover. Click on "Start Scan" to initiate the scanning process.
Once the scan is complete, FoneDog will display a preview of the recoverable photos. Select the photos you want to recover.
Click on "Recover" to save the photos to your computer.
FoneDog iOS Data Recovery offers a reliable and efficient solution for recovering photos from the Calculator app on your iPhone. Its user-friendly interface, versatility, and selective recovery options make it a standout choice for users seeking a comprehensive and straightforward recovery process.
In the final part of our guide, we will summarize the key takeaways and offer additional tips to ensure the successful recovery of your photos. Stay tuned as we conclude our exploration of photo recovery from the Calculator app on your iPhone.
Avoiding the loss of photos and screenshots from iPhone apps is crucial for preserving precious memories. One key strategy is to establish a routine for regular backups. Enable iCloud Backup in your iPhone settings to automatically back up your device when connected to Wi-Fi, locked, and charging. This ensures that your photos and screenshots are securely stored in the cloud. Additionally, consider using iTunes or Finder to create local backups on your computer, providing an extra layer of protection.
Furthermore, leverage the power of iCloud Photos by enabling the feature in your settings. This automatically syncs and stores your photos across all your Apple devices, reducing the risk of data loss in case of device damage or loss. For additional backup options, explore third-party cloud services like Google Photos, Dropbox, or OneDrive, allowing you to store your photos independently of Apple's ecosystem.
To avoid accidentally deleting photos or screenshots, be mindful of your actions and use caution when managing your media. If an app offers a "trash" or "recycle bin" feature, take advantage of it to temporarily store deleted items before they are permanently removed. Regularly review your photos and screenshots, deleting only what is necessary to free up space, and consider organizing them into folders or albums for easier management.
Lastly, keep your iOS software up to date, as updates often include security enhancements and stability improvements. By incorporating these practices into your routine, you can significantly reduce the risk of losing photos and screenshots from your iPhone apps, ensuring that your visual memories remain safe and accessible.
Leave a Comment
Comment

iPhone/Android Devices’ Maintenance Expert
Staying home, listening to music, writing tech articles
Many people asked me to repair their mobile phones so I have a lot of experience in mobile phone repair, and I know a lot about Android or Apple phones.
iOS Data Recovery
3 Methods to recover your deleted data from iPhone or iPad.
Free Download Free DownloadHot Articles
 /
/
INTERESTINGDULL
/
SIMPLEDIFFICULT
Thank you! Here' re your choices:
Excellent
Rating: 4.7 / 5 (based on 102 ratings)
