FoneDog Screen Recorder
FoneDog Screen Recorder
Special Offer
Special Offer


By Nathan E. Malpass, Last updated: October 24, 2023
Our social media profiles have become modern-day photo albums, capturing the essence of our lives and preserving memories for years to come. Facebook, as one of the most popular social networking platforms, has played a significant role in this journey, hosting countless images that tell our stories.
But what happens when you accidentally delete a cherished photo from your Facebook account? Is there any way how to recover deleted photos from Facebook?
The good news is that yes, you can recover deleted photos from Facebook, and in this comprehensive guide, we'll show you exactly how. Whether you've deleted a picture by accident or simply changed your mind about keeping it hidden, we'll walk you through the steps to unlock those visual memories.
Get ready to embark on a journey to retrieve your deleted photos from Facebook, reconnect with your past, and relive the moments you thought were lost forever.
Part #1: Runner-Up Methods: How to Recover Deleted Photos from FacebookPart #2: How to Recover Deleted Photos from Facebook on iOS: FoneDog iOS Data RecoveryConclusion
When you delete a photo from your Facebook account, it might seem like it's gone forever, but Facebook offers a hidden treasure trove that can help you recover deleted photos—the Facebook Archive, place you can also find your archived Facebook text messages. Here's how to retrieve your deleted photos using this method:
Step #1: Log in to Your Facebook Account
Start by logging in to your Facebook account using your credentials. You can do this on a web browser or the Facebook app.
Step #2: Go to Settings
On the web, click the drop-down arrow located at the top right corner of the Facebook homepage, and select "Settings & Privacy" and then "Settings". If you're using the Facebook app, tap the three horizontal lines (menu) at the bottom right corner, scroll down, and select "Settings & Privacy" and then "Settings."
Step #3: Access Your Facebook Information
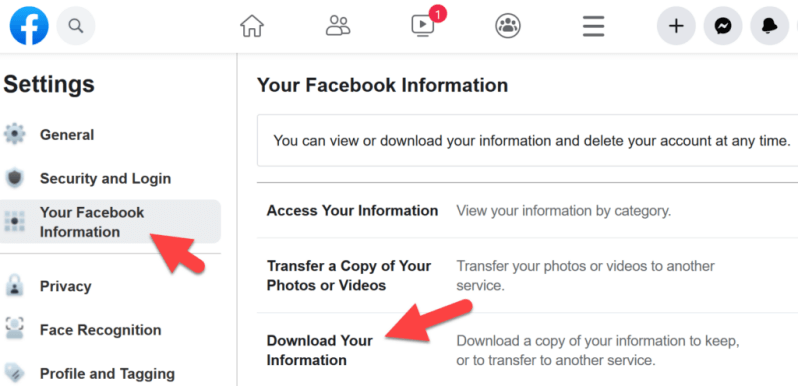
In the Settings menu, look for "Your Facebook Information" on the left-hand side (web) or near the top (app). Click or tap on it to expand the options.
Step #4: Select "Download Your Information"
Under "Your Facebook Information," you'll find an option labeled "Download Your Information". Click or tap on it to proceed.
Step #5: Choose What to Download
Facebook allows you to select the specific data you want to download. To recover deleted photos, deselect all options except "Photos and Videos". You can also choose a specific date range if you remember when the deleted photo was uploaded.
Step #6: Create File
Click or tap the "Create File" button. Facebook will compile your selected data into a downloadable file and notify you when it's ready.
Step #7: Download Your Archive
Once your archive is prepared, Facebook will send you a notification or email with a link to download it. Click the link and follow the instructions to download the file to your device.
Step #8: Extract and Find Your Deleted Photos
After downloading the archive, extract the contents to reveal a folder containing your photos and videos. You can now browse through your deleted photos and recover the ones you want.
While the Facebook Archive method is a valuable option for recovering deleted photos, it's essential to note that it may not include photos deleted long ago. If this method doesn't work for you, don't worry—we have more recovery methods to explore in the following sections of this article.
If you've deleted photos from Facebook that were originally uploaded from your Mac computer, you might have a chance to recover them using Time Machine, the built-in backup solution on macOS. Here's how to recover deleted photos from Facebook using Time Machine:
Step #1: Activate Time Machine
Make sure your external hard drive or Time Capsule is connected to your Mac. Then, click on the Apple logo in the top-left corner of your screen and select "System Preferences". In System Preferences, choose "Time Machine".
Step #2: Enter Time Machine
Click the "Select Backup Disk" button and choose your external drive or Time Capsule as the backup disk. Once selected, click "Use Disk".
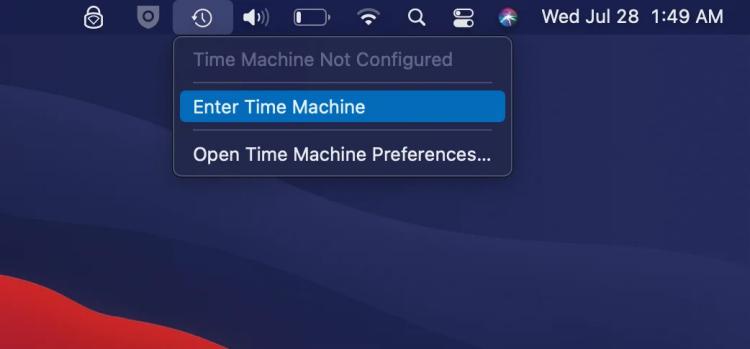
Step #3: Navigate to the Date of Deletion
Now, navigate back in time to the date when the photos were still on your computer. You can do this by clicking the Time Machine icon in the menu bar and selecting "Enter Time Machine".
Step #4: Locate Your Photos
Use the timeline on the right-hand side to scroll back to the date when the photos were available on your Mac. As you move through time, your Finder window will display your computer's state as it was on each selected date.
Step #5: Restore Your Photos
Once you've found the date with your deleted photos, navigate to the folder where the photos were originally stored. Select the photos you want to recover, right-click (or Control-click) on them, and choose "Restore" or "Restore to [your folder]" to recover them to their original location.
Step #6: Verify and Open Your Recovered Photos
After the restoration process is complete, check the original location to ensure your photos have been successfully recovered. You can now open and access your recovered photos.
Please note that this method is only effective if you have Time Machine backups of your Mac and if the photos were originally stored on your computer. If the photos were uploaded to Facebook from a different device or were not backed up with Time Machine, consider exploring other recovery options, such as cloud backups or third-party data recovery software.
If you've deleted photos from Facebook that were originally uploaded from your Windows computer, you can attempt to recover them using Command Prompt. Here's how to do it:
Step #1: Open Command Prompt as Administrator
To begin, you'll need to open Command Prompt with administrator privileges. To do this, right-click on the Start button and select "Windows Terminal (Admin)" or "Command Prompt (Admin)" from the menu. If you're using an older version of Windows, you can search for "Command Prompt", right-click on it in the search results, and choose "Run as administrator".
Step #2: Navigate to the Appropriate Drive
In Command Prompt, you'll need to navigate to the drive where your deleted files were originally stored. For example, if your photos were on the C: drive, type the following command and press Enter:
C:
Replace "C" with the appropriate drive letter if your photos were on a different drive.
Step #3: Use the 'undelete' Command
Now, you can use the "undelete" command to attempt to recover deleted files. Type the following command and press Enter:
undelete *.jpg /s
This command attempts to recover all deleted JPEG image files on the specified drive. If your deleted photos were in a different format (e.g., PNG, GIF), replace "jpg" with the appropriate file extension.
Step #4: Review Recovered Files
If the Command Prompt finds any recoverable photos, it will display a list of them along with their original paths. You can then review the list and note the paths to the recovered photos.
Step #5: Restore Recovered Photos
To restore a recovered photo, use the "copy" command in Command Prompt. For example, if the recovered photo is listed as "D:\RecoveredPhotos\myphoto.jpg" and you want to restore it to the "Pictures" folder, you can use the following command:
copy "D:\RecoveredPhotos\myphoto.jpg" "C:\Users\<YourUsername>\Pictures"
Replace <YourUsername> with your actual Windows username.
Step #6: Verify and Open Recovered Photos
After running the "copy" command for each recovered photo, check the destination folder (in this case, the "Pictures" folder) to ensure your photos have been successfully recovered. You can now open and access your recovered photos.
Please note that the success of this method depends on several factors, including the type of file system on your drive and whether the space previously occupied by the deleted photos has been overwritten by new data. If this method doesn't work, consider other recovery options, such as using specialized data recovery software to help you better recover possible overwritten data.
If you've deleted photos from Facebook that you originally uploaded from your Android or iOS device, you can attempt to recover them using the "Recently Deleted" album feature available on both platforms. Here's how to recover deleted photos from Facebook using Recently Deleted Album:
For iOS (iPhone and iPad):
Step #1: Open the Photos App
Launch the Photos app on your iOS device.
Step #2: Tap on Albums
At the bottom of the screen, tap on "Albums".
Step #3: Scroll Down and Select "Recently Deleted"
Scroll down to the "Other Albums" section and tap on "Recently Deleted".
Step #4: Review and Recover Photos
In the "Recently Deleted" album, you'll find all the photos and videos that you've deleted within the last 30 days. Browse through the list, tap on the photos you want to recover, and then tap the "Recover" button. The selected photos will be restored to your main photo library.
For Android (Samsung, Google Pixel, etc.):
Step #1: Open the Google Photos App
Launch the Google Photos app on your Android device.
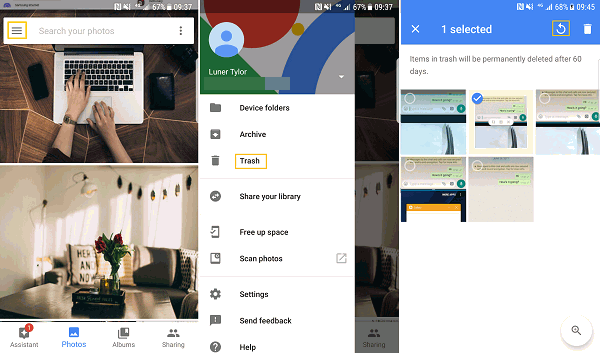
Step #2: Tap on the Three Horizontal Lines
In the top-left corner of the screen, tap on the three horizontal lines to open the menu.
Step #3: Select "Trash"
From the menu, select "Trash" This is where deleted photos are temporarily stored.
Step #4: Review and Restore Photos
In the "Trash" folder, you'll see the photos and videos you've deleted within the last 60 days. Tap on the photos you want to recover to select them, then tap the "Restore" button. The selected photos will be restored to your Google Photos library.
Important Notes:
FoneDog iOS Data Recovery is a powerful third-party iPhone 15-supported software tool designed to help you recover deleted photos and other data from your iOS device, including iPhone and iPad. Whether you've lost photos due to accidental deletion, iOS updates, factory resets, or other reasons, FoneDog iOS Data Recovery offers a reliable solution to retrieve your precious memories.
iOS Data Recovery
Recover photos, videos, contacts, messages, call logs, WhatsApp data, and more.
Recover data from iPhone, iTunes and iCloud.
Compatible with latest iPhone and iOS.
Free Download
Free Download

Steps on how to recover deleted photos from Facebook using FoneDog iOS Data Recovery:
Start by downloading and installing FoneDog iOS Data Recovery on your computer. It's available for both Windows and macOS. Launch the program once it's installed.
Use a USB cable to connect your iOS device (iPhone or iPad) to your computer. Ensure that you have iTunes installed on your computer for the tool to work properly.
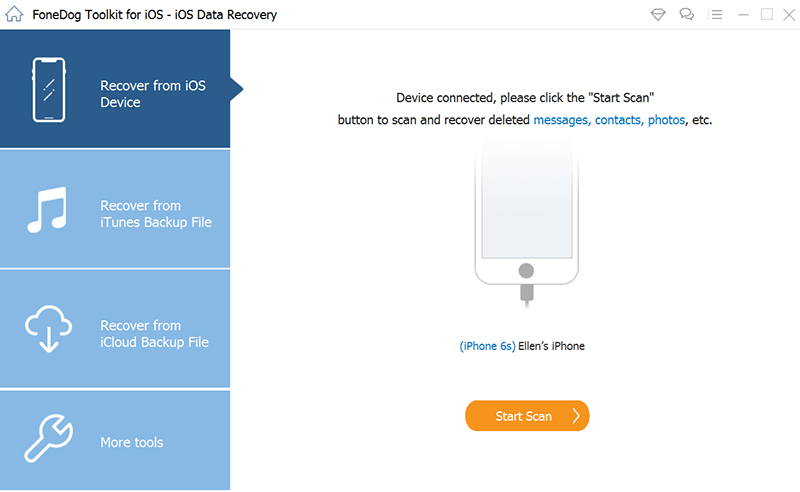
In the FoneDog iOS Data Recovery interface, you'll see several recovery options. To recover deleted Facebook photos, choose "Recover from iOS Device".
Click the "Start Scan" button to initiate a scan of your connected iOS device. The software will begin scanning for deleted data, including photos, on your device.
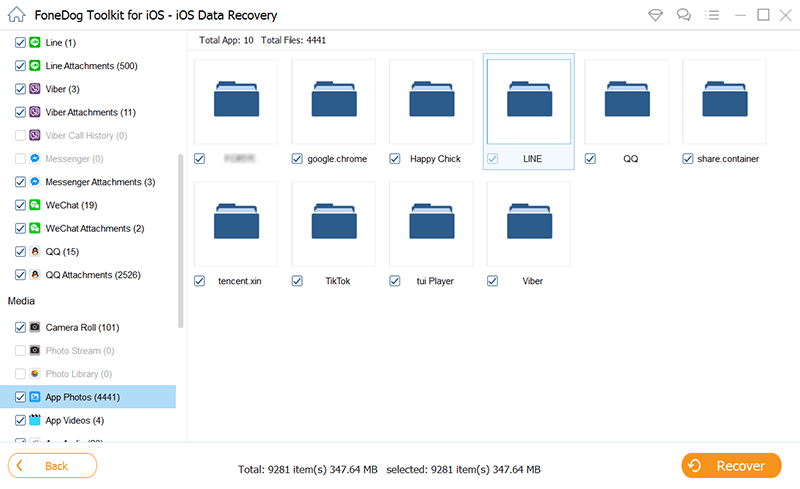
Once the scan is complete, you'll see a list of recoverable data categories on the left side of the screen. To recover Facebook photos, click on "Photos" and preview the deleted photos that are displayed in the interface.
Select the photos you want to recover by checking the boxes next to them. After making your selections, click the "Recover" button.
FoneDog iOS Data Recovery will prompt you to choose a location on your computer to save the recovered photos. Select a folder or location and click "Recover" once more.
The software will complete the recovery process and provide a notification when it's finished. You can now access the recovered Facebook photos on your computer.
FoneDog iOS Data Recovery simplifies the process of recovering deleted photos from your iOS device, making it an effective and user-friendly solution. Remember to perform the recovery as soon as possible after deleting the photos to increase the chances of successful retrieval. Additionally, always maintain regular backups of your iOS device to safeguard your data in the future.
People Also ReadHow to Fix “This Person Isn’t Available Right Now” Error on Facebook Messenger [2023 Guide]3 Best Ways: How to Find Hidden Facebook Messages [2023]
In this comprehensive guide, we've explored various methods on how to recover deleted photos from Facebook on different platforms. Whether you're using a web browser, Mac computer, Windows PC, or iOS device, there are options available to retrieve those cherished memories.
From utilizing Facebook's built-in Archive to employing third-party tools like FoneDog iOS Data Recovery, the key takeaway is that prompt action and the right method can often lead to successful photo recovery. Always remember to act quickly, as the longer you wait, the more challenging it may become to recover deleted photos.
Ultimately, safeguarding your digital memories is essential, so consider regular backups and best practices to minimize the risk of accidental photo loss in the first place.
Leave a Comment
Comment

iPhone/Android Devices’ Maintenance Expert
Staying home, listening to music, writing tech articles
Many people asked me to repair their mobile phones so I have a lot of experience in mobile phone repair, and I know a lot about Android or Apple phones.
iOS Data Recovery
3 Methods to recover your deleted data from iPhone or iPad.
Free Download Free DownloadHot Articles
 /
/
INTERESTINGDULL
/
SIMPLEDIFFICULT
Thank you! Here' re your choices:
Excellent
Rating: 4.8 / 5 (based on 76 ratings)
