FoneDog Screen Recorder
FoneDog Screen Recorder
Special Offer
Special Offer


By Nathan E. Malpass, Last updated: June 27, 2025
iPhones are personal photo albums, storing countless memories captured in the form of pictures and videos. However, despite their convenience, iPhones are not impervious to the occasional mishap, leading to the loss of valuable photos. Whether it's accidental deletion, a software update gone wrong, or a damaged device, the heart-sinking feeling of losing cherished images is something we've all experienced at one point or another.
The good news is that your lost photos on iPhone may not be gone forever. With the right techniques and tools, it's often possible to retrieve and restore those precious memories. In this comprehensive guide, we will walk you through various methods to help you recover lost photos on your iPhone, ensuring that you can relive those moments once again. So, let's dive into the world of digital photo recovery and discover how to turn your despair into joy as you retrieve your lost photos on your iPhone.
Part 1. How to Recover Lost/Deleted Photos on iPhonePart 2. Best Tool to Recover Lost/Deleted Photos on iPhonePart 3. How to Avoid Losing Photos on iPhonePart 4. The Bottom Line
Losing photos from your iPhone can be distressing, but if you've been diligent about backing up your device using iCloud, there's a good chance you can recover your lost pictures. iCloud is Apple's cloud storage service that automatically backs up your photos, allowing you to restore them when needed. Here's how to retrieve lost photos on iPhone using iCloud:
Step 1: Check Your iCloud Backup
Before you proceed, it's essential to ensure that you have an iCloud backup containing the photos you want to recover. To do this, go to your iPhone's settings, tap on your Apple ID, then navigate to "iCloud" and finally "Manage Storage" or "Storage & Backup," depending on your iOS version. Here, you can view the date of your last iCloud backup. If your photos were lost after this date, they may not be in the backup.
Step 2: Restore Your iPhone from iCloud Backup
Step 3: Wait for the Restore to Complete
During the restoration, your iPhone will download and install the data from your selected iCloud backup, including your lost photos. The time this takes depends on the size of the backup and your internet connection speed. Ensure your device is connected to Wi-Fi and a power source during this process.
Step 4: Check Your Recovered Photos
Once the restoration is complete, your iPhone should contain the recovered photos. Open the Photos app and check if your lost pictures are back in your gallery.
If you've been regularly backing up your iPhone to iTunes on your computer, you can restore your lost photos from a previous iTunes backup. This method can be particularly useful if you don't have an iCloud backup or if your lost photos are not in the iCloud backup. Follow these steps to recover lost photos on iPhone using iTunes:
Step 1: Connect Your iPhone to Your Computer
Connect your iPhone to the computer where you have your iTunes backup. Ensure that you're using the same computer that you used to create the backup.
Step 2: Open iTunes
Launch the iTunes application on your computer. If you're prompted for a password to unlock your device or allow access, enter it.
Step 3: Choose Your Device
In iTunes, select your iPhone when it appears in the upper-left corner.
Step 4: Restore Your iPhone from iTunes Backup
Step 5: Check Your Restored Photos
Once the restoration process is finished, your iPhone will restart, and the lost photos from the selected iTunes backup should be back on your device. Open the Photos app to verify that your precious memories have been successfully recovered.
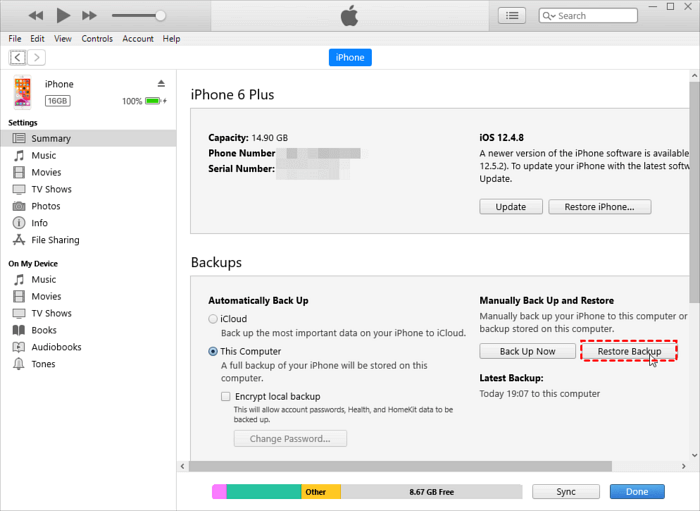
If you own a Mac computer running macOS Catalina or later, Apple has replaced iTunes with Finder for device management, including backups and restores. You can use Finder to recover lost photos on iPhone by following these steps:
Step 1: Connect Your iPhone to Your Mac
Use a USB cable to connect your iPhone to your Mac computer.
Step 2: Open Finder
Launch Finder on your Mac. You can do this by clicking on the Finder icon in your Dock or by opening a new Finder window.
Step 3: Locate Your iPhone
In the Finder window, you'll see your iPhone listed in the left-hand sidebar under "Locations." Click on your iPhone's name.
Step 4: Choose Your Backup
In the main window, you'll see information about your iPhone. Click on the "General" tab, and you'll find the "Restore Backup" option. Click on it.
Step 5: Select the Backup
A window will appear showing you the available backups. Choose the backup that contains the photos you want to recover and click the "Restore" button.
Step 6: Wait for the Restore to Finish
The restore process will begin, and your iPhone will reboot when it's completed.
Step 7: Check Your Restored Photos
After the restart, open the Photos app on your iPhone to check if your lost photos have been successfully recovered.
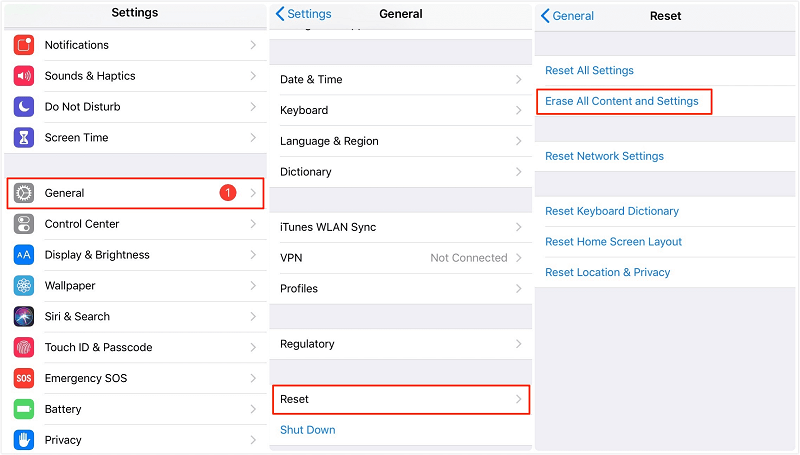
In later iOS versions, Apple introduced a "Recently Deleted" folder within the Photos app. This folder serves as a safety net for deleted photos, giving you a chance to recover them before they're permanently removed. Here's how to use this feature to retrieve lost photos on iPhone:
Step 1: Open the Photos App
Unlock your iPhone and open the Photos app from your home screen.
Step 2: Access the "Recently Deleted" Folder
Step 3: Review and Recover Photos
Inside the "Recently Deleted" album, you'll find photos that have been deleted in the last 30 days. Here, you can perform the following actions:
Step 4: Check Your Recovered Photos
After you've recovered the photos from the "Recently Deleted" folder, they will be restored to your main photo library. Open the Photos app to verify that your lost photos are now safely back on your iPhone.
If you've shared the lost photos with friends or family through messaging apps like iMessage or WhatsApp, there's a chance you can retrieve them from the chat threads. Follow these steps to check and recover lost photos on iPhone from messaging apps:
Step 1: Open the Messaging App
Step 2: Scroll Through the Chat
Scroll back through the chat history to find the conversation where you shared the photos. If you remember when you sent them, this will make the process easier.
Step 3: Find and Save the Photos
Step 4: Check Your Photo Library
After saving the photos, check your iPhone's photo library to ensure they have been successfully recovered. They should now be accessible in your Photos app.
If you don’t have a backup or your backup doesn’t include the photos you need, third-party tools like FoneDog iOS Data Recovery can help. FoneDog is designed to recover deleted data directly from your iPhone, even if it's permanently deleted from the Photos app. Even iPhone contacts disappearing randomly, it can help you.
iOS Data Recovery
Recover photos, videos, contacts, messages, call logs, WhatsApp data, and more.
Recover data from iPhone, iTunes and iCloud.
Compatible with latest iPhone and iOS.
Free Download
Free Download

In this part of our guide, we'll introduce you to this handy tool and show you how to use this iPhone photo recovery software to recover lost photos on iPhone.
Steps to Recover Lost Photos with FoneDog:
Step 1: Download and Install FoneDog iOS Data Recovery
Start by downloading FoneDog iOS Data Recovery on your computer. Install the software following the on-screen instructions.
Step 2: Connect Your iPhone to the Computer
Connect your iPhone to the computer using a USB cable. Launch FoneDog iOS Data Recovery, and it should detect your device automatically.
Step 3: Select a Recovery Mode
Choose one of the three recovery modes based on your situation:
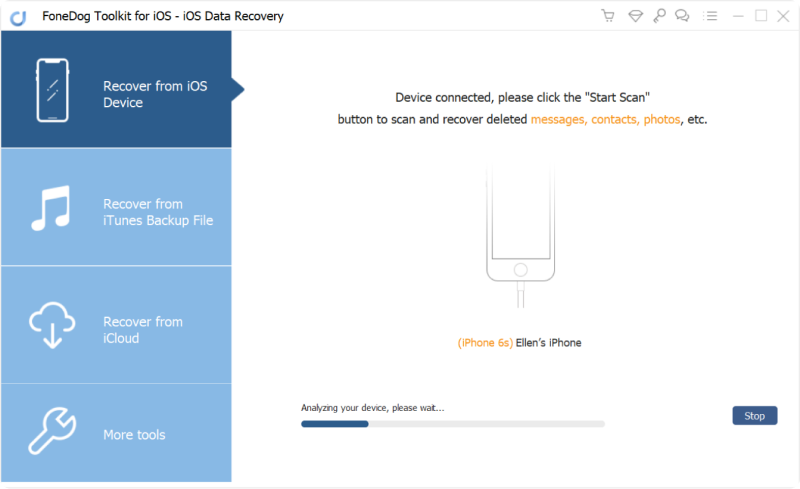
Step 4: Scan Your iPhone or Backup
The software will initiate a scan of your iPhone or the selected backup. This process may take a few minutes, depending on the amount of data.
Step 5: Preview and Recover Lost Photos
Once the scan is complete, you'll see a list of recoverable data. Select "Photos" from the list, and you can preview the lost photos. Choose the photos you want to recover, and then click the "Recover" button.
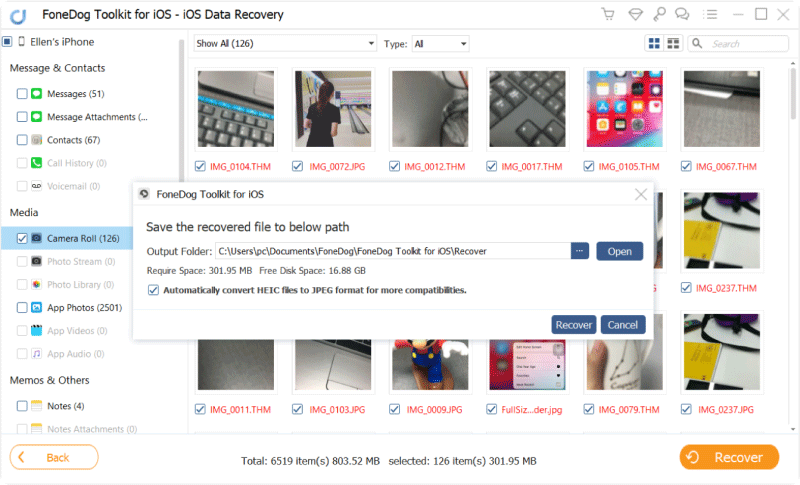
Step 6: Save Recovered Photos
Specify a location on your computer to save the recovered photos, and FoneDog will export them to your chosen folder.
With these steps, FoneDog iOS Data Recovery provides a reliable and user-friendly solution for recovering lost photos on your iPhone, ensuring that your cherished memories are never truly lost.
Losing photos on your iPhone can be a devastating experience, but there are several measures you can take to safeguard your precious memories. Here are some effective strategies to avoid losing photos:
1. Regular Backups:
2. Use iCloud Photos:
3. Google Photos or Other Cloud Services:
Consider using third-party cloud services like Google Photos, Dropbox, or OneDrive to back up your photos. These apps offer additional storage options and can automatically sync your photos to the cloud.
4. Transfer Photos to Computer:
Regularly transfer your photos to your computer using a USB cable. This provides an additional local backup and frees up space on your iPhone.
5. Avoid Deleting Photos Too Quickly:
Be cautious when deleting photos. Ensure that they are safely backed up before deleting them from your device.
By implementing these measures, you significantly reduce the risk of losing your precious photos on your iPhone. Prevention through regular backups and smart usage practices is key to maintaining a secure and reliable photo library.
In this comprehensive guide, we've explored various methods to help you retrieve lost photos on iPhone. Whether you've accidentally deleted your precious memories, experienced a system malfunction, or faced any other data loss situation, there are multiple options available to recover your photos.
Each of these methods offers different options for retrieving your lost photos, depending on your specific circumstances and available backups. Choose the one that best suits your needs and preferences, ensuring that your cherished memories are safe and accessible once again.
Leave a Comment
Comment

iPhone/Android Devices’ Maintenance Expert
Staying home, listening to music, writing tech articles
Many people asked me to repair their mobile phones so I have a lot of experience in mobile phone repair, and I know a lot about Android or Apple phones.
iOS Data Recovery
3 Methods to recover your deleted data from iPhone or iPad.
Free Download Free DownloadHot Articles
 /
/
INTERESTINGDULL
/
SIMPLEDIFFICULT
Thank you! Here' re your choices:
Excellent
Rating: 4.7 / 5 (based on 68 ratings)
