FoneDog Screen Recorder
FoneDog Screen Recorder
Special Offer
Special Offer


By Nathan E. Malpass, Last updated: May 27, 2025
Smartphones have become more than just communication devices; they are repositories of cherished memories captured through countless photos. However, what happens when your beloved iPhone suffers an unfortunate accident, leaving you with a broken device and potentially lost photos? Fear not, as this article is here to guide you through the process on how to recover photos from a broken iPhone.
Whether your iPhone screen is shattered, it's submerged in water, or it simply won't turn on, there are still several methods you can explore to retrieve those irreplaceable memories. From using data recovery software to seeking professional assistance, we've got you covered with the best practices and step-by-step instructions to help you salvage your precious photos. Let's embark on this journey together and learn how to recover the moments you thought might be lost forever.
Method 1. Using iCloud Backup RestorationMethod 2. Using iTunes BackupMethod 3. Using iCloudMethod 4. Using FoneDog iOS Data RecoverySummary
How to recover photos from a broken iPhone? Losing access to your photos due to a broken iPhone can be a distressing experience, but if you've been backing up your iPhone using iCloud, there's a ray of hope. Apple's iCloud offers a convenient way to store your data securely in the cloud, including photos, which means you can retrieve them on a new device even if your old iPhone is beyond repair. Here's how to do it:
Step 01: Set Up Your New iPhone
If you don't already have a new iPhone, this is the first step. You can either purchase a new one or borrow one from a friend or family member. Ensure that it's a device compatible with iCloud and that it's running the same or a more recent iOS version as your broken iPhone.
Step 02: Start the Setup Process
Turn on your new iPhone and follow the initial setup instructions. When you reach the "Apps & Data" screen, select "Restore from iCloud Backup." You will be prompted to sign in to your iCloud account using your Apple ID and password.
Step 03: Choose the Backup
Once you're logged in, your new iPhone will display a list of available iCloud backups. Select the most recent backup that contains the photos you want to recover. Keep in mind that this backup should predate the time when your iPhone broke or experienced issues.
Step 04: Restore Your Photos
After selecting the backup, your iPhone will begin the restoration process. This may take some time, depending on the size of the backup and your internet connection speed. Ensure your device remains connected to Wi-Fi and a power source throughout this process.
Step 05: Complete the Setup
Once the restoration is complete, follow the on-screen instructions to complete the setup of your new iPhone. Your photos, along with other data, will be restored to your device. Open the Photos app to confirm that your cherished memories are back where they belong.
Remember that this method requires a working internet connection and enough storage space on your new iPhone to accommodate the backup. If you have a limited data plan, it's advisable to connect to Wi-Fi to avoid excessive data usage during the restoration. Additionally, regularly backing up your iPhone to iCloud ensures that your photos and data are safe and easily recoverable in the event of unforeseen accidents.
How to recover photos from a broken iPhone? If you've been diligent about backing up your iPhone using iTunes on your computer, you can still recover your photos from a broken iPhone. Here's how to restore your photos from an iTunes backup onto a new device:
Step 01: Prepare Your New iPhone
Begin by ensuring that you have access to a compatible new iPhone and a computer with the latest version of iTunes installed. Connect your new iPhone to the computer using a USB cable.
Step 02: Launch iTunes
Open iTunes on your computer. If prompted, make sure to update it to the latest version to ensure compatibility with your new iPhone.
Step 03: Connect Your Broken iPhone
If your broken iPhone can still connect to your computer, go ahead and connect it using a USB cable. iTunes should recognize your device.
Step 04: Select Your Broken iPhone
In iTunes, locate your broken iPhone when it appears on the left-hand side under "Devices." Click on it to select it.
Step 05: Choose "Restore Backup"
Within the device summary screen, you'll see the option to "Restore Backup." Click on this option.
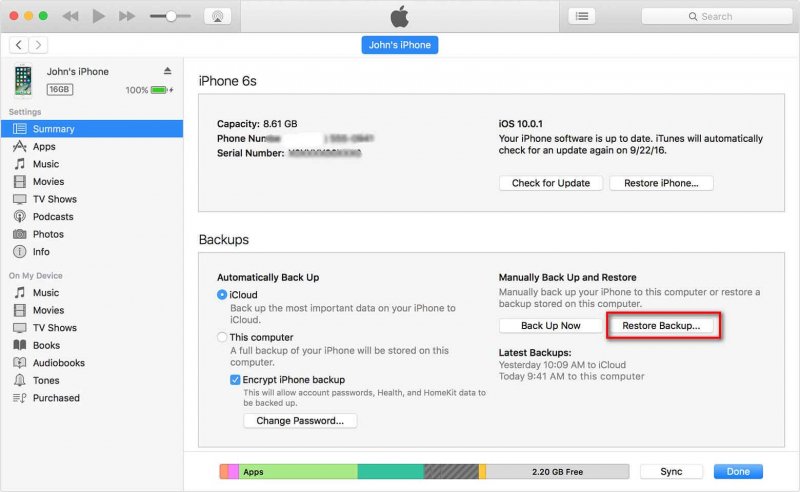
Step 06: Select the Appropriate Backup
A list of available iTunes backups will appear. Choose the most recent backup that contains the photos you want to recover. Keep in mind that this backup should predate the time when your iPhone broke or experienced issues.
Step 07: Begin the Restoration Process
Click the "Restore" button to initiate the restoration process. iTunes will start extracting the backup and copying it to your new iPhone. This may take some time, depending on the size of the backup.
Step 08: Complete the Setup
Once the restoration is complete, disconnect your new iPhone from the computer and follow the on-screen instructions to finish setting up your device. Open the Photos app to confirm that your photos have been successfully recovered.
By restoring from an iTunes backup, you can retrieve not only your photos but also other data, including contacts, messages, and app data. Just like with iCloud backups, make sure you have enough free space on your new iPhone to accommodate the data from the backup.
How to recover photos from a broken iPhone? If you find yourself without access to a new iPhone or a computer with iTunes, you can still attempt to recover your photos from a broken iPhone by using a web browser to access iCloud.com. Here's how:
Step 01: Access iCloud.com
Using a computer or another mobile device, open a web browser and navigate to iCloud.com. Ensure that you're using a web browser that's compatible with iCloud services, such as Safari, Chrome, or Firefox.
Step 02: Sign In to iCloud
On the iCloud sign-in page, enter your Apple ID and password to log in. Make sure you're using the same Apple ID that was associated with the broken iPhone.
Step 03: Navigate to Photos
Once you're logged in, you'll see various iCloud services. Click on the "Photos" icon. This will open the Photos app on iCloud.com, where you can access and manage your photo library.
Step 04: Browse and Download Photos
In the Photos app, you should see your entire photo library, including albums and individual pictures. You can browse through your photos and select the ones you want to recover. To download a photo, simply click on it, and then click the download icon (usually represented by a cloud with an arrow).
Step 05: Save Photos to Your Computer or Cloud Storage
After downloading your photos, they will typically be saved to your computer's default download location. You can then transfer them to a secure location, such as an external hard drive or a cloud storage service, to ensure they're safely backed up.
How to recover photos from a broken iPhone quickly? In this part of the article, we will explore an alternative method for recovering photos from a broken iPhone using the iPhone 15 supported FoneDog iOS Data Recovery software. FoneDog offers a user-friendly solution to retrieve lost or inaccessible data from iOS devices, including photos. FoneDog iOS Data Recovery is a powerful tool designed to help you recover various types of data, including photos, contacts, messages, and more, from your iOS device, even if it's broken or unresponsive. Even iPhone contacts disappearing randomly, it can help you.
FoneDog iOS Data Recovery is a versatile software tool designed to help you recover lost or deleted data from your iOS devices. Here's a brief overview of its key features:
iOS Data Recovery
Recover photos, videos, contacts, messages, call logs, WhatsApp data, and more.
Recover data from iPhone, iTunes and iCloud.
Compatible with latest iPhone and iOS.
Free Download
Free Download

This software provides multiple recovery modes, and in this section, we'll walk you through the steps to recover photos from iCloud Backup File using FoneDog.
Note: Before you begin, make sure you have FoneDog iOS Data Recovery software installed on your computer. You can download and install it from the official FoneDog website.
Step 01: Launch FoneDog iOS Data Recovery
Launch the FoneDog iOS Data Recovery software on your computer. You will see several recovery options on the main interface. Select "Recover from iCloud Backup File" from the available modes.
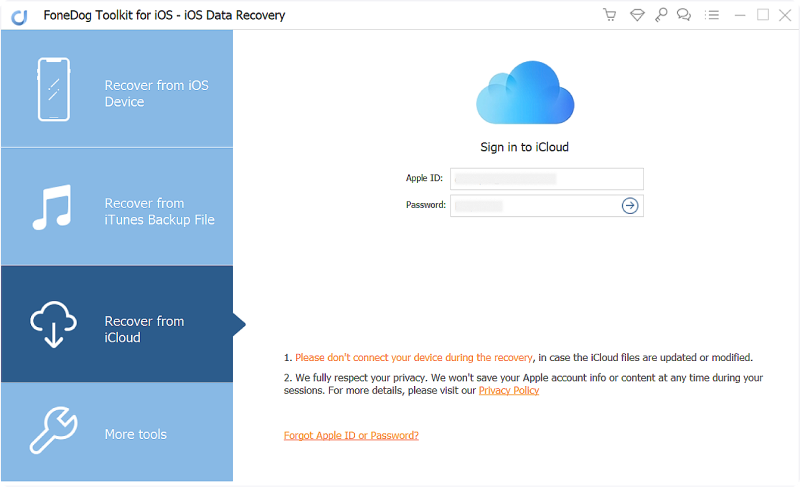
Step 02: Sign In to Your iCloud Account
You will be prompted to sign in to your iCloud account using your Apple ID and password. FoneDog takes data security seriously, so your information is kept private and secure during this process.
Step 03: Choose the Backup File
After signing in, FoneDog will display a list of iCloud backup files associated with your Apple ID. Select the backup that contains the photos you wish to recover. Ensure that the backup corresponds to the time period when your photos were on your broken iPhone.
Step 04: Download and Scan the Backup
Once you've selected the appropriate backup, click "Download" to retrieve it. FoneDog will begin downloading and scanning the chosen iCloud backup file. This may take a few minutes depending on the backup's size and your internet speed.
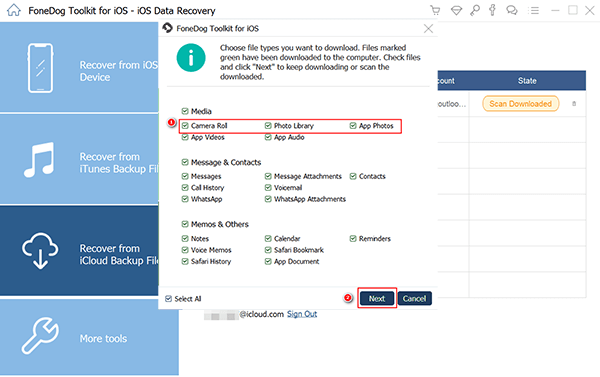
Step 05: Preview and Select Photos
After the scan is complete, FoneDog will present you with a list of recoverable data categories, including photos. You can preview the photos within each category to ensure you're recovering the right ones. Select the photos you want to recover.
Step 06: Recover Photos
With your desired photos selected, click the "Recover" button. FoneDog iOS Data Recovery will prompt you to choose a location on your computer where you want to save the recovered photos. Once you've specified the location, click "Recover" again.
Step 07: Access Your Recovered Photos
FoneDog will proceed to recover the selected photos and save them to the location you specified. Once the process is complete, you can access your recovered photos and transfer them to your new iPhone or store them securely.
FoneDog iOS Data Recovery simplifies the process of recovering photos from a broken iPhone by offering a user-friendly interface and robust recovery capabilities. Keep in mind that regular backups, whether through iCloud or iTunes, are essential for safeguarding your data, especially in case of unexpected device issues.
With the guide above, you have known how to recover photos from a broken iPhone. It can be a challenging task, but with the right methods and tools, you can often salvage your precious memories. Remember to regularly back up your iPhone to iCloud or iTunes to prevent data loss in the future. When it comes to safeguarding your precious memories, a proactive approach to data backup is your best defense against unexpected device issues.
iOS Data Recovery
Recover photos, videos, contacts, messages, call logs, WhatsApp data, and more.
Recover data from iPhone, iTunes and iCloud.
Compatible with latest iPhone and iOS.
Free Download
Free Download
Leave a Comment
Comment

iPhone/Android Devices’ Maintenance Expert
Staying home, listening to music, writing tech articles
Many people asked me to repair their mobile phones so I have a lot of experience in mobile phone repair, and I know a lot about Android or Apple phones.
iOS Data Recovery
3 Methods to recover your deleted data from iPhone or iPad.
Free Download Free DownloadHot Articles
 /
/
INTERESTINGDULL
/
SIMPLEDIFFICULT
Thank you! Here' re your choices:
Excellent
Rating: 4.7 / 5 (based on 61 ratings)
