FoneDog Screen Recorder FoneDog Screen Recorder
Special Offer Special Offer
Only Only
$4.49 $4.49
to get a ONE-month license to get a ONE-month license
Sale ends in xx days Sale ends in xx days
Buy Now
sale

iPhone Trash Recovery: How to Restore Deleted Data with Ease

By Nathan E. Malpass, Last updated: March 28, 2024

In the fast-paced digital age, our iPhones have become indispensable tools that store a wealth of valuable data, from treasured photos and important documents to crucial messages and contacts. But what happens when you accidentally delete something important, only to find out there's no easy way to recover it? The good news is that you're not out of options. Welcome to our guide on mastering iPhone trash recovery, where we'll unravel the mystery of retrieving deleted data from your iOS device.

Whether you've unintentionally deleted a text message, lost a precious photo, or mistakenly trashed a critical document, this article will equip you with the knowledge and tools to rescue your data from the digital abyss. We'll explore a range of methods, from built-in iPhone features to third-party software solutions, ensuring you have the best chance of recovering your valuable information.

So, if you've ever found yourself in the unfortunate position of desperately needing to recover data from your iPhone trash, fear not – we've got you covered. Let's dive into the world of iPhone trash recovery and bring your lost data back to life.

Part 1. iPhone Trash Recovery Question - Is There a Universal iPhone Trash Bin?Part 2. iPhone Trash Recovery Methods to Retrieve Different Data TypesPart 3. Best iPhone Trash Recovery Tool: Recover Permanently Deleted Data without Backup

Part 1. iPhone Trash Recovery Question - Is There a Universal iPhone Trash Bin?

In the world of computing, it's a common practice to have a designated "trash" or "recycle bin" where deleted files go, offering a safety net before the files are permanently removed. However, when it comes to iPhones and iOS devices, you might be surprised to find out that there is no universal trash bin that collects all deleted files in one place.

Unlike desktop computers where you can find a single trash bin that stores everything you've deleted, the iPhone operates differently. Instead, iOS uses a decentralized approach to manage deleted files. Let's break it down.

  1. Photos App: When you delete a photo or video from your iPhone's Photos app, it doesn't go to a centralized trash bin. Deleted media gets moved to a "Recently Deleted" album where it resides for a specific duration (usually 30 days) before being permanently erased. This is your chance to recover those accidental deletions.
  2. Notes App: The Notes app has its own "Recently Deleted" folder. When you delete a note, it's not gone immediately; instead, it's moved to this folder, allowing you to restore it before it's gone for good.
  3. Email Apps: Email apps like Apple Mail or Gmail handle deleted emails differently. They typically have a "Trash" or "Bin" folder where deleted emails are placed. You can often move items from these folders back to your inbox or other folders if you change your mind.
  4. Third-Party Apps: Apps you've installed on your iPhone may handle deletions differently. Some may have their own "trash" or "recycle bin" features, while others might not have an easy way to recover deleted data. It largely depends on how the app was designed.

In summary, while there's no universal trash bin on the iPhone that collects everything you delete, there are separate mechanisms in place for different types of data and apps. It's essential to understand these unique procedures to ensure you can recover deleted data effectively. In the next sections of this article, we'll explore how to recover deleted data from various apps and explore third-party solutions to help you in your iPhone trash recovery journey.

Part 2. iPhone Trash Recovery Methods to Retrieve Different Data Types

Method 01. Check Recently Deleted Album to Recover Photos

If you've accidentally deleted photos or videos from your iPhone's Photos app, the good news is that iOS offers a straightforward way to recover them through the "Recently Deleted" album. Here's how to do it:

  1. Unlock your iPhone: Ensure your device is unlocked, and you're on the home screen.
  2. Open the Photos app: Locate and tap on the "Photos" app icon on your home screen.
  3. Access the Recently Deleted album: Within the Photos app, scroll to the bottom of the screen and select the "Albums" tab. From there, scroll down until you find "Recently Deleted" under the "Other Albums" section and tap on it.
  4. Recover your photos: Inside the "Recently Deleted" album, you'll find all the photos and videos you've deleted in the last 30 days. To restore an item, tap on it, then click "Recover" at the bottom right corner of the screen. This will move the photo or video back to your main Photos library.
  5. Permanent deletion: Be aware that items in the "Recently Deleted" album are only stored for a limited time, typically 30 days, after which they are automatically and permanently deleted. So, make sure to recover any photos or videos you want to keep before this window closes.

iPhone Trash Recovery: Recover Photos

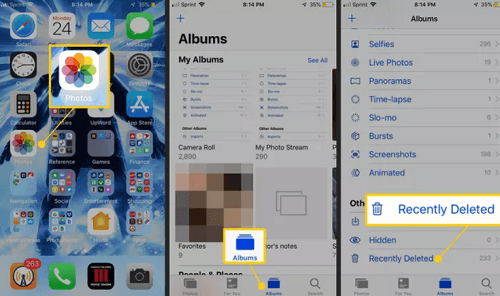
This method is perfect for recovering accidentally deleted photos and videos. However, if you're looking to recover other types of data from recycle bin or need to retrieve items from apps that don't use the "Recently Deleted" concept, you'll need to explore alternative methods. In the following sections, we'll dive into more iPhone trash recovery methods to help you retrieve different types of deleted data.

Method 02. Check Email Trash to Recover Deleted Messages

If you've accidentally deleted important emails from your iPhone's email app, you can often recover them from the email service's "Trash" or "Deleted Items" folder. Here's how to do it using Apple Mail and Gmail as examples:

Recovering Deleted Emails in Apple Mail:

  1. Open the Mail App: Launch the Mail app on your iPhone.
  2. Go to Mailboxes: At the top left corner of the screen, tap "Mailboxes" to go back to the main menu.
  3. Navigate to the Trash Folder: Scroll down to your email account's folders, and you'll find a "Trash" or "Deleted Items" folder. Tap on it to access your deleted emails.
  4. Recover Deleted Emails: Inside the Trash folder, locate the email you want to recover. Swipe left on the email, and you should see the option to "Move to Inbox" or "Move to" followed by the folder name. Tap "Move to Inbox" to restore the email to your inbox.

Recover Deleted Emails from Trash on iPhone

Recovering Deleted Emails in Gmail:

  1. Open the Gmail App: Launch the Gmail app on your iPhone.
  2. Access the Sidebar Menu: Tap the three horizontal lines in the upper-left corner to open the sidebar menu.
  3. Go to Bin (Trash): Under "Gmail", you'll find a "Bin" (Trash) folder. Tap on it to view your deleted emails.
  4. Recover Deleted Emails: Inside the Bin (Trash) folder, locate the email you wish to recover. Tap on the email to open it, then tap the three dots (more options) in the top-right corner. Choose "Move to" and select the appropriate label (usually "Inbox") to restore the email.

Please note that the specific steps may vary depending on your email service provider and the email app you use. The key is to look for the "Trash" or "Deleted Items" folder in your email app and follow the steps to recover deleted messages. It's essential to act quickly as emails in the trash folder may also have a limited retention period before permanent deletion.

Method 03. Restore the iCloud Backup File to Your iPhone

If you've recently deleted data from your iPhone and are seeking a more comprehensive way to recover it, restoring from an iCloud backup can be a powerful solution. Here's how to do it:

Before you start: Ensure that you have an iCloud backup available.

  1. Access the Settings App: Open your iPhone's Settings app from the home screen.
  2. Tap on your Apple ID: Scroll down and tap on your Apple ID banner at the top, which will display your Apple ID, iCloud, and other settings.
  3. Select "iCloud": In the Apple ID menu, tap "iCloud" to access your iCloud settings.
  4. Choose "Manage Storage": In the iCloud settings, tap on "Manage Storage". This will allow you to manage your iCloud backups.
  5. Select the Backup: Under the "Backups" section, you'll see a list of your devices. Choose the device for which you want to restore data. This should be the device that you want to recover data on.
  6. View Backup Details: On the next screen, you can see the details of the selected backup, including the date of the backup. Confirm that this backup contains the data you want to recover.
  7. Initiate the Restore: To restore your iPhone to the state of this backup, tap "Restore Backup". You may be prompted to enter your Apple ID password for confirmation.
  8. Wait for the Restore: Your iPhone will begin the restoration process. It will restart and may take some time, depending on the size of the backup. Make sure your device is connected to Wi-Fi and has enough battery or is plugged into a power source during this process.
  9. Set Up Your Device: Once the restoration is complete, your iPhone will restart, and you'll be guided through the setup process. Follow the on-screen instructions, and when prompted, sign in with your Apple ID.
  10. Choose the Backup: During the setup, you will be given the option to restore from the iCloud backup. Choose the backup you've just restored, and your iPhone will configure itself based on the data from that backup.

Keep in mind that restoring from an iCloud backup replaces your current data with the data from the selected backup. This means that any data created or modified after the backup date will be lost. However, it's an effective way to recover a significant amount of data, such as photos, contacts, messages, and app data.

Method 04. Restore iTunes Backup File to Your iPhone

In addition to restoring from an iCloud backup, you can recover deleted data by restoring from an iTunes backup if you have one available. Here's how to do it:

Note: Ensure that you have an iTunes backup. You should have previously created this backup using iTunes on your computer.

  1. Connect Your iPhone to Your Computer: Use a USB cable to connect your iPhone to a computer with iTunes installed. If prompted, enter your device passcode or select "Trust This Computer".
  2. Open iTunes: Launch the iTunes application on your computer. If you're using macOS Catalina or later, you'll need to open Finder instead of iTunes.
  3. Select Your Device: In iTunes or Finder, you should see your connected iPhone appear as an icon or listed under "Devices". Click on your device to select it.
  4. Choose "Restore Backup": In the device summary, under the "Backups" section, you'll find a "Restore Backup" button. Click on it.
  5. Select the Backup: A window will appear showing a list of available iTunes backups. Choose the backup that contains the data you want to recover, and then click "Restore".
  6. Wait for the Restore: iTunes will begin the restoration process, which may take some time, depending on the size of the backup. Ensure your device stays connected throughout the process.
  7. Your iPhone will restart and guide you through the setup process. Follow the on-screen instructions, and when prompted, sign in with your Apple ID.
  8. Choose the appropriate backup, and your device will be configured based on the data from that backup.

Restore iTunes Backup to iPhone

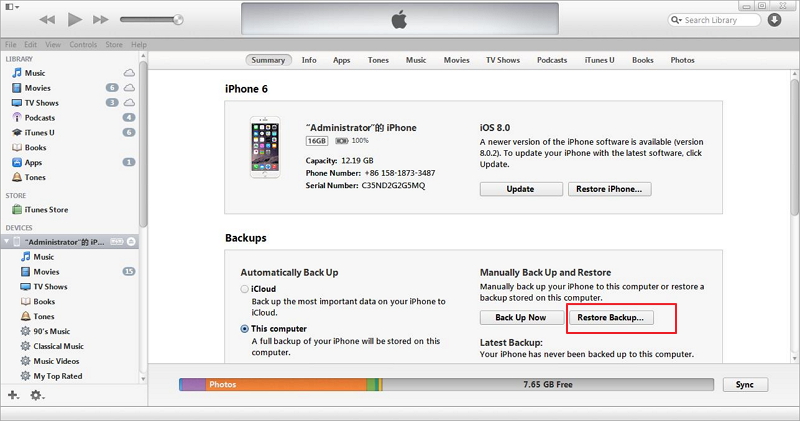
Restoring from an iTunes backup can be an effective method to recover data, especially if you regularly create backups on your computer. It's particularly useful when you don't have access to Wi-Fi or iCloud or when you want to recover data selectively from a specific iTunes backup.

Remember that restoring from an iTunes backup replaces your current data with the data from the selected backup, so any data created or modified after the backup date will be lost.

Method 05. Restore Backup Using Finder on Mac

If you're using macOS Catalina or later, iTunes has been replaced by Finder for managing your iPhone backups. You can still restore your device from a backup using Finder. Here's how:

Before you start: Ensure that you have a Finder backup that includes the data you want to recover.

  1. Connect Devices: Use a USB cable to connect your iPhone to your Mac.
  2. Open Finder: Launch Finder on your Mac if it doesn't open automatically when you connect your iPhone.
  3. Locate Your Device: In the Finder sidebar, you should see your iPhone listed under "Locations". Click on your device to select it.
  4. Choose "Restore Backup": In the device summary in Finder, you'll find a section labeled "General". Under this section, click on the "Restore Backup" button.
  5. Select the Backup: A window will appear displaying a list of available Finder backups. Choose the backup that contains the data you want to recover, and then click "Restore".
  6. Wait for the Restore: Finder will initiate the restoration process. Ensure that your device remains connected throughout the process, and your Mac should provide progress updates.
  7. Set Up Your Device: After the restore is complete, follow the instructions, and then sign in with your Apple ID.
  8. Restore Your Backup: During the setup, you'll be given the option to restore your iPhone from the backup you just restored.

Restoring from a Finder backup on your Mac is similar to restoring from an iTunes backup. This method is useful when you have a backup stored on your Mac, and you want to recover data selectively or restore your device to a specific state in the past. Keep in mind that restoring from a backup replaces your current data with the data from the selected backup, so any data created or modified after the backup date will be lost.

Part 3. Best iPhone Trash Recovery Tool: Recover Permanently Deleted Data without Backup

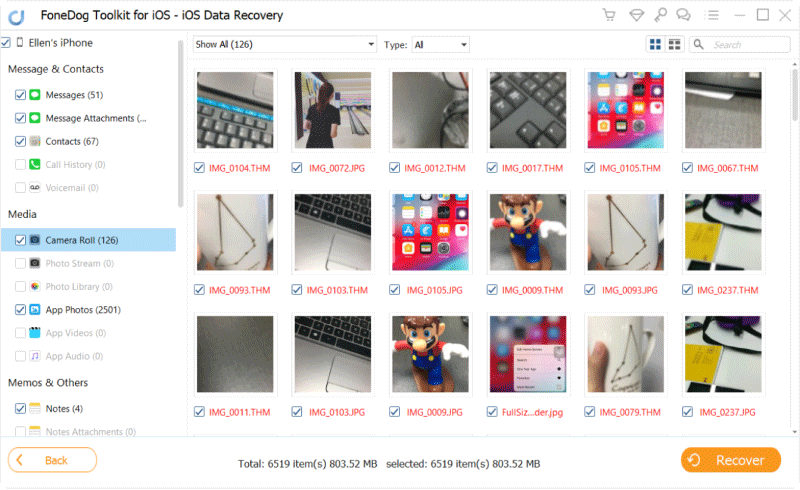
When it comes to iPhone trash recovery, having a reliable and efficient tool at your disposal is crucial. FoneDog iOS Data Recovery is recognized as one of the best options for recovering lost or deleted data on iOS devices. In this section, we'll provide an overview of FoneDog iOS Data Recovery and outline the general steps to recover your data.

FoneDog iOS Data Recovery is a user-friendly and powerful iPhone 15-supported software designed to help you retrieve lost or deleted data from your iPhone, iPad, or iPod Touch. It supports a wide range of data types, including photos, videos, messages, contacts, notes, and more. Whether you've lost data due to accidental deletion, iOS updates, factory resets, or other reasons, FoneDog iOS Data Recovery offers a reliable solution.

iOS Data Recovery Recover photos, videos, contacts, messages, call logs, WhatsApp data, and more. Recover data from iPhone, iTunes and iCloud. Compatible with latest iPhone and iOS. Free Download Free Download FoneDog iOS Data Recovery

Steps to Recover Data Using FoneDog iOS Data Recovery:

  1. Download and Install FoneDog iOS Data Recovery on your computer. It's available for both Windows and macOS.
  2. After installation, launch it on your computer.
  3. Use a USB cable to connect your iPhone to the computer. The software should detect your device automatically.
  4. FoneDog iOS Data Recovery offers several recovery modes, such as "Recover from iOS Device," "Recover from iTunes Backup," and "Recover from iCloud Backup." Choose the mode that suits your situation. For trash recovery, "Recover from iOS Device" is typically the choice.
  5. Click on the "Start Scan" button to initiate the scanning process. The software will scan your iPhone for deleted data, including items that may have been moved to the trash.
  6. Once the scan is complete, you'll see a list of recoverable items. You can preview the data to ensure it's what you want to recover. Select the items you wish to restore.
  7. After selecting the data, click the "Recover" button. Choose a location on your computer to save the recovered files.
  8. Once the recovery process is finished, you can access the recovered data on your computer. It's recommended to transfer the data back to your iPhone if that's your intention.

iPhone Trash Recovery: Recover Permanently Deleted Data

People Also ReadHow to Recover/Retrieve Deleted Text Messages on iPhoneHow to Recover Deleted Photos from iPhone 11/XS/XR/X/8

FoneDog iOS Data Recovery simplifies the process of recovering lost or deleted data from your iPhone. Whether you're dealing with data that was moved to the trash or data lost in other ways, this tool offers a straightforward solution. Just follow the steps outlined above to retrieve your valuable information.

Free DownloadFree Download

Leave a Comment

Comment

Comment ()
author image

Nathan E. Malpass

iPhone/Android Devices’ Maintenance Expert

Staying home, listening to music, writing tech articles

Many people asked me to repair their mobile phones so I have a lot of experience in mobile phone repair, and I know a lot about Android or Apple phones.

iOS Data Recovery logo

iOS Data Recovery

3 Methods to recover your deleted data from iPhone or iPad.

Free Download Free Download

How Do You Like This Article?

Check icon/ Check icon

INTERESTINGDULL

Check icon/ Check icon

SIMPLEDIFFICULT

Thank you! Here' re your choices:

Rate This Article: Excellent

Rating: 4.6 / 5 (based on 102 ratings)

iOS Data Recovery logo

iOS Data Recovery

3 Methods to recover your deleted data from iPhone or iPad.

Free Download Free Download

FoneDog uses cookies to ensure you get the best experience on our website. Click here to learn more.