FoneDog Screen Recorder
FoneDog Screen Recorder
Special Offer
Special Offer


By Nathan E. Malpass, Last updated: October 25, 2023
In our increasingly digital world, USB drives have become indispensable tools for data storage and transfer. Whether it's important work documents, cherished family photos, or vital project files, we rely on these compact devices to keep our data safe and accessible.
But what happens when you accidentally delete files from your USB drive? Panic may set in, but fear not! With the right knowledge and tools, you can recover deleted files from USB drives and prevent data loss nightmares.
In this comprehensive guide, we will take you on a journey through the process of USB file recovery. We'll cover various methods, from simple and user-friendly solutions to more advanced techniques, ensuring that you have the best chance of rescuing your lost data.
So, whether you've accidentally deleted files or your USB drive has encountered an unexpected error like failing to format your USB properly, follow along as we equip you with the skills to become a USB file recovery expert. Let's get started on the path to rescuing your invaluable data.
Part #1: How to Recover Deleted Files from USB DrivesPart #2: The Best Tool to Recover Deleted Files from USB: FoneDog Data RecoverySummary
When you've accidentally deleted important files from your USB drive, panic may be your initial reaction. However, before you lose hope, know that Windows offers a built-in feature that can help recover deleted files – the "Previous Versions" tab on properties.
This method works if you've enabled System Restore on your computer and if you have created restore points in the past. Here's how to use this method step by step to recover deleted files from USB:
Step #1: Plug in the USB Drive
Insert your USB drive into your computer's USB port, ensuring it's recognized by your system.
Step #2: Locate the Deleted Folder or File
Navigate to the folder or location on your USB drive where the deleted file or folder was originally located.
Step #3: Right-Click on the File or Folder
Right-click on the folder or file that you want to recover. In the context menu that appears, select "Properties".
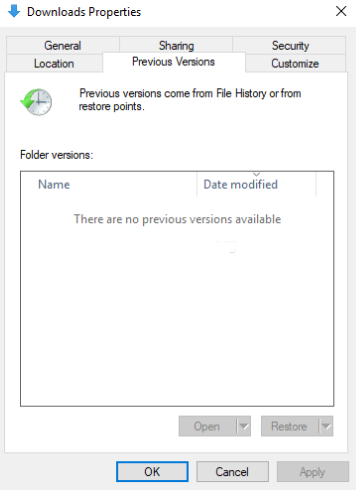
Step #4: Open the Previous Versions Tab
In the Properties window, you'll find several tabs at the top. Click on the "Previous Versions" tab to access a list of available restore points.
Step #5: Select a Previous Version
In the "Previous Versions" tab, you'll see a list of previous versions of the folder or file. These are snapshots taken by Windows when a restore point was created. Select the version of the file or folder that you want to recover.
Step #6: Restore the Previous Version
After selecting the desired previous version, click the "Restore" button. Windows will ask for confirmation; click "Restore" again to initiate the recovery process.
Step #7: Check the Recovered File or Folder
Once the restoration is complete, navigate back to the original folder location on your USB drive. You should find the deleted file or folder restored to its previous state.
Using the "Previous Versions" tab on properties is a handy way to recover deleted files from your USB drive, but it relies on the availability of restore points created by Windows. If you haven't enabled System Restore or if no suitable restore points exist, don't worry. In the next sections, we'll explore alternative methods for USB file recovery, ensuring you have multiple options at your disposal to rescue your valuable data.
If the "Previous Versions" method didn't yield the results you were hoping for or if you're using a Windows 10 or later system, you can turn to a powerful built-in tool called "Windows File Recovery". This tool is specifically designed for file recovery in Windows and can be a lifesaver when trying to recover deleted files from a USB drive. Here's how to use it:
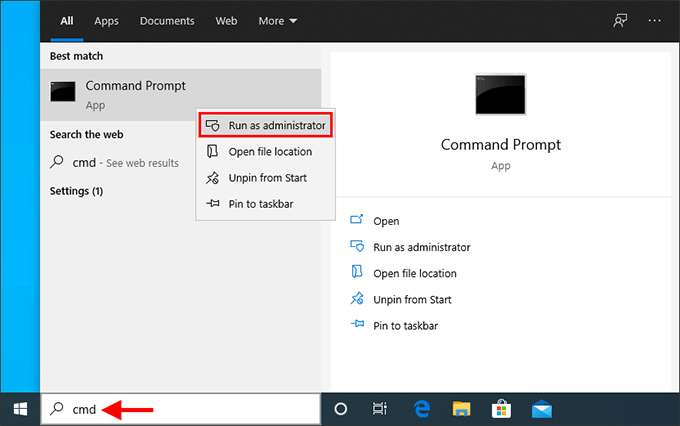
Step #1: Open the Command Prompt as Administrator
To start, open the Command Prompt with administrative privileges. You can do this by typing "Command Prompt" or "cmd" into the Windows search bar, right-clicking on it, and selecting "Run as administrator".
Step #2: Install Windows File Recovery
In the Command Prompt window, type the following command and press Enter:
winfr source-drive: destination-drive: [/switches]
Replace "source-drive" with the drive letter of your USB drive (e.g., F:), and replace "destination-drive" with the drive letter where you want to save the recovered files. You can also specify optional switches for more advanced recovery options.
Step #3: Choose a Recovery Type
Windows File Recovery offers three recovery modes:
To use the default recovery mode, simply press "Y" when prompted.
Step #4: Locate and Restore Deleted Files
Windows File Recovery will now scan your USB drive for recoverable files. This process may take some time depending on the drive's size and your USB drive's performance.
Step #5: Review and Save Recovered Files
Once the scanning process is complete, you'll see a list of recoverable files with their original paths. Carefully review the list, select the files you want to recover, and press "Y" to confirm their recovery.
Step #6: Check the Recovered Files
Navigate to the destination drive specified in Step 2 to find the recovered files. Ensure that they are intact and accessible.
Using "Windows File Recovery" is a reliable method for recovering deleted files from your USB drive, especially if you're using Windows 10 or a later version. It offers more control and flexibility compared to the "Previous Versions" method and can often recover files that other methods might miss. If this method doesn't yield the desired results, don't worry; we have more techniques to explore in our quest to recover your valuable data from your USB drive.
If you prefer a more hands-on approach or if the previous methods didn't work for you, you can use Command Prompt (CMD) to recover deleted files from your USB drive. Here's a step-by-step guide to recover deleted files from USB using Command:
Step #1: Connect Your USB Drive
Ensure your USB drive is connected to your computer and recognized by your system.
Step #2: Open Command Prompt as Administrator
Type "Command Prompt" or "cmd" into the Windows search bar. Right-click on "Command Prompt" in the search results. Select "Run as administrator" to open CMD with administrative privileges.
Step #3: Navigate to the USB Drive
In the Command Prompt window, you need to navigate to your USB drive. The drive letter of your USB drive may vary, so you'll need to determine it. Type the following command and press Enter:
cd /d X:\
Replace "X" with the actual drive letter assigned to your USB drive.
Step #4: Run the CHKDSK Command
The CHKDSK (Check Disk) command can potentially recover lost or deleted files from a USB drive. Use this command with the following syntax:
chkdsk X: /f
Replace "X" with your USB drive's letter. The "/f" parameter instructs CHKDSK to fix any errors it finds.
Step #5: Check the Root Directory
After CHKDSK completes its scan and any necessary repairs, you can navigate to the root directory of your USB drive. Type the following command and press Enter:
dir
This will display a list of files and directories in the root of your USB drive.
Step #6: Recover Files
You can now try to locate and recover your deleted files. Use the "cd" command to navigate through folders and the "copy" command to copy files to another location on your computer. For example, if your deleted file was in a folder called "Documents," you could use:
cd Documents
copy filename.extension C:\DestinationFolder
Replace "filename.extension" with the name of your deleted file and its extension and "C:\DestinationFolder" with the desired destination on your computer.
Using Command Prompt to recover deleted files from a USB drive is a manual and potentially effective method. However, it requires some technical knowledge and careful navigation through directories. If this method doesn't provide the desired results, don't give up. We still have additional techniques to explore in our quest to recover your valuable data from your USB drive.
When it comes to USB file recovery, sometimes you need a dedicated and user-friendly tool to ensure the highest chances of success. FoneDog Data Recovery is one such tool that stands out as a powerful and reliable solution. In this part, we'll provide an overview of FoneDog Data Recovery and walk you through the steps to recover deleted files from your USB drive using this software.
Data Recovery
Recover deleted image, document, audio and more files.
Get deleted data back from computer (including Recycle Bin) and hard drives.
Recover loss data caused by disk accident, operation system crushes and other reasons.
Free Download
Free Download

FoneDog Data Recovery is a comprehensive data recovery tool designed to help you recover deleted files from various storage devices, including USB drives. Whether your files were deleted accidentally, lost due to formatting, or became inaccessible due to corruption, FoneDog Data Recovery is equipped to handle a wide range of data loss scenarios.
Key Features of this USB partition software:
Now, let's go through the steps to recover deleted files from USB drive using FoneDog Data Recovery:
Visit the FoneDog website and download the software for your respective operating system (Windows or Mac). Follow the installation instructions to install the software on your computer.
After installation, launch FoneDog Data Recovery on your computer.
Plug in your USB drive to ensure it's recognized by the software.
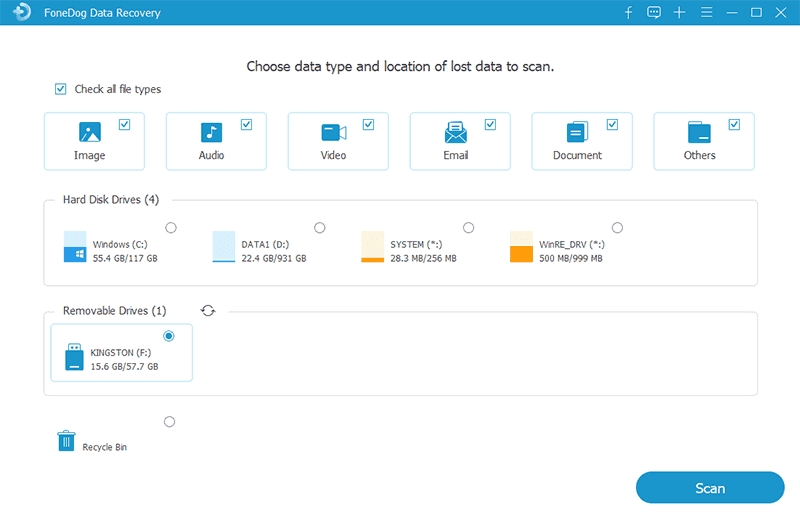
In the FoneDog Data Recovery interface, you'll be prompted to select the types of files you want to recover (e.g., photos, videos, documents). Next, choose your USB drive from the list of available drives.
Click the "Scan" button to initiate a scan of your USB drive. The software will perform both quick and deep scans to locate deleted files.
Once the scan is complete, you'll see a list of recoverable files. Preview the files to verify their integrity. Select the files you want to recover, and then click the "Recover" button.
Choose a location on your computer where you want to save the recovered files. It's recommended not to save them back to the same USB drive to avoid overwriting data.
Click "Recover" once more to complete the recovery process. FoneDog Data Recovery will save the selected files to your specified location.
FoneDog Data Recovery offers a straightforward and effective solution to recover deleted files from your USB drive. Its user-friendly interface, extensive file type support, and deep scanning capabilities make it a top choice for data recovery tasks. With this tool in your arsenal, you can confidently retrieve your valuable data from a USB drive, ensuring that your important files are never lost for good.
People Also ReadA Complete Guide On The USBFix Review, Costs, And Its Best AlternativeA Complete And Easy Solution To Do A USB Reset That’s Not Working
Choosing to recover deleted files from USB is a task that can be accomplished using various methods and tools. In this comprehensive guide, we've explored multiple approaches including FoneDog Data Recovery software to help you retrieve your valuable data.
Each of these methods offers a different approach to USB file recovery, catering to various scenarios and user preferences. Whether you prefer using built-in Windows features or third-party software like FoneDog Data Recovery, you now have the tools and knowledge to recover deleted files from your USB drive.
Remember to act quickly to improve your chances of successful recovery and always save the recovered files to a different location to avoid overwriting data. With these techniques at your disposal, you can rescue your important data and prevent data loss nightmares.
Leave a Comment
Comment

iPhone/Android Devices’ Maintenance Expert
Staying home, listening to music, writing tech articles
Many people asked me to repair their mobile phones so I have a lot of experience in mobile phone repair, and I know a lot about Android or Apple phones.
Data Recovery
FoneDog Data Recovery recovers the deleted photos, videos, audios, emails, and more from your Windows, Mac, hard drive, memory card, flash drive, etc.
Free Download Free DownloadHot Articles
 /
/
INTERESTINGDULL
/
SIMPLEDIFFICULT
Thank you! Here' re your choices:
Excellent
Rating: 4.7 / 5 (based on 100 ratings)
