FoneDog Screen Recorder
FoneDog Screen Recorder
Special Offer
Special Offer


By Adela D. Louie, Last updated: January 2, 2020
Thinking of doing a partition on your USB drive? Surely, you are now looking for the best USB partition tool there is, right? Well, you have come to the right place as we are about to show you the best USB partition tool that you can use.
There are times wherein for you to be able to utilize the benefit of your USB device, you will be needing to partition your drive. This way, you will be able to organize your files which you will be able to access easily. So if you are looking for the best USB partition tool that you can use, then that is what we are going to show you in this post.
Part 1: How to Recover Accidentally Deleted Files From a USB Partition ToolPart 2: The Other Top 3 USB Partition ToolsPart 3: Conclusion
Now there can be instances wherein you may lose your data due to accidentally deletion when you partition your USB. So, with that, you will be needing a tool that can help you recover those files that you have lost. And there are tools that you can use for you to get back those data.
And when it comes to recovering data that is you lost on your computer, the FoneDog Data Recovery software is the one that you can trust.
The FoneDog Data Recovery software can help you recover any lost data from an accidental when you use a USB partition tool like your photos, audios, emails, and documents. You can also recover data coming from the hard drive you are using, SD card, and directly on your Windows 10, Windows 7, Windows 8, and Windows XP and also from your Mac computer.
Data Recovery
Recover deleted image, document, audio and more files.
Get deleted data back from computer (including Recycle Bin) and hard drives.
Recover loss data caused by disk accident, operation system crushes and other reasons.
Free Download
Free Download

The FoneDog Data Recovery software is super easy to navigate as well because of its simple interface and it is very safe to use as well because your existing data will not be affected during the recovery process. And to show you more about the FoneDog Data Recovery software here is a quick step process that you can easily follow.
From the moment that you have installed and run the FoneDog Data Recovery software on your computer, go ahead and head to its main interface. There, you will then see a list of the data type that you can recover. So, from there, just go ahead and click on the type of data that you want to restore.
Also, on the same interface, go ahead and choose your USB that you want to restore your data from. Here, you have to see to it that the connection of your USB drive and your PC is stable to avoid any interruptions.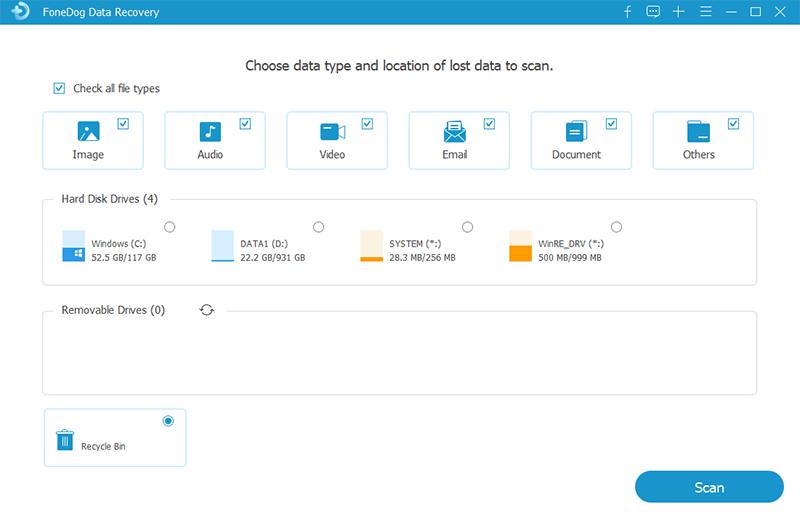
And once that you have chosen the file type and your USB device, go ahead and click the Scan key. The FoneDog Data Recovery software will then start scanning your USB drive. But before the scanning process pushes through, you have two options on how you want to make the scanning process. You can choose from Quick Scanning and Deep Scanning.
If you are going to select the Deep Scan option, you have to wait until the process is complete because this may take a longer time than the usual scanning time.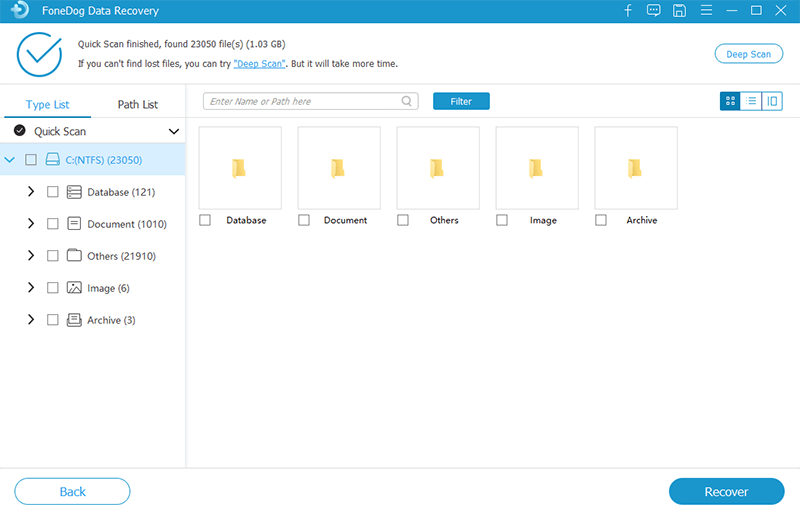
And after the success of the scanning process takes place, you can then go and check out the files that were scanned by the FoneDog Data Recovery. Doing it this way will help you to ensure you are going to get the right data to restore. You can pick on them one at a time or you can use the search field if you have anything in mind that you are aiming to restore.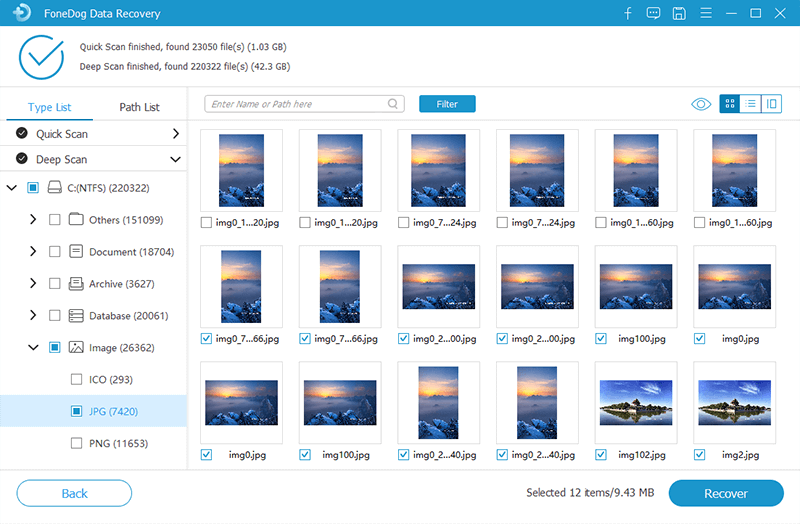
And once that you are done choosing all the files that you want to get back, then you can then proceed and click on the Recover button. And after doing that, the FoneDog Data Recovery program will then begin in recovering those files that you have chosen so all you need to do now is to wait for it to complete.
Nowadays, there is a lot of USB partition tool that you can use that is available in the market. But only some of them are the best tool that you can use for you to partition your USB device. And with that, here are the top three USB partition tool that you might want to consider.
Do you want the process of partitioning your USB to be quick? If your answer is Yes, then the MiniTool Partition Wizard is for you. This tool comes with a user-friendly interface that is perfect for those who are not that into technical stuff. This tool can be used for you to do some regular functions such as deleting, moving, formatting, copying, resizing, splitting, and also merging your partitions.
Aside from that, the MiniTool Partition Wizard is not like any ordinary USB partition tool. It comes with some extra features that can be helpful to you such as the following.
Pros:
Cons:
People Also ReadDifferent Efficient Ways on How to Partition A USB DriveMac Resize Partition Without Erasing Using Disk Utility
They say that the best thing in life comes for free. So when it comes to the USB partition tool, you can rely on using the EaseUS partition. This tool is said to be straight forward and easy to use. It let the partition to expand, shrink, and also turns on the password creation for this tool.
This tool will also allow you to make your password protection for the partition that you made. You can also make your system drive a larger bootable one, you can combine partitions, and you can copy Windows to another hard drive.
Pros:
Cons:
This tool is another USB partition tool that is considered to be one of the easiest to use the tool. And with this, you will be able to make a new partition from unallocated space and can also organize those existing partitions that you have by changing their size and as well as by having them formatted. It is also compatible with all types of file system and then it can manage its conventional files such as FAT, HFST, EXT 2/3/4, and NTFS.
This USB partition tool also comes with great features for you to convert from MBR and FAT32 partitioning, GPT, edit booth records, and more.
Pros:
Cons:
Data Recovery
Recover deleted image, document, audio and more files.
Get deleted data back from computer (including Recycle Bin) and hard drives.
Recover loss data caused by disk accident, operation system crushes and other reasons.
Free Download
Free Download
So as you can see, those top 3 USB partition tools are the ones that you can trust when it comes to partitioning your USB drive. But when in the event that you lose your data because of the process, then you can use the FoneDog Data Recovery software. It is safe, easy, and quick to use.
Leave a Comment
Comment

Tech Website Writing /Content Optimization
Singing, smiling, surprising every day!
So as a technical writer, it is my duty to gather effective and reliable solutions to answer questions on how to deal with the issues they are having with their devices.
Data Recovery
FoneDog Data Recovery recovers the deleted photos, videos, audios, emails, and more from your Windows, Mac, hard drive, memory card, flash drive, etc.
Free Download Free DownloadHot Articles
 /
/
INTERESTINGDULL
/
SIMPLEDIFFICULT
Thank you! Here' re your choices:
Excellent
Rating: 4.7 / 5 (based on 61 ratings)
