FoneDog Screen Recorder
FoneDog Screen Recorder
Special Offer
Special Offer


By Gina Barrow, Last updated: December 7, 2019
USB drives are portable. They are our handy go-to for extending our data. People love using USB drives because they are small but powerful. Sometimes because of the large capacity of the USB drive, there is a need to partition it. You may also want to partition the USB drive because there is a RAW file system or an unsupported file system.
Regardless of your reason is behind the need for USB drive partition, we are here for you. Keep your concentration and read on as we show you the different ways on how to partition a USB drive.
Part 1 - How to Partition A USB Drive in WindowsPart 2 - How to Partition A USB Drive on MacPart 3 - Best Way to Recover Data from USB Drive After Partition Part 4 - Wrapping Up
We use Disk Management in Windows to manage and create partitions in drives. Before, it was hard to partition USB and micro SD cards using Disk Management. Today, it’s a different story. Windows have varying ways of identifying USB drives. If you are using the common USB drives, Windows will see it as Basic. On the other hand, if you use USB sticks; it will be seen as Removable. Here is how to partition a USB drive. Follow these steps to create a second partition on the USB drive:
Doing a partition on the USB drive does not take too long. Just follow these steps and you can enjoy a USB drive that is divided and accessible.
Mac offers a fairly simple process in partitioning a USB drive. With the use of Disk Utility, you can divide and resize partitions easily. Here are the steps to follow in USB drive partition on Mac:
Before doing the steps mentioned above, make sure that there are important files or data in your USB drive. It is also best to keep the data backed up because the files will be deleted. The backup will help recover deleted data.
One of the recommended steps you can do before partitioning a USB drive is creating a backup. If all else fails, the backup will be there to revive all that is lost along the process of partition. If you lose critical data were left out during the backup, FoneDog Data Recovery is your best friend that will help you find the lost or deleted data you need back. Here’s how:
Search, download, and install FoneDog Data Recovery on your computer. Launch the FoneDog Data Recovery software.
Data Recovery
Recover deleted image, document, audio and more files.
Get deleted data back from computer (including Recycle Bin) and hard drives.
Recover loss data caused by disk accident, operation system crushes and other reasons.
Free Download
Free Download

Do not fear if you left out data in the partitioning process, FoneDog Data Recovery will recover all lost or deleted data fast and securely. Select the source and the type of file to begin the scan of deleted files.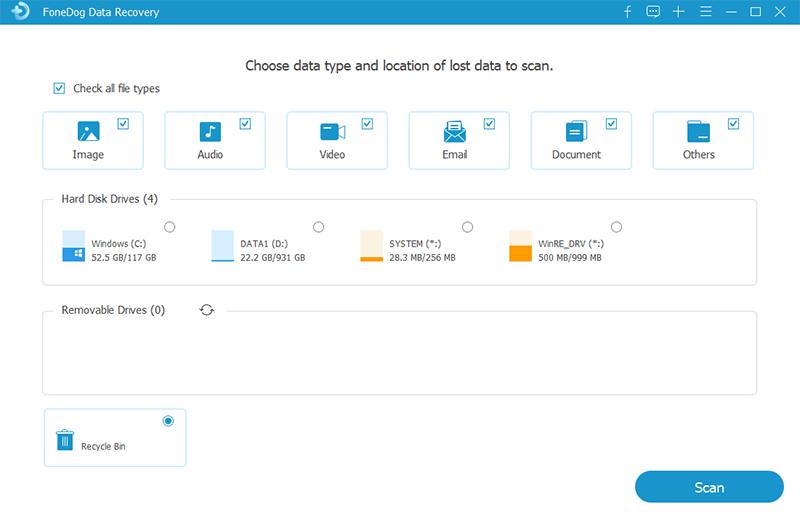
A deleted file list will display after the scan. Choose the data you need and click “Recover.” Wait for the process of recovery to finish.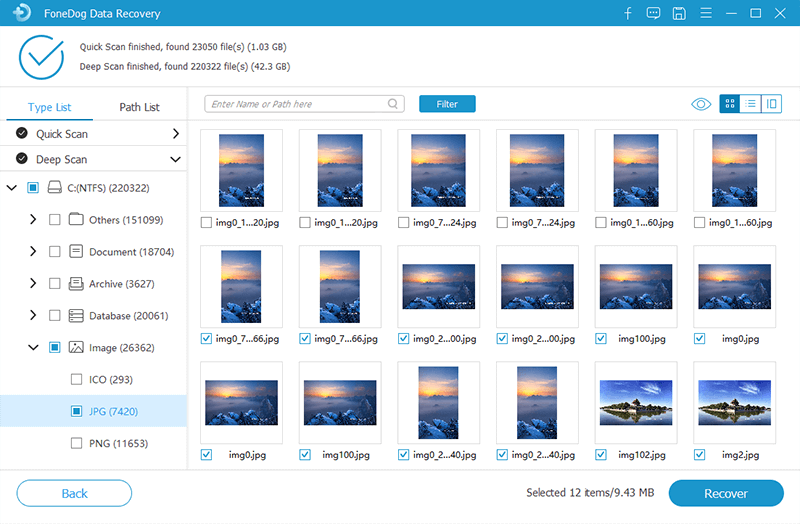
When it comes to data recovery, FoneDog Data Recovery is the best solution. It does not matter if you lost or deleted data. No matter what storage medium you are using, FoneDog Data Recovery is compatible to work with. Everything you have in your USB drive will be recovered fast and with a high success rate!
Choose FoneDog Data Recovery for safe and reliable data recovery. With FoneDog Data Recovery, you are 100% guaranteed that you will revive all data quickly and securely. Expect no damage or alterations on your data. Get it back in the original way you had it.
We hope that you now know how to partition a USB drive. USB drive partition is a great method. There are numerous wonders on doing USB drive partition. From managing, splitting, and keeping your data separate from one another; it really serves you well. Another positive thing about it is how it frees up more space.
There are many good things you can enjoy by doing USB drive partitions. But before you dive into the process, make sure you backup your files. We know how valuable data is. Make it a habit to back up and save so there will be no regrets in the end.
If in case the unavoidable happens and data is lost or deleted, you always have FoneDog Data Recovery! For premium and professional data recovery, choose FoneDog Data Recovery. It is a user-friendly software that is easy as Launch, Scan, Recover. With 3 simple steps, your data will be as good as it is never gone. Choose FoneDog Data Recovery and discover awesome data recovery capabilities!
Leave a Comment
Comment

Technical/Creative Writer
Kitchen, my safe space; black, my favorite color
Was a Technical Specialist for a while, troubleshooting Smartphone and Software-related issues until a writing stint caught my attention.
Data Recovery
FoneDog Data Recovery recovers the deleted photos, videos, audios, emails, and more from your Windows, Mac, hard drive, memory card, flash drive, etc.
Free Download Free DownloadHot Articles
 /
/
INTERESTINGDULL
/
SIMPLEDIFFICULT
Thank you! Here' re your choices:
Excellent
Rating: 4.6 / 5 (based on 88 ratings)
