FoneDog Screen Recorder
FoneDog Screen Recorder
Special Offer
Special Offer


By Nathan E. Malpass, Last updated: July 18, 2025
A corrupted hard drive can result from various factors, such as power surges, physical damage, bad sectors, or software issues. When your hard drive becomes inaccessible or exhibits strange behavior, it's essential to act swiftly to prevent further data loss. We'll walk you through a range of recovery strategies, from DIY methods that you can try at home to more advanced techniques that may require professional assistance.
So, whether you're a tech-savvy individual or a novice, join us on this journey to explore the best practices, software solutions, and expert advice for corrupted hard drive recovery. By the end of this article, you'll be equipped with the knowledge to tackle this challenging situation and, hopefully, save your valuable data.
Part 1. Recover Data from Corrupted Hard Drive on MacPart 2. Recover Data from Corrupted Hard Drive on WindowsPart 3. The Best Too to Recover Data from Corrupted Hard DrivePart 4. Summary
When faced with a corrupted hard drive on your Mac, one of the first steps you should consider is using the built-in tool called Disk Utility. Disk Utility is a powerful utility that can help repair minor file system and disk errors, making it a handy tool for recovering lost files on Mac and getting your hard drive back in working order. Here's how you can use Disk Utility for corrupted hard drive recovery:
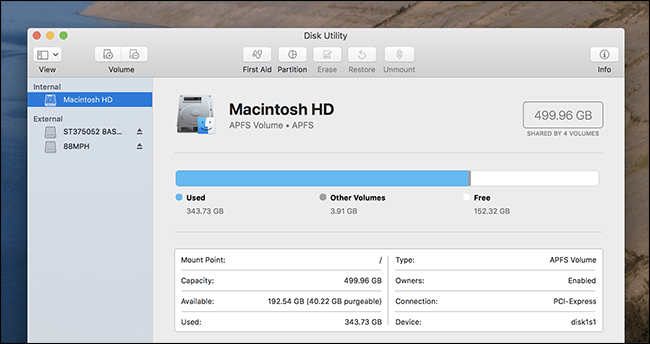
Using Disk Utility is an excellent first step for addressing minor issues with a corrupted hard drive. However, if your drive has suffered from severe corruption or hardware damage, you might need to explore other methods and consider seeking professional help. In the next sections, we'll delve into more advanced techniques and software solutions to recover data from a corrupted Mac hard drive.
If Disk Utility doesn't resolve your corrupted hard drive issues on your Mac, you can turn to the Terminal for more advanced data recovery methods. The Terminal allows you to interact with your Mac's file system and execute powerful commands to attempt data recovery. Here's how you can use the Terminal for this purpose:
Using the Terminal for corrupted hard drive recovery gives you more control and flexibility over the recovery process. However, it's crucial to exercise caution, as incorrect commands or operations can further damage your data. Always make sure to back up any critical data and consult with a professional if you're uncertain about the steps involved. In the subsequent sections of this article, we'll explore additional methods and software solutions to help you recover data from your corrupted Mac hard drive.
If you're dealing with a corrupted hard drive on a Windows computer, one of the initial steps you can take is to utilize the Disk Management Utility, a built-in Windows tool. Disk Management allows you to manage and troubleshoot your storage devices, which includes repairing minor file system issues and potentially recovering data from a corrupted drive. Here's how you can use Disk Management:
Disk Management is a good starting point for addressing minor corruption or file system issues on a Windows hard drive. However, if your drive experiences more severe corruption, physical damage, or if you're unable to recover your data using this method, there are other advanced approaches and third-party data recovery tools you can consider. In the upcoming sections, we'll delve into these alternatives to help you salvage your precious data from a corrupted Windows hard drive.
If Disk Management doesn't resolve your corrupted hard drive issues on a Windows system, you can turn to the Command Prompt for more advanced data recovery methods. The Command Prompt allows you to execute specific commands to attempt data recovery, especially when dealing with issues that Disk Management cannot handle. Here's how you can use the Command Prompt for this purpose:
The Command Prompt offers you a higher level of control when dealing with corrupted hard drives, making it a valuable tool for data recovery. However, exercise caution when using command-line tools, as incorrect commands can potentially worsen the situation.
Always make sure to back up essential data before attempting any recovery procedures. If the drive corruption is extensive, or if you're not confident in your command-line skills, it's advisable to consult with a data recovery expert who can assist in more complex recovery scenarios. In the following sections of this article, we'll explore additional data recovery methods and third-party tools to help you recover data from a corrupted Windows hard drive.
When it comes to comprehensive and user-friendly corrupted hard drive recovery, FoneDog Data Recovery stands out as an excellent choice for both Windows and Mac users. In this section, we will provide an overview of FoneDog Data Recovery, its key features, and the steps to recover data from a corrupted hard drive using this tool.
FoneDog Data Recovery is a powerful and versatile hard drive recovery software designed to retrieve lost, deleted, or corrupted files from various storage devices, including hard drives, SSDs, USB drives, memory cards, and more. It's known for its user-friendly interface and effectiveness in recovering a wide range of file types, making it a go-to solution for individuals and professionals facing data loss situations.
Data Recovery
Recover deleted image, document, audio and more files.
Get deleted data back from computer (including Recycle Bin) and hard drives.
Recover loss data caused by disk accident, operation system crushes and other reasons.
Free Download
Free Download

Follow these steps to recover data from a corrupted hard drive using FoneDog Data Recovery:
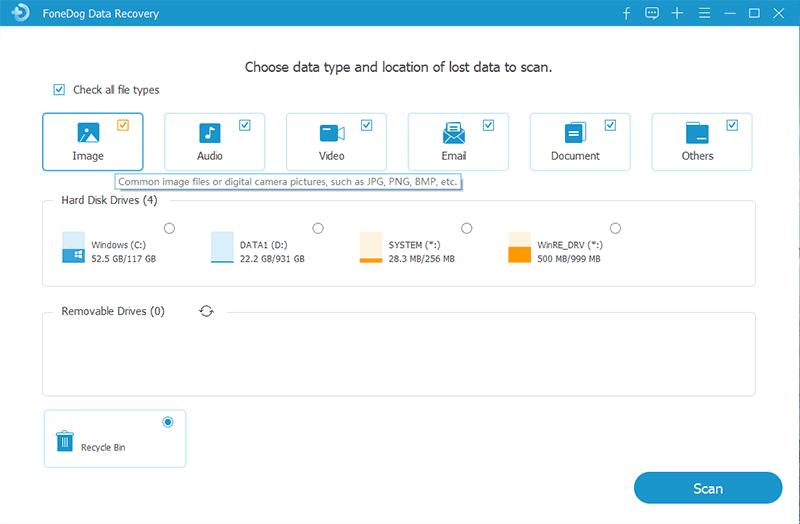
FoneDog Data Recovery simplifies the process of recovering data from corrupted hard drives, making it an excellent choice for users who want a straightforward and effective solution. Whether you're dealing with accidental deletions, formatting errors, or severe drive corruption, FoneDog can help you retrieve your valuable files with ease.
Dealing with a corrupted hard drive can be a stressful experience, but with the right tools and methods, you can often recover your valuable data. In this article, we explored various corrupted hard drive recovery methods for both Mac and Windows systems.
For Mac users, we discussed using Disk Utility as a first step to repair minor file system issues. When that's not enough, the Terminal provides a more advanced approach to data recovery, offering greater control over the process.
For Windows users, we looked at using the Disk Management Utility, a built-in tool to manage and repair storage devices. When Disk Management falls short, the Command Prompt allows for more advanced recovery options through specific commands.
Additionally, we introduced a comprehensive and user-friendly data recovery tool, FoneDog Data Recovery Software, suitable for both Mac and Windows. With its wide file format support, versatile device compatibility, and intuitive interface, FoneDog simplifies the data recovery process, making it accessible to users of all levels of expertise.
In summary, when facing a corrupted hard drive, start with the built-in tools like Disk Utility (Mac) or Disk Management (Windows). If those methods fail or the corruption is severe, you can turn to more advanced options like the Terminal (Mac) or Command Prompt (Windows). For a user-friendly and effective solution, FoneDog Data Recovery Software offers a comprehensive tool to recover your data from corrupted hard drives.
Remember to exercise caution, back up your data before attempting any recovery methods, and seek professional assistance if you're unsure about the steps involved. Your data is valuable, and with the right approach, you can often salvage it even from a corrupted hard drive.
Leave a Comment
Comment

iPhone/Android Devices’ Maintenance Expert
Staying home, listening to music, writing tech articles
Many people asked me to repair their mobile phones so I have a lot of experience in mobile phone repair, and I know a lot about Android or Apple phones.
Data Recovery
FoneDog Data Recovery recovers the deleted photos, videos, audios, emails, and more from your Windows, Mac, hard drive, memory card, flash drive, etc.
Free Download Free DownloadHot Articles
 /
/
INTERESTINGDULL
/
SIMPLEDIFFICULT
Thank you! Here' re your choices:
Excellent
Rating: 4.6 / 5 (based on 83 ratings)
