FoneDog Screen Recorder FoneDog Screen Recorder
Special Offer Special Offer
Only Only
$4.49 $4.49
to get a ONE-month license to get a ONE-month license
Sale ends in xx days Sale ends in xx days
Buy Now
sale

[Quick Guide] How to Recover Deleted TV Recordings

By Nathan E. Malpass, Last updated: March 6, 2024

Whether it's a memorable sporting event, a favorite TV series, or a once-in-a-lifetime moment, the loss can be devastating. But fear not! In this comprehensive guide, we'll delve into the intricacies of how to recover deleted TV recordings, providing you with the knowledge, especially a top recordings recovery tool needed to bring back those lost moments.

From understanding common causes of deletion to exploring advanced recovery methods, we're here to ensure that your favorite shows are never lost in the digital abyss again. Let's embark on a journey to unlock the lost and rediscover the joy of your treasured TV recordings.

Part #1: How to Recover Deleted TV Recordings on DirecTV Using DirecTV HistoryPart #2: How to Recover Deleted TV Recordings on SkyQ Using the Deleted FolderPart #3: How to Recover Deleted TV Recordings on TiVo DVR?Part #4: The Best Tool to Recover Deleted TV Recordings: FoneDog Data RecoverySummary

Part #1: How to Recover Deleted TV Recordings on DirecTV Using DirecTV History

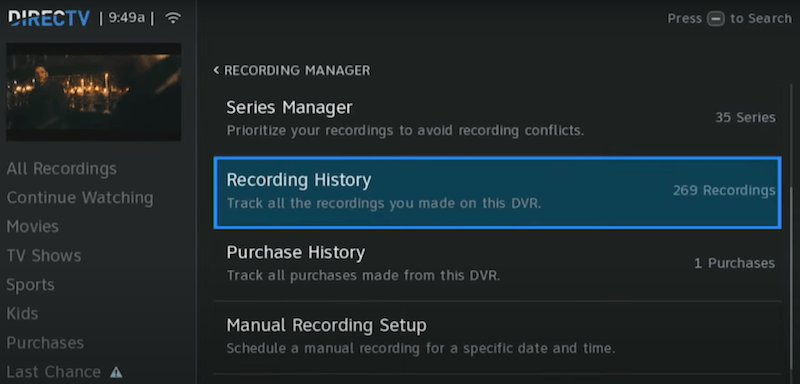
Accidentally deleting a TV recording can be a gut-wrenching experience, especially when it involves your favorite DirecTV shows. Fortunately, DirecTV comes equipped with a valuable feature that could be your ticket to reclaiming those lost moments – DirecTV History.

DirecTV History serves as a digital archive of your viewing activity, including a record of your recently watched channels and recordings. This feature can be a game-changer when it comes to recovering deleted TV recordings. To access DirecTV History, follow these simple steps:

  1. Navigate to the Main Menu: On your DirecTV remote, press the "MENU" button. This will bring up the main menu, providing you with various options.
  2. Select "History": Using the arrow keys on your remote, navigate to the "History" option in the main menu.

Recovering Deleted TV Recordings:

Now that you're in the DirecTV History section, you'll find a list of recently watched channels and recordings. Follow these steps on how to recover deleted TV recordings:

  1. Scroll through the History: Use the arrow keys on your remote to scroll through the DirecTV History. Look for the program or recording you accidentally deleted.
  2. Select the Deleted Recording: Once you've located the deleted recording, highlight it and press the "SELECT" button on your remote.
  3. Choose "Recover" or "Restore": In most cases, DirecTV will offer an option to recover or restore the deleted recording. Select this option, and the system will initiate the recovery process.
  4. Confirm the Recovery: DirecTV may ask for confirmation before proceeding with the recovery. Confirm your choice, and the system will work its magic to restore the deleted TV recording.

Important Tips:

  • Act Quickly: The effectiveness of DirecTV History in recovering deleted recordings often depends on how quickly you act. The longer you wait, the higher the chance that the system may overwrite the deleted data.
  • Check Available Storage: Before attempting to recover a deleted recording, ensure that your DirecTV DVR has sufficient storage space. If the storage is full, the recovery process may encounter issues.

Recover Deleted TV Recordings on DirecTV Using DirecTV History

In this first part of our series on recovering deleted TV recordings, you've learned the basics of using DirecTV History to reclaim your lost moments. Stay tuned for the next installment, where we'll explore additional methods and tools to ensure a comprehensive approach to recovering deleted TV recordings.

Part #2: How to Recover Deleted TV Recordings on SkyQ Using the Deleted Folder

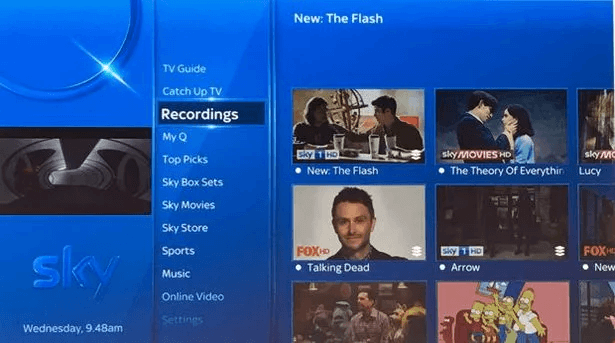
Losing a cherished TV recording on Sky Q can be disheartening, but fear not – Sky Q provides a safety net in the form of the Deleted Folder. In this segment of our guide, we'll walk you through the steps to recover deleted TV recordings using the Deleted Folder feature.

Sky Q's Deleted Folder functions as a temporary holding space for recordings that you've recently deleted. Unlike some systems where once deleted, recordings are gone forever, Sky Q gives you a chance to rescue them. Here's how to access the Deleted Folder:

  1. Navigate to the Recordings: Using your Sky Q remote, navigate to the "Recordings" section on the main menu. This is where you'll find the Deleted Folder.
  2. Enter the Deleted Folder: Within the Recordings section, locate and select the "Deleted" or "Recently Deleted" option. This will take you to the Deleted Folder.

Once you're in the Deleted Folder, the way on how to recover deleted TV recordings is straightforward:

  1. Browse the Deleted Folder: Scroll through the Deleted Folder using your remote to find the recording you want to recover.
  2. Select Recording: Highlight the deleted recording you wish to recover, and press the appropriate button on your remote to initiate the recovery process. This button is typically labeled "Recover" or "Restore".
  3. Confirm the Recovery: Sky Q may ask for confirmation before proceeding with the recovery. Confirm your selection and the system will move the recording back to your main list of recordings.

Recover Deleted TV Recordings on SkyQ Using the Deleted Folder

Part #3: How to Recover Deleted TV Recordings on TiVo DVR?

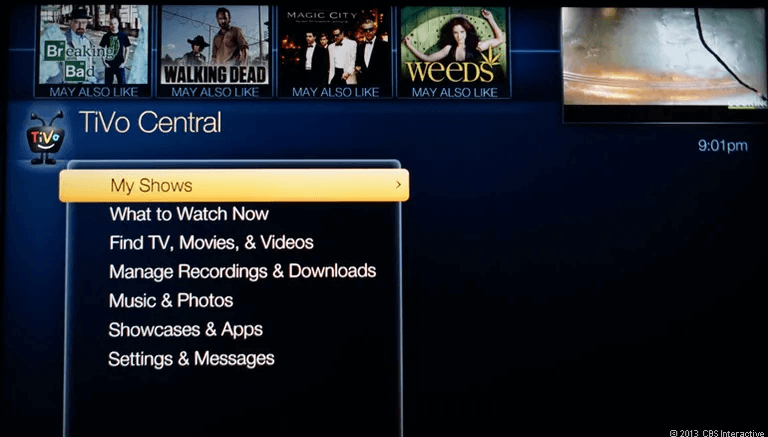
TiVo has been a stalwart in the DVR (Digital Video Recorder) landscape, offering users the ability to record and store their favorite TV shows. However, the sinking feeling that accompanies the accidental deletion of a cherished recording is all too familiar. Fear not, as TiVo provides options for recovering deleted TV recordings. In this segment, we'll guide you through the process.

TiVo DVR comes equipped with a Recently Deleted folder, akin to a digital recycle bin. This folder temporarily stores recordings that have been deleted, providing a grace period before they are permanently removed. Here's how to access it:

  1. Navigate to TiVo Central: Use your TiVo remote to navigate to the TiVo Central menu. This is the main hub for all TiVo functions.
  2. Select "My Shows": Within TiVo Central, locate and select the "My Shows" or "Now Playing" option. This will lead you to your list of recorded shows.
  3. Access Recently Deleted: Look for an option like "Recently Deleted" or "Deleted Items". Select this option to access the folder containing recently deleted recordings.

Once you're in the Recently Deleted folder, follow these steps on how to recover deleted TV recordings:

  1. Browse Deleted Recordings: Scroll through the Recently Deleted folder to find the recording you want to recover.
  2. Select the Recording: Highlight the deleted recording, and choose the appropriate option to recover it. This might be labeled as "Undelete" or "Recover".
  3. Confirm the Recovery: TiVo may prompt you to confirm your choice. Confirm the recovery, and the system will move the recording back to your main list of recorded shows.

Additional Tips:

  • Storage Consideration: Ensure that your TiVo DVR has enough available storage space to restore the deleted recording successfully.
  • Time Sensitivity: The Recently Deleted folder provides a limited time window before recordings are permanently removed. Act promptly to increase the chances of successful recovery.
  • Check TiVo Settings: Familiarize yourself with TiVo settings related to deleted recordings, as these can vary. Adjust the settings if necessary to align with your preferences.

Recover Deleted TV Recordings on TiVo DVR

With these steps, you can leverage TiVo's Recently Deleted folder to recover TV recordings that were mistakenly deleted. In the next part of our guide, we'll explore additional strategies and tools for a comprehensive approach to reclaiming lost TV moments on your TiVo DVR.

Part #4: The Best Tool to Recover Deleted TV Recordings: FoneDog Data Recovery

While built-in features like DirecTV History, Sky Q's Deleted Folder, and TiVo's Recently Deleted provide valuable recovery options, sometimes you need a more robust solution. FoneDog Data Recovery emerges as a powerful tool that goes beyond the capabilities of native features.

Data Recovery Recover deleted image, document, audio and more files. Get deleted data back from computer (including Recycle Bin) and hard drives. Recover loss data caused by disk accident, operation system crushes and other reasons. Free Download Free Download FoneDog Data Recovery

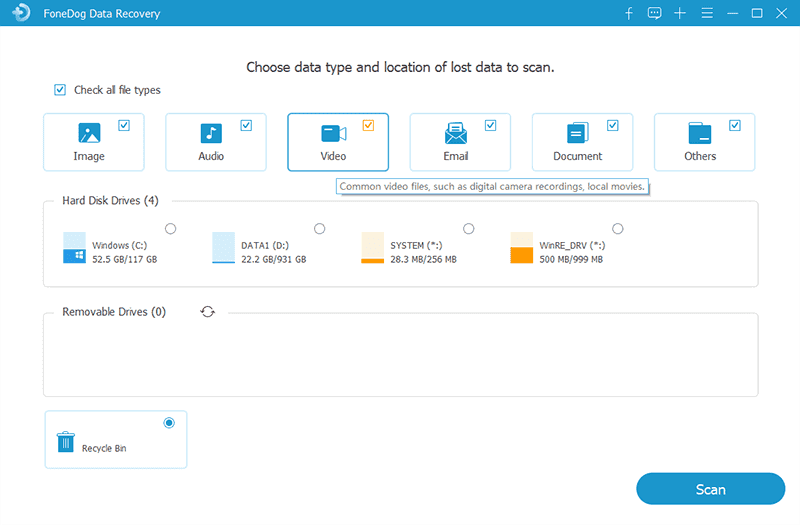
FoneDog Data Recovery is a comprehensive and user-friendly software designed to recover lost or deleted data from your laptop - Mac or Windows, plus DVRs, etc. It supports a wide range of file types, making it an ideal solution for reclaiming TV recordings that may not be recoverable through built-in features alone.

How to recover deleted TV recordings with FoneDog Data Recovery:

  1. Download and Install FoneDog Data Recovery: Start by downloading and installing FoneDog Data Recovery on your computer. Ensure that you download the version compatible with your operating system.
  2. Connect Your DVR Storage Device: Connect the storage device from your DVR to your computer. This could be an external hard drive, USB drive, or any other storage medium where the deleted TV recordings were initially stored.
  3. Launch FoneDog Data Recovery: Open the FoneDog Data Recovery software. Once launched, select the type of data you want to recover. In this case, choose the option related to video or media files.
  4. Select the DVR Storage Device: FoneDog Data Recovery will detect connected storage devices. Choose the one associated with your DVR and click "Next" to proceed.
  5. Scan for Deleted TV Recordings: The software will initiate a scan of the selected storage device, searching for deleted or lost TV recordings. The scanning process may take some time, depending on the size of the storage.
  6. Preview and Select Recordings for Recovery: Once the scan is complete, FoneDog Data Recovery will display a list of recoverable files. Preview the files to identify the deleted TV recordings you want to recover. Select the desired recordings.
  7. Recover Deleted TV Recordings: After selecting the recordings, click on the "Recover" button. Choose a location on your computer to save the recovered files. Avoid saving them back to the original DVR storage device to prevent overwriting.
  8. Confirm and Complete the Recovery: Confirm your selection, and FoneDog Data Recovery will proceed with the recovery process. Once completed, you'll find your recovered TV recordings in the chosen location on your computer.

Recover Deleted TV Recordings: FoneDog Data Recovery

Important Tips:

  • Act Quickly: To increase the chances of successful recovery, use FoneDog Data Recovery as soon as possible after realizing the recordings are deleted.
  • Storage Consideration: Ensure that the destination where you save the recovered files has sufficient space.
  • Regular Backups: Implement regular backups to prevent data loss in the future. FoneDog Data Recovery can also be a handy tool for restoring backups.

By following these steps, you can leverage FoneDog Data Recovery as a powerful ally in recovering deleted TV recordings that might be challenging to restore through standard DVR features alone. Stay tuned for the final part of our guide, where we'll offer tips on preventing accidental deletions and ensuring the longevity of your TV recordings.

People Also ReadHow Do You Recover Deleted Files from a USB Flash DriveGuide on How to Recover Deleted Photos on Mac

Summary

How to recover deleted TV recordings? In summary, the process of recovering deleted TV recordings involves a strategic combination of both the inherent features provided by your DVR service and the deployment of specialized recovery tools such as FoneDog Data Recovery.

For users of DirecTV, the DirecTV History feature proves to be an invaluable resource, granting access to a detailed record of recently watched channels and an avenue for the retrieval of inadvertently deleted recordings.

Leave a Comment

Comment

Comment ()
author image

Nathan E. Malpass

iPhone/Android Devices’ Maintenance Expert

Staying home, listening to music, writing tech articles

Many people asked me to repair their mobile phones so I have a lot of experience in mobile phone repair, and I know a lot about Android or Apple phones.

Data Recovery logo

Data Recovery

FoneDog Data Recovery recovers the deleted photos, videos, audios, emails, and more from your Windows, Mac, hard drive, memory card, flash drive, etc.

Free Download Free Download

How Do You Like This Article?

Check icon/ Check icon

INTERESTINGDULL

Check icon/ Check icon

SIMPLEDIFFICULT

Thank you! Here' re your choices:

Rate This Article: Excellent

Rating: 4.7 / 5 (based on 57 ratings)

Data Recovery logo

Data Recovery

FoneDog Data Recovery recovers the deleted photos, videos, audios, emails, and more from your Windows, Mac, hard drive, memory card, flash drive, etc.

Free Download Free Download

FoneDog uses cookies to ensure you get the best experience on our website. Click here to learn more.