FoneDog Screen Recorder
FoneDog Screen Recorder
Special Offer
Special Offer


By Nathan E. Malpass, Last updated: October 23, 2023
Many of us rely on cloud storage services like Google Photos to keep our cherished pictures safe. However, over time, we may forget the login details of an old Google account, leaving us wondering if we've lost those nostalgic snapshots forever.
If you've found yourself in this situation, fear not. In this article, we'll walk you through the process of how to recover photos from old Google account. Whether you've forgotten your account credentials or accidentally deleted photos, we've got you covered. With a step-by-step guide and helpful tips, you'll be able to reunite with your precious memories in no time.
Let's embark on this journey to recover your digital treasures and ensure they remain safe for years to come.
Part #1: How to Recover Photos from Old Google AccountPart #2: Best Tool to Recover Photos from Old Google Account: FoneDog Android Data RecoverySummary
Losing access to your old Google account doesn't necessarily mean your photos are gone forever. Google provides a safety net in the form of the Google Drive and Google Photos Trash folders, where deleted files and photos are temporarily stored before being permanently removed. Follow these steps to recover your photos from these locations:
Step #1: Sign in to Your Google Account
Step #2: Account Verification
Step #3: Reset Your Password
Step #4: Sign In to Your Account
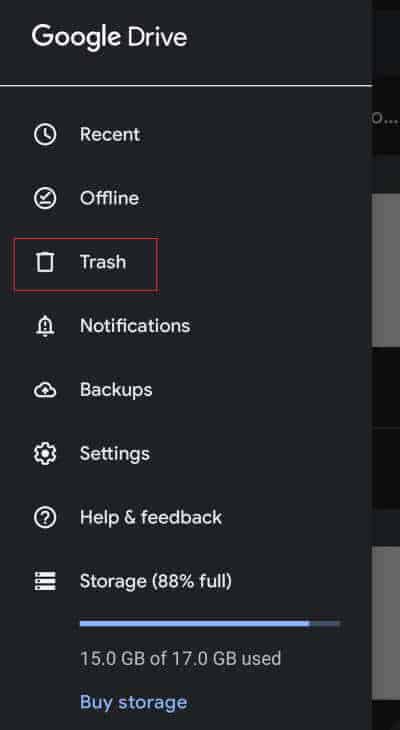
Step #5: Recover Photos from Google Drive Trash
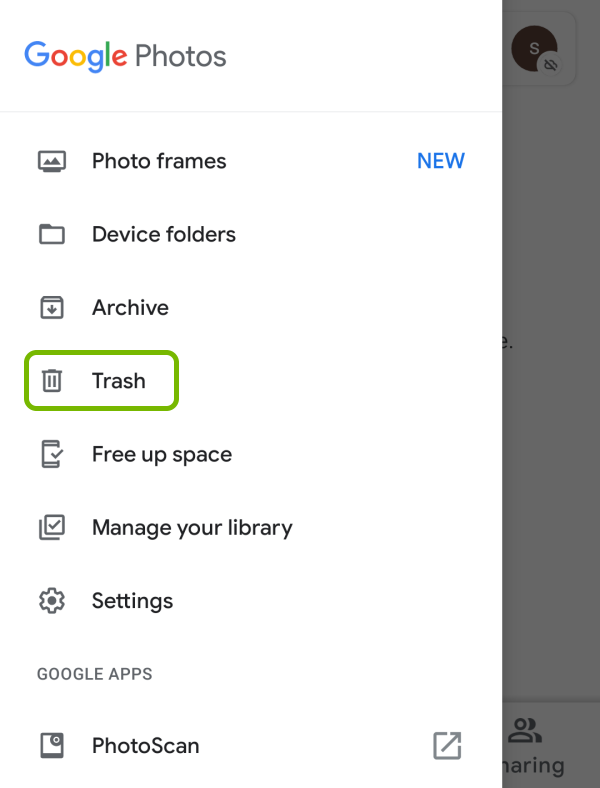
Step #6: Recover Photos from Google Photos Trash
Congratulations! You've successfully recovered the permanently deleted Android files by utilizing the Google Drive and Google Photos Trash folders. However, if your photos are not in the Trash folders, don't lose hope. There are more methods to explore in the upcoming sections to help you reclaim your precious memories.
If you've gained access to your old Google account and want to retrieve photos and transfer them to a new device, follow these steps on how to recover photos from old Google account to new device:
Step #1: Access Your Old Google Account
Step #2: Verify the Security of Your Account
Step #3: Navigate to Google Photos
Step #4: Select Photos for Download
Step #5: Download Photos
Step #6: Transfer Photos to Your New Device
Step #7: Extract Photos
Now, you have successfully restored photos from your old Google account and transferred them to your new device. Your cherished memories are once again at your fingertips, and you can enjoy them on your latest gadgets or share them with loved ones.
If you've exhausted the options to recover your photos on your own, or if you're encountering difficulties, reaching out to Google Support can be a valuable step. Here's how to contact Google Support for assistance to recover photos from old Google account:
Step #1: Sign in to Your Google Account
Step #2: Account Verification
Step #3: Navigate to Google Help Center
Step #4: Select "Contact Us"
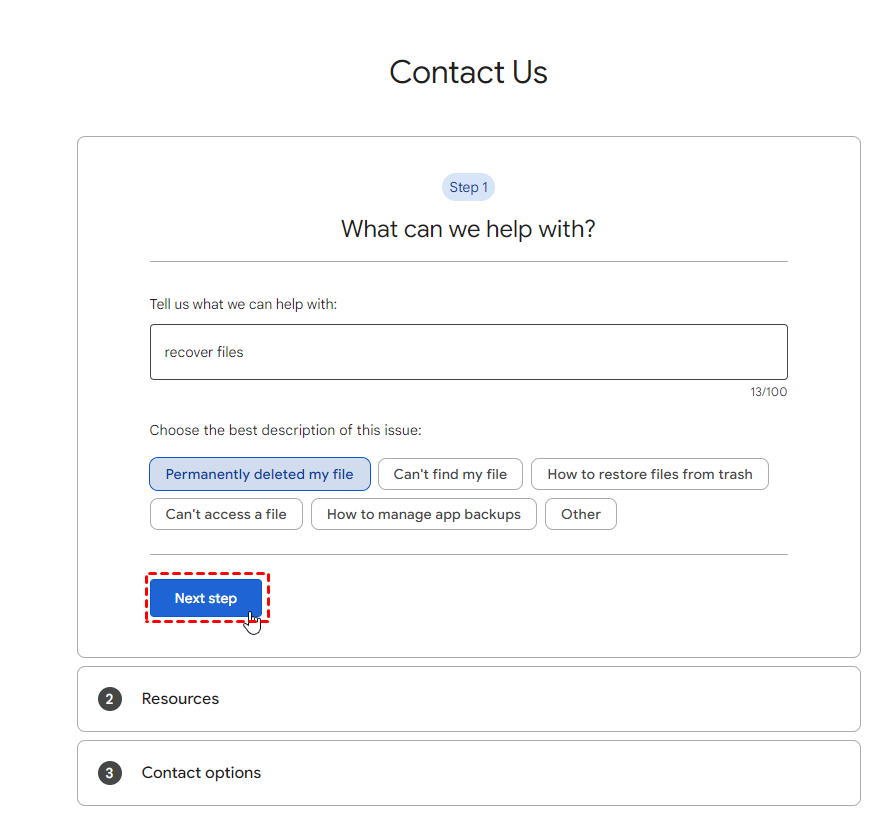
Step #5: Choose the Appropriate Support Category
Step #6: Contact Google Support
Step #7: Explain Your Issue
Step #8: Follow Guidance
Step #9: Be Patient and Persistent
Google Support is well-equipped to assist with account recovery issues, and they will do their best to help you retrieve your photos. Remember to stay in contact with them as needed until the issue is resolved. Be prepared to provide any necessary proof of ownership for the account to expedite the recovery process.
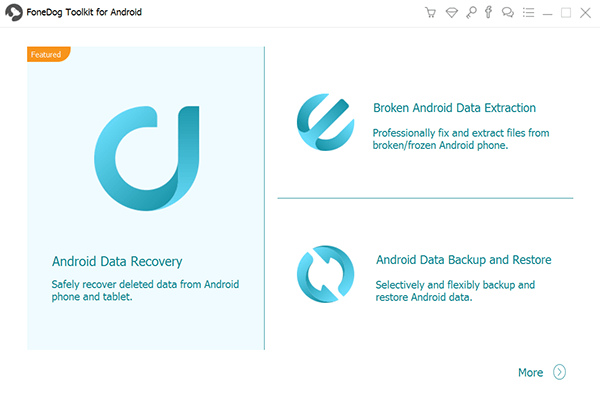
FoneDog Android Data Recovery is a powerful and user-friendly software tool designed to help you recover photos and other data from your old Google account. Whether you've lost access to your Google account or accidentally deleted photos, this tool can be a lifesaver. It is especially useful for Android users.
Android Data Recovery
Recover deleted messages, photos, contacts, videos, WhatsApp and so on.
Quickly Find Lost and deleted data on Android with or without root.
Compatible with 6000+ Android devices.
Free Download
Free Download

Below are the steps to recover photos from old Google account using FoneDog Android Data Recovery:
Start by downloading FoneDog Android Data Recovery from the official website. Install the software on your computer.
After installation, launch FoneDog Android Data Recovery.
Connect your Android device to your computer using a USB cable. Make sure USB debugging is enabled on your Android device. If not, you'll be guided through the process of enabling it.
On the main interface of FoneDog Android Data Recovery, select "Android Data Recovery". This option will allow you to recover data from your Android device, including photos from your old Google account.
In the next window, you can choose the types of data you want to recover. Select "Photos" or any other relevant data categories you wish to retrieve. Then click "Next".

FoneDog Android Data Recovery will begin scanning your connected Android device to analyze the data. This may take a few moments.
You will need to grant superuser permission to the software so it can access your device's data. Follow the on-screen instructions to do so.
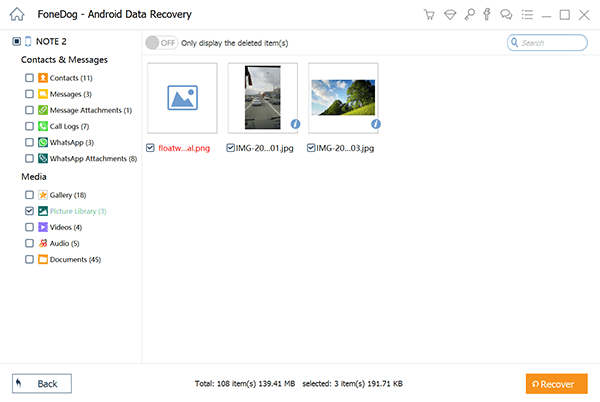
Once the scanning is complete, you'll see a list of recoverable photos. Preview them to ensure you're recovering the right ones. Select the photos you want to retrieve, and then click "Recover".
Choose a location on your computer to save the recovered photos. It's advisable to save them to a different location than the original for safety.
After saving the photos, the recovery process is complete. You can now access and enjoy your recovered photos on your computer.
FoneDog Android Data Recovery simplifies the process of recovering deleted photos on your Android device without backup. It's a convenient and reliable tool for ensuring that your cherished memories are not lost, even if you've lost access to your Google account.
People Also ReadGuide on How to Recover Photos from SD Card on Android PhoneHow to Recover Photos from Android Phone Internal Memory
Choosing to recover photos from old Google account is a vital process for regaining access to cherished memories. Whether you've lost account credentials, accidentally deleted photos, or are facing any other account-related issues, there are multiple methods to retrieve your photos.
Choose the method that best suits your situation, and ensure that your valuable photos remain safe and accessible for years to come. Whether through DIY recovery or the assistance of professional support, your memories are worth the effort to recover.
Leave a Comment
Comment

iPhone/Android Devices’ Maintenance Expert
Staying home, listening to music, writing tech articles
Many people asked me to repair their mobile phones so I have a lot of experience in mobile phone repair, and I know a lot about Android or Apple phones.
Android Data Recovery
Recover deleted files from Android phone or tablets.
Free Download Free DownloadHot Articles
 /
/
INTERESTINGDULL
/
SIMPLEDIFFICULT
Thank you! Here' re your choices:
Excellent
Rating: 4.7 / 5 (based on 93 ratings)
