FoneDog Screen Recorder
FoneDog Screen Recorder
Special Offer
Special Offer


By Nathan E. Malpass, Last updated: July 12, 2023
In today's digital age, cloud computing has become an indispensable tool for businesses and individuals alike. Google Cloud, a powerful platform that offers a wide range of services and resources, empowers users to store, manage, and analyze data, build robust applications, and collaborate seamlessly in the cloud. What's even more convenient is the ability to implement how to access Google Cloud on Android device, enabling you to stay productive and connected while on the move.
Whether you're a developer seeking to deploy applications, a data analyst analyzing large datasets, or an entrepreneur looking to leverage the cloud for your business, this article will guide you through the process of accessing Google Cloud on your Android device. We'll walk you through the necessary steps, highlighting essential tools, and providing practical tips to ensure a smooth and efficient experience.
Join us as we explore the world of Google Cloud on Android and unlock its full potential. Let's dive in and discover how to harness the power of cloud computing at your fingertips.
Part #1: How to Access Google Cloud on Android DevicesPart #2: FAQs: How to Access Google Cloud on AndroidPart #3: The Best Way to Recover Data from Android Devices: FoneDog Android Data Recovery
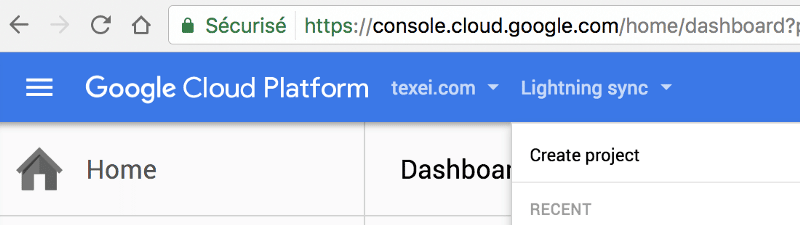
The Google Cloud App is a dedicated mobile application that allows Android users to access and manage their Google Cloud resources directly from their devices. With this app, you can conveniently monitor and control your cloud services, virtual machines, storage, and more, all from the palm of your hand. Here are the steps on how to access Google Cloud on Android using the Google Cloud App:
![]()
By following these steps, you can effectively access and manage your Google Cloud resources using the Google Cloud App on your Android device. Harness the power of the cloud while on the go and take full advantage of Google Cloud's capabilities from the convenience of your mobile device.
Apart from using the dedicated Google Cloud App, you can also access Google Cloud on your Android device through a web browser. This method allows you to utilize the web-based interface of Google Cloud Console, giving you access to a wide range of services and features. Here are the steps on how to access Google Cloud on Android device using a web browser:
By following these steps, you can access and manage your Google Cloud resources using an Android web browser. Whether you're on the move or prefer a web-based interface, this method allows you to utilize the comprehensive features of Google Cloud Console directly from your Android device.
A: Yes, you can either use the Google Cloud App or access Google Cloud through a web browser on your Android device.
A: Yes, you can access and manage various Google Cloud services, such as Compute Engine, App Engine, Cloud Storage, and more, using either the Google Cloud App or a web browser on your Android device.
A: While the functionality of the Google Cloud App may be more streamlined compared to the desktop experience, you can still perform essential actions, such as creating and managing resources, monitoring services, and accessing important notifications and alerts.
A: How to access Google Cloud on Android securely? Google Cloud provides robust security measures to ensure the safety of your data. However, it is crucial to follow security best practices, such as using strong passwords, enabling two-factor authentication, and keeping your device and apps up to date, to enhance the security of your Google Cloud account on your Android device.
A: Yes, as long as your Android device has an internet connection and meets the minimum system requirements for the Google Cloud App or web browser, you should be able to access Google Cloud services.
A: Absolutely! You can choose to use either the Google Cloud App or a web browser based on your preference and convenience. Both methods provide access to Google Cloud services and resources.
A: Accessing and using Google Cloud services may incur costs, depending on the specific services you use and your usage patterns. It's essential to review Google Cloud's pricing documentation and monitor your usage to understand and manage any associated costs.
These FAQs address common questions regarding on how to access Google Cloud on Android devices. Remember to refer to official documentation or reach out to Google Cloud support for any specific or technical queries related to your Google Cloud account and services.
Now you know how to access Google Cloud on Android. Imagine when you in and find something missing. Losing data from your Android device can be a distressing experience, whether it's due to accidental deletion, software issues, or device damage.
Fortunately, there are reliable solutions available to recover your precious data and restore peace of mind. One such tool that has gained popularity among Android users is FoneDog Android Data Recovery.
Android Data Recovery
Recover deleted messages, photos, contacts, videos, WhatsApp and so on.
Quickly Find Lost and deleted data on Android with or without root.
Compatible with 6000+ Android devices.
Free Download
Free Download
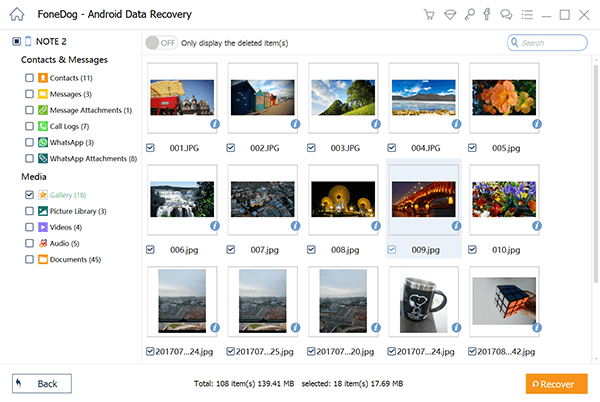
FoneDog Android Data Recovery is a comprehensive software tool designed specifically for recovering lost data on Android devices. It offers a wide range of features and functionalities to help you recover lost or deleted data efficiently.
Whether you've lost photos, videos, contacts, messages, or other important files in Google Cloud, FoneDog Android Data Recovery simplifies the process of data recovery and minimizes the risk of permanent data loss.
By following these steps, you can effectively use this free Android data recovery software to recover lost or deleted data from your Android device. So what are you waiting for?
People Also ReadGoogle Contacts Restore Process: Recover Deleted ContactsHow to Recover Deleted Photos from Google Photos? [2023 Guide]
Leave a Comment
Comment

iPhone/Android Devices’ Maintenance Expert
Staying home, listening to music, writing tech articles
Many people asked me to repair their mobile phones so I have a lot of experience in mobile phone repair, and I know a lot about Android or Apple phones.
Android Data Recovery
Recover deleted files from Android phone or tablets.
Free Download Free DownloadHot Articles
 /
/
INTERESTINGDULL
/
SIMPLEDIFFICULT
Thank you! Here' re your choices:
Excellent
Rating: 4.8 / 5 (based on 95 ratings)
