By Nathan E. Malpass, Last updated: April 23, 2024
Our iPhones have become the hub of our lives, containing a treasure trove of photos, messages, contacts, and important data. While Apple's iCloud service offers a convenient way to back up your iPhone, some users prefer to have an additional layer of security by backing up their device to a PC. Whether you want to preserve cherished memories, safeguard important documents, or ensure a smooth transition to a new device, knowing how to back up iPhone to PC is a crucial skill.
This comprehensive guide will take you through the step-by-step process of backing up your iPhone to your computer, so you can rest assured that your data is safe and accessible at all times. Whether you're a seasoned iPhone user or just getting started, our instructions and tips will make the process straightforward and stress-free.
Part #1: How to Back Up iPhone to PC: Runner-Up MethodsPart #2: The Best Tool to Back Up iPhone to PC: FoneDog iOS Data Backup & RestoreSummary
Part #1: How to Back Up iPhone to PC: Runner-Up Methods
Method #1: Using iTunes
Using iTunes is a classic method for backing up your iPhone to a PC. Please follow these steps:
- Install iTunes: If you don't have iTunes on your PC, download and install it from the official Apple website.
- Connect Your iPhone: Use a USB cable to connect your iPhone to your PC.
- Trust This Computer: If prompted on your iPhone, select "Trust This Computer" to establish a connection.
- Open iTunes: Launch the iTunes application on your PC if it doesn't open automatically when you connect your iPhone.
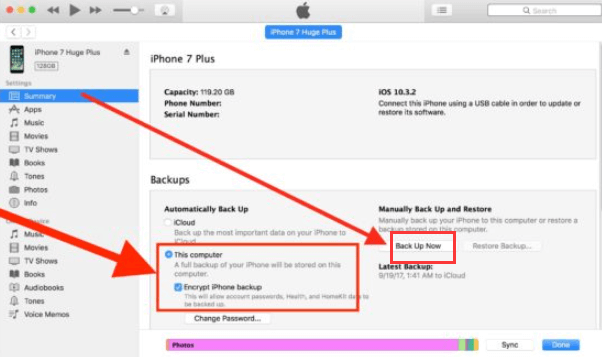
- Locate Your Device: In iTunes, your connected iPhone should appear in the upper-left corner. Click on your device to select it.
- Choose a Backup Option: In the "Backups" section, you have two options:
- iCloud: You can choose to back up your device to iCloud by clicking "Back Up Now". This will create a backup on your PC if you have "iCloud Backup" enabled on your iPhone.
- This Computer: Select "This Computer" and click "Back Up Now" to create a local backup on your PC.
- Wait for the Backup to Complete: iTunes will start the backup process. Depending on the amount of data on your iPhone, this may take some time.
- Verify the Backup: Once the backup is complete, you can go to "Edit" (on macOS) or "Preferences" (on Windows) and check the location of your backup. By default, it's in your iTunes folder.
- Secure Your Backup: It's advisable to encrypt your backup for added security. To do this, check the box "Encrypt iPhone backup" and set a password.
- Finish the Backup: Click "Done" when the process is finished, and your iPhone data is backed up to your PC.
Remember to perform regular backups to ensure your data is up-to-date and secure. This method allows you to have a local copy of your iPhone data on your PC, which can be handy in case of emergencies or when you want to transfer data to a new device.
Method #2: Using Finder (macOS Catalina And Later)
With the transition from iTunes to Finder on macOS Catalina and later, you can still back up your iPhone to your Mac using the following steps to back up iPhone to PC using Finder:
- Connect Your iPhone: Use a USB cable to connect your iPhone to your Mac running macOS Catalina or a later version.
- Trust This Computer: If prompted on your iPhone, select "Trust This Computer" to establish a connection.
- Open Finder: The Finder app on your Mac should open automatically when you connect your iPhone. If not, open Finder manually.
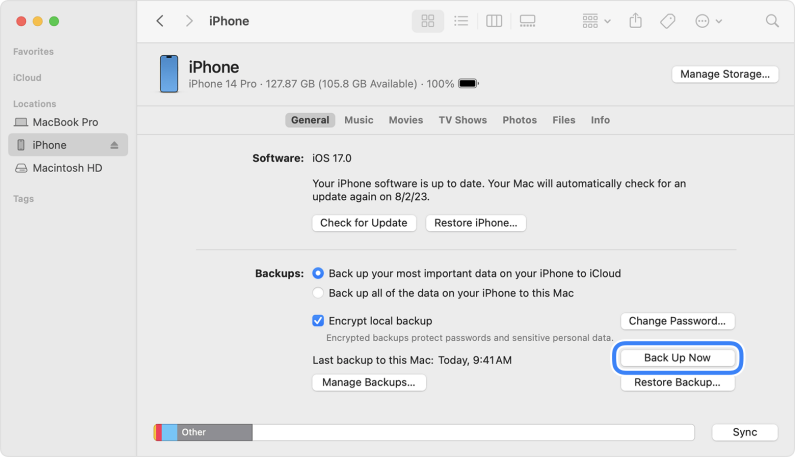
- Locate Your Device: In the Finder sidebar, under "Locations", you will see your iPhone listed. Click on it to select your device.
- Choose a Backup Option: In the General tab, you'll find options for backups. You have two primary choices:
- Back Up All the Data on Your iPhone to This Mac: This will create a complete backup of your iPhone data on your Mac.
- Back Up Photos to This Mac: This option specifically focuses on backing up your photos.
- Select Your Preferred Backup Option: Choose the option that suits your needs. If you want a comprehensive backup, select "Back Up All the Data on Your iPhone to This Mac".
- Start the Backup: Click the "Back Up Now" button to initiate the backup process. The duration of the backup depends on the amount of data on your iPhone.
- Check Backup Location: You can check the location of your backups under "Backups" in Finder Preferences. By default, backups are stored in the ~/Library/Application Support/MobileSync/Backup/ folder.
- Secure Your Backup (Optional): You can encrypt your backup by selecting the "Encrypt local backup" option and setting a password. This adds an extra layer of security to your backup.
- Finish the Backup: Once the backup is complete, the Finder will indicate when the last backup was performed. You've successfully backed up your iPhone to your Mac.
Regularly backing up your iPhone to your Mac is essential for preserving your data and ensuring that you can recover it in case of any unforeseen circumstances. This method provides a local backup, making it an excellent option for users who prefer to have their data on their Mac rather than in the cloud.
Method #3: Using iCloud for Windows
If you prefer to back up your iPhone to your PC using iCloud, you can do so by installing iCloud for Windows. Here's how to set up and use iCloud for Windows:
- Download iCloud for Windows: If you haven't already, download and install iCloud for Windows from the official Apple website.
- Sign in to iCloud: Launch iCloud for Windows, and sign in with your Apple ID and password.
- Select iCloud Features: In the iCloud for Windows application, you can choose which iCloud features you want to use. Ensure that "Photos" and "Backup" are selected.
- Options for Photos: If you want to back up your photos and videos, you can choose to download your entire collection or only recent items to your PC. Select your preference.
- Options for Backup: To back up your iPhone to your PC, click the "Options" button next to "Backup". Check the box for "Back up all of the data on your iPhone to this PC". You can also choose to encrypt your backup by selecting the "Encrypt local backup" option.
- Apply Settings: Click "Apply" to save your settings.
- Connect Your iPhone: Connect your iPhone to your PC using a USB cable. If prompted on your iPhone, select "Trust This Computer".
- Start the Backup: iCloud for Windows will begin backing up your iPhone to your PC. The duration of the backup depends on the amount of data to be backed up.
- Check Backup Location: You can view and verify the location of your backups in the iCloud for Windows application.
- Monitor and Complete the Backup: The application will show the progress of the backup. Once the backup is finished, your iPhone data will be stored on your PC.
Using iCloud for Windows allows you to have a local copy of your iPhone data on your PC, which can be convenient for users who prefer not to rely solely on cloud-based backups. But remember that iCloud has limited space, so take into consideration how many backups can your iCloud keep.
Ensure you have enough free space on your PC to accommodate your iPhone's data, and regularly check for updates to the iCloud for Windows software for a smooth experience.
Method #4: Using Google Drive
While Google Drive primarily serves as a cloud storage service, you can use it to back up specific data from your iPhone, such as photos and documents. Here's how to back up iPhone to PC through Google Drive:
- Download Google Drive: If you don't already have the Google Drive app installed on your iPhone, download it from the App Store.
- Sign in or Create an Account: Open the Google Drive app and sign in with your Google account. If you don't have one, you can create a Google account.
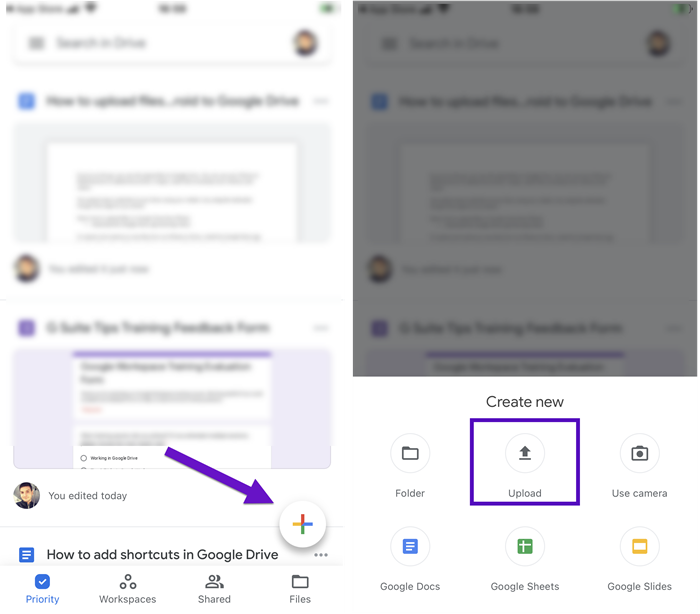
- Upload Photos and Videos:
- Tap the "+" icon within the Google Drive app.
- Select "Upload" or "Upload Photos and Videos" (the wording may vary depending on the app version).
- Choose the photos and videos you want to back up and confirm the upload.
- Organize Files: You can create folders within Google Drive to organize your files if desired.
- Documents and Files: You can also upload documents and files directly to Google Drive by tapping the "+" icon and selecting "Upload".
- Access from PC: To access your iPhone files on your PC, simply open Google Drive in a web browser and log in with the same Google account. You can download your files from there.
Please note that Google Drive is not a full device backup solution like iTunes or iCloud. It's more suitable for specific file and photo backups. For a complete iPhone backup, you should consider using iTunes, iCloud, or other dedicated backup solutions.
Method #5: Using Windows 10’s Photos App
If you're using a PC running Windows 10, you can utilize the built-in Photos app to import and back up photos and videos from your iPhone. Here's how to do it:
- Connect Your iPhone: Use a USB cable to connect your iPhone to your Windows 10 PC. Make sure to unlock your iPhone if it's locked.
- Trust This Computer: If prompted on your iPhone, select "Trust This Computer" to establish a connection.
- Open the Photos App: On your Windows 10 PC, open the "Photos" app. You can usually find it in the Start menu or by searching for "Photos".
- Import Your Photos and Videos:
- In the Photos app, click on the "Import" button in the upper-right corner.
- The app will automatically detect your connected iPhone and display the photos and videos on your device.
- You can choose to select all items or specific ones for import.
- Import Settings: You can select the import settings, such as where to save the imported items and whether to delete them from your iPhone after import. Choose your preferences.
- Start the Import: Click the "Import" button to begin the process. The Photos app will transfer the selected photos and videos from your iPhone to your Windows 10 PC.
- Check Imported Files: Once the import is complete, you can find your files in the folder you specified during the import settings.
The Windows 10 Photos app is a convenient way to back up your photos and videos from your iPhone to your PC. However, keep in mind that this method focuses solely on media files and does not create a complete device backup like iTunes or iCloud. For a comprehensive backup of your iPhone, consider using other methods mentioned earlier.
Part #2: The Best Tool to Back Up iPhone to PC: FoneDog iOS Data Backup & Restore
FoneDog iOS Data Backup & Restore is a reliable and user-friendly iPhone 15-supported software designed to create comprehensive backups of your iPhone's data and restore them when needed.
iOS Data Backup and Restore
One click to backup the whole iOS device to your computer.
Allow to preview and restore any item from the backup to a device.
Export what you want from the backup to your computer.
No data loss on devices during the restore.
iPhone Restore Won't Overwrite Your Data
Free Download
Free Download

It offers a straightforward solution to back up your iPhone to your PC, ensuring that your valuable data is safe and easily recoverable. Whether you're safeguarding important information, switching to a new iPhone, or simply seeking peace of mind, FoneDog iOS Data Backup & Restore is an excellent choice.
Key Features:
- Selective Backup: FoneDog allows you to selectively back up specific data types, such as Line chats, WhatsApp messages, and more, saving both time and storage space.
- Encrypted Backups: You can encrypt your backups with a password, providing an additional layer of security for your sensitive data.
- Preview Before Restore: FoneDog enables you to preview your backup data before restoring, helping you choose exactly what you want to recover.
- No Data Loss: During the backup and restore process, FoneDog ensures that no data is lost or overwritten.
- Compatibility: It works with various iOS devices, including iPhone, iPad, and iPod Touch, and supports the latest iOS versions.
Steps to back up iPhone to PC with FoneDog iOS Data Backup & Restore:
- Download and Install FoneDog: Visit the official FoneDog website and download the software. Follow the on-screen instructions to install it on your PC.
- Launch FoneDog: After installation, open the FoneDog iOS Data Backup & Restore software.
- Connect Your iPhone: Use a USB cable to connect your iPhone to your PC. Ensure your iPhone is recognized by the software.
- Choose Backup & Restore: In the FoneDog interface, select the "iOS Data Backup & Restore" feature.
- Select Backup: Click "iOS Data Backup" to initiate the backup process.
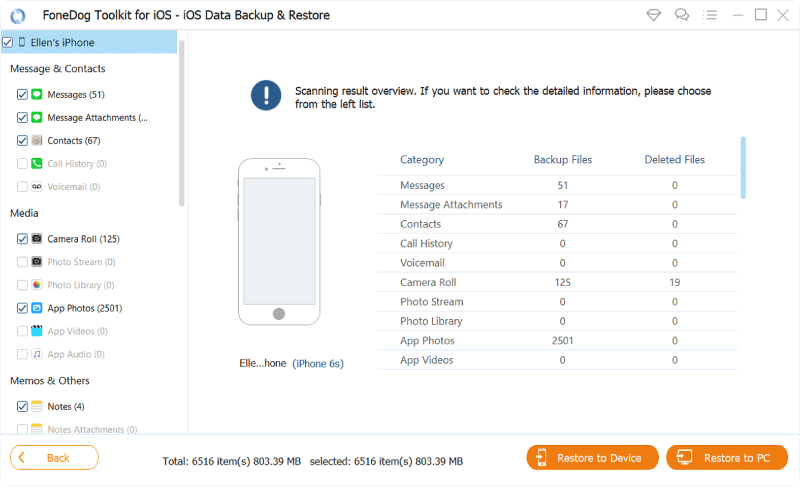
- Choose Data Types: You can choose which data types you want to back up. Select the ones you want to include in the backup.
- Start the Backup: Click the "Start" button to begin the backup process. FoneDog will create a backup of the selected data on your iPhone.
- View and Export Backup Data: Once the backup is complete, you can preview and export your data to your PC. You can also choose to encrypt the backup with a password for added security.
FoneDog iOS Data Backup & Restore provides a comprehensive and secure way to back up your iPhone to your PC. It's an excellent choice for users who want control over their backup process, allowing you to selectively choose what to back up and ensuring your data is always within reach, even in case of unexpected data loss or device issues.
People Also ReadHow to Back up SMS from Your iPhoneHow Long Does the iCloud Backup Process Take?
Summary
Back up iPhone to PC is a crucial step in preserving your valuable data and ensuring it's safe from unexpected loss. While various methods are available, each with its own advantages, you can choose the one that best suits your needs.
For a more comprehensive and user-friendly backup solution, you can consider third-party tools like FoneDog iOS Data Backup & Restore. It offers selective backup, encryption, and easy data recovery options. Remember to choose the method that aligns with your backup preferences and needs to ensure your iPhone data remains secure and accessible.


 /
/
