FoneDog Screen Recorder
FoneDog Screen Recorder
Special Offer
Special Offer


By Nathan E. Malpass, Last updated: June 16, 2025
Smartphones have become an extension of our lives. We rely on them to store important information, from to-do lists to personal notes and reminders. But what happens when you accidentally delete a crucial note on your iPhone? Is it lost forever? The good news is that, with the right techniques and tools, you can easily retrieve deleted notes on iPhone and restore that valuable information.
In this article, we'll walk you through a step-by-step guide on how to recover those deleted notes from your iPhone. Whether you've deleted a note by mistake or it disappeared after an iOS update, we've got you covered. Let's explore the various methods and tools at your disposal to ensure that your important notes are never truly lost.
Part 1. How to Retrieve Deleted Notes on Your iPhonePart 2. Best Tool to Retrieve Deleted Notes on Your iPhone Part 3. Summary
f you've accidentally deleted a note on your iPhone and you have an iCloud backup, you're in luck. iCloud provides a convenient way to recover lost notes. Follow these steps to retrieve deleted notes on iPhone using iCloud.com:
Step 1: Access iCloud.com
Open your web browser and visit iCloud.com. Sign in to your iCloud account using your Apple ID and password.
Step 2: Access Notes
Once you're logged in, you'll see various app icons. Click on "Notes" to access your iCloud Notes.
Step 3: Locate Recently Deleted Notes
In the Notes app, look for the "Recently Deleted" folder, usually located on the left-hand side. Click on it to view your recently deleted notes.
Step 4: Recover Deleted Notes
Browse through the list of deleted notes and find the one you want to recover. Select the note by clicking on it. In the top-right corner, you'll find a "Recover" button. Click on it to restore the selected note.
Step 5: Check Your iPhone
After restoring the note, it will be moved back to your "Notes" app on iCloud. Open the Notes app on your iPhone, and you should find the recovered note there.
Congratulations! You've successfully retrieved a deleted note using iCloud.com. This method is particularly useful if you regularly back up your iPhone to iCloud. You can also recover the deleted photos on iPhone using this method. However, if you don't have an iCloud backup or if the note was not included in the backup, don't worry. There are other methods you can try to recover your deleted notes. Keep reading to explore alternative solutions.
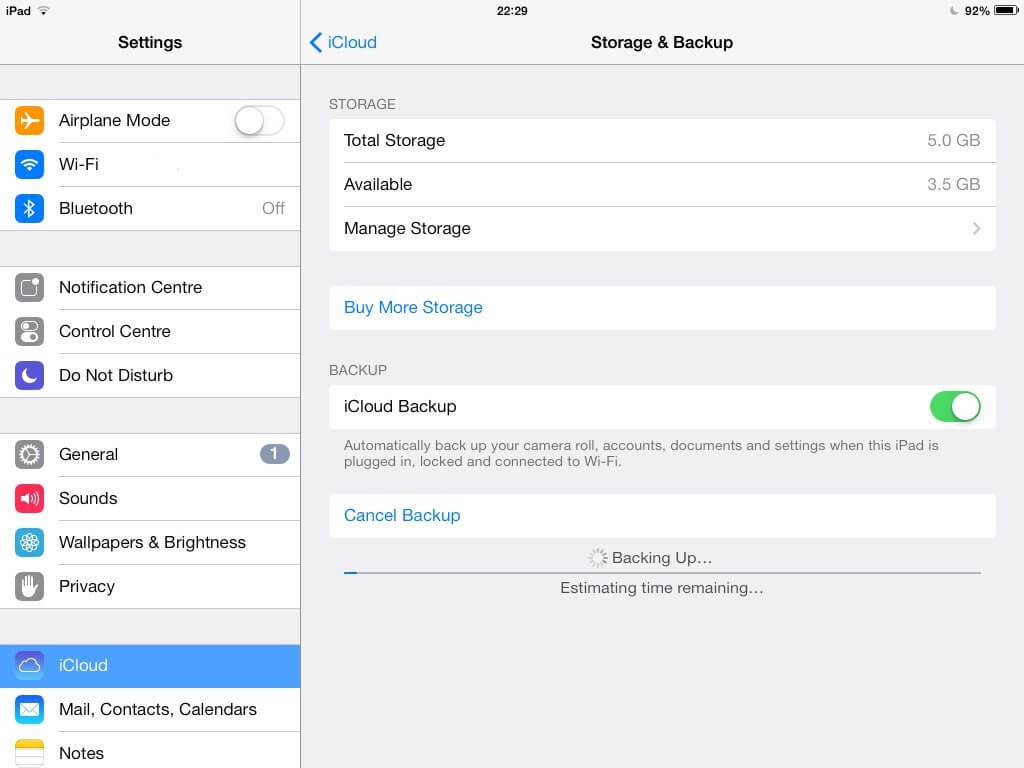
If you have been routinely backing up your iPhone to iCloud and you deleted a note, you can restore your entire device from a previous iCloud backup to retrieve the missing note. Here's how to do it:
Before proceeding, be aware that restoring from an iCloud backup will revert your device to the state it was in when the backup was created, which means any data and changes made after the backup will be lost.
Step 1: Backup Your Current Data (Optional)
Before you restore an iCloud backup, consider backing up your current data if there's anything important you don't want to lose during the process.
Step 2: Erase Your Device
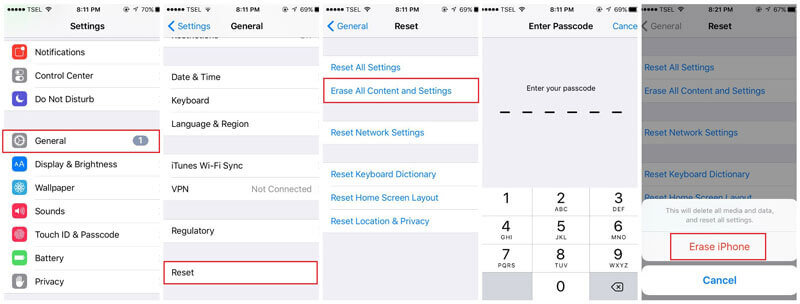
Step 3: Restore from iCloud Backup
Step 4: Check Your Notes
Once the restore is complete, your iPhone will restart. Go to the "Notes" app and check if the deleted note has been recovered.
By restoring your iPhone from an iCloud backup, you have the opportunity to retrieve deleted notes along with other data that may have been lost. However, it's important to note that this method will affect all data on your device, so it's advisable to back up your current data before proceeding if you don't want to lose any recent changes.
If you regularly back up your iPhone using iTunes on your computer, you can recover deleted notes by restoring your device from a previous iTunes backup. Follow these steps to retrieve deleted notes on iPhone using an iTunes backup:
Step 1: Connect Your iPhone to Your Computer
Connect your iPhone to a computer using a USB cable. Launch the iTunes application on your computer. Ensure that you are using the latest version of iTunes.
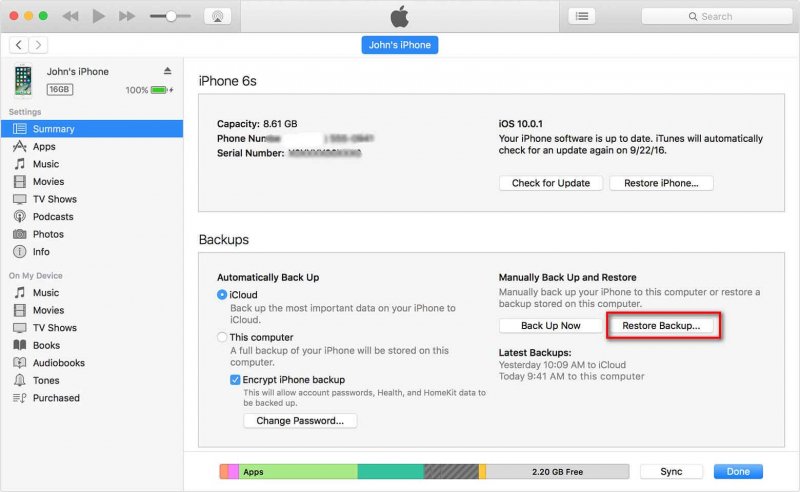
Step 2: Select Your Device
In iTunes, your connected iPhone will appear as an icon in the upper left corner. Click on it to select your device.
Step 3: Choose a Backup to Restore
Under the "Backups" section, you will see options for "Restore Backup." Click on it. A list of available backups will appear. Select the backup that contains the notes you want to recover. Be sure to choose a backup created before the note was deleted.
Step 4: Confirm and Restore
Click "Restore" and confirm your choice. iTunes will begin the restoration process.
Step 5: Wait for the Restore to Complete
iTunes will restore your iPhone from the selected backup. This may take some time, depending on the size of the backup and your computer's performance.
Step 6: Check Your Notes
After the restore is complete, your iPhone will restart. Open the "Notes" app on your device and check if the deleted note has been successfully recovered.
Restoring from an iTunes backup is an effective method for retrieving deleted notes and other data if you've been regularly backing up your iPhone with iTunes. However, similar to the iCloud backup method, be aware that this process will revert your device to the state it was in when the backup was created, potentially overwriting any recent data. Therefore, it's a good idea to back up your recent data separately if you don't want to lose it during the restoration process.
If you have been backing up your iPhone to your Mac using Finder (on macOS Catalina and later) or iTunes (on macOS Mojave and earlier), you can retrieve deleted notes by restoring your device from a previous backup. Here's how to retrieve deleted notes on iPhone using Finder on macOS Catalina and later:
Step 1: Connect Your iPhone to Your Mac
Connect your iPhone to your Mac using a USB cable. Open Finder on your Mac. Your connected iPhone should appear in the Finder's sidebar under "Locations."
Step 2: Select Your iPhone in Finder
Click on your iPhone under "Locations" in Finder. This will open the device summary page.
Step 3: Choose a Backup to Restore
In the device summary page, you'll see a "Restore Backup" button. Click on it. A list of available backups will be displayed. Choose the backup that includes the deleted notes you want to recover, and make sure it's a backup created before the notes were deleted.
Step 4: Confirm and Restore
Click "Restore" and confirm your choice. Finder will begin the restoration process.
Step 5: Wait for the Restore to Complete
Finder will restore your iPhone from the selected backup. This may take some time, depending on the size of the backup and your Mac's performance.
Step 6: Check Your Notes
After the restore is complete, your iPhone will restart. Open the "Notes" app on your device and verify if the deleted note has been successfully recovered.
Using Finder on your Mac is an effective method for recovering deleted notes if you've been backing up your iPhone to your Mac. However, similar to other restoration methods, keep in mind that this process will revert your device to the state it was in when the backup was created, which could overwrite any recent data. To avoid losing recent changes, consider backing up your recent data separately before initiating the restoration process.
When it comes to efficiently recovering deleted notes on your iPhone, one of the top solutions available is the iPhone 15 supported FoneDog iOS Data Recovery. This reliable software offers a user-friendly and effective way to retrieve your lost notes, whether you have an iTunes or iCloud backup or not.
iOS Data Recovery
Recover photos, videos, contacts, messages, call logs, WhatsApp data, and more.
Recover data from iPhone, iTunes and iCloud.
Compatible with latest iPhone and iOS.
Free Download
Free Download

Step 1: Install and Launch FoneDog iOS Data Recovery
To retrieve deleted notes on iPhone, download and install FoneDog iOS Data Recovery on your computer (both Windows and Mac versions are available). Launch the software.
Step 2: Connect Your iPhone to the Computer
Connect your iPhone to the computer using a USB cable.
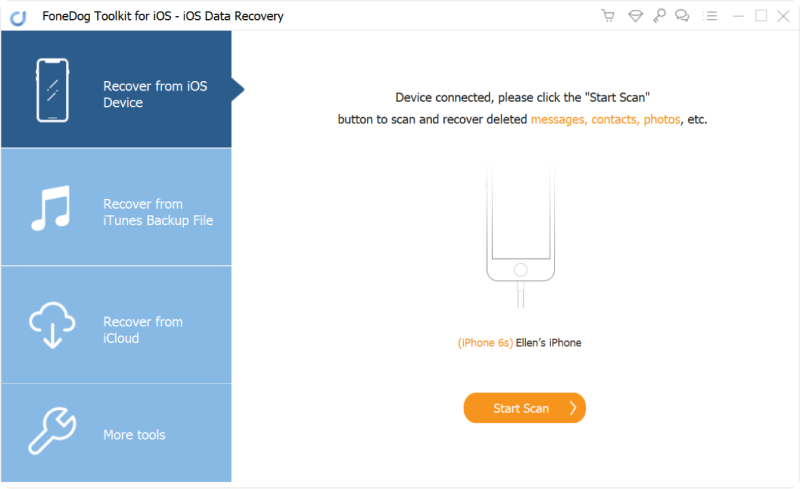
Step 3: Scan Your iPhone for Deleted Notes
Once your device is recognized, select "Recover from iOS Device" from the left-hand menu. Click "Start Scan" to allow FoneDog to scan your iPhone for deleted notes.
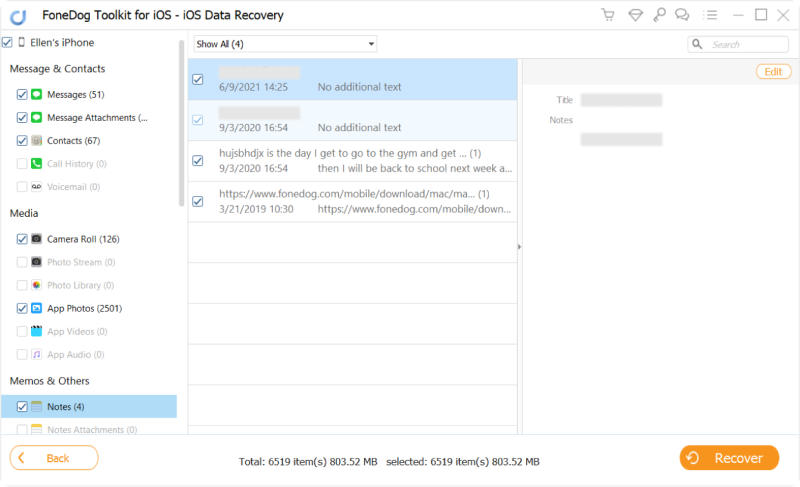
Step 4: Preview and Recover Deleted Notes
After the scan is complete, you will see a list of recoverable data categories. Select "Notes" from the list. You can preview the deleted notes and choose the ones you want to recover. Click "Recover" to save the selected notes to your computer.
FoneDog iOS Data Recovery simplifies the process of recovering deleted notes from your iPhone, ensuring that your valuable information is easily accessible. Whether you have a backup or not, this tool offers a reliable solution to retrieve your lost notes and various other types of data. Give it a try and regain access to your important notes with ease.
In this comprehensive guide, we've explored various methods for retrieving deleted notes from your iPhone. Whether you have an iCloud backup, an iTunes backup, or no backup at all, there are solutions available to help you recover your important notes. Here's a quick recap of what we've covered:
Now, armed with these methods and the FoneDog iOS Data Recovery tool, you can confidently retrieve your deleted notes and ensure that your valuable information is never lost for good. Choose the method that best suits your needs and recover your notes with ease.
Leave a Comment
Comment

iPhone/Android Devices’ Maintenance Expert
Staying home, listening to music, writing tech articles
Many people asked me to repair their mobile phones so I have a lot of experience in mobile phone repair, and I know a lot about Android or Apple phones.
iOS Data Recovery
3 Methods to recover your deleted data from iPhone or iPad.
Free Download Free DownloadHot Articles
 /
/
INTERESTINGDULL
/
SIMPLEDIFFICULT
Thank you! Here' re your choices:
Excellent
Rating: 4.7 / 5 (based on 80 ratings)
