FoneDog Screen Recorder
FoneDog Screen Recorder
Special Offer
Special Offer


By Nathan E. Malpass, Last updated: November 18, 2019
iTunes is famous for displaying a lot of errors to its users. For instance, one error involves failing to read a connected iPhone’s contents. Another error involves the inability to play music. iTunes just frustrates its users with a lot of issues faced by using the platform.
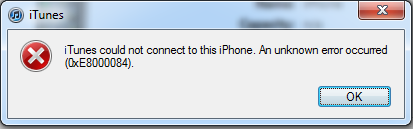
One such error is “iTunes Could Not Connect To This iPhone… (0xE80000A)”. Once you face this error, you might think you’re not in the right place at the right time. However, there’s still a way around this problem.
In this guide, we’ll teach you how to fix the iTunes error 0xE80000A. We’ll also delve into the possible causes of the said error. Let’s get started.
Part 1: Causes of “iTunes Could Not Connect to This iPhone... (0xE80000A) Error”Part 2: Seven Top Fixes to The iTunes Error 0xE80000APart 3: To Wrap It All Up
Before we delve into the various solutions for this problem, let’s look at the possible causes of the said error. Here are some of them:
FoneDog is 100% secure with your files and sensitive information kept private. It is easy to use and understand. And you have a 30-day money-back guarantee allowing you to try the software. If you’re not satisfied for any reason, you can get your money back within the 30-day period.
Below are the steps on how to use the tool in order to fix your iPhone and ultimately, the iTunes error in question: 
Step 01 - Download, install, and launch, FoneDog Toolkit for iOS. Connect your iPhone to the computer using a USB cable. Then, within the main interface, select iOS System Recovery.
Step 02 - The tool will show you a list of various issues it can fix. Simply, click “Start.”
Step 03 - Select the Mode or repair type you wish to use. The Standard Model doesn’t result in data loss. The Advanced Mode leads to a complete wipe off of your data. The latter is more deep and comprehensive and is required for problems that are difficult to deal with. Now, after you have chosen your Mode, click Confirm.
Step 04 - Check the information of your iPhone and press Optimize.
Step 05 - Download the iOS version which FoneDog iOS System Recovery provides.
Step 06 - Wait until the downloaded firmware package is verified.
Step 07 - Now, after the verification process, your iPhone will automatically be repaired. For this, you have to wait until the process is complete. Your iPhone will now be unlocked and be back to its normal state.
You have to update your Windows computer, your iPhone’s iOS, and your iTunes software. There might be various hardware or software incompatibilities causing the error “iTunes could not connect to this iPhone… (0xE80000A).” Thus, when you update all three of these components, then you might just fix the error.
You should begin by updating your Windows 10 PC. In order to do this, go to the Start menu and then type in “check for updates.” After this, open the file that shows up. A box pertaining to Windows Updates will be displayed. Check the button that says “Check For Updates.” Then, make sure new updates are installed if there is anything available.
Now, the next step is to update your iOS. To do this, launch Settings within your iPhone. Then, press General. After this, choose Software Update. Press “Download and Install” which will be present if there are available updates.
Next, you have to update your iTunes software within the Windows PC. Simply go to the Start menu and type in “Apple Software Update.” After this, press Enter. Check out if certain updates are made available. You have to install these updates to help fix the error.
Usually, third-party antivirus software can lead to incompatibility issues and even connectivity problems between the iPhone and iTunes. Thus, in order to make sure of this, you can pause the antivirus tool for a moment. After this, try to connect the iPhone to that of your computer again.
Or, you can disable the varying live shields used by the antivirus application. If these worked, it means, the antivirus software is the problem. Thus, what you should do is to add iTunes as an exception to the antivirus tool’s firewall.
When you have settings that are corrupted for both location and privacy, this iTunes error will be displayed. Usually, the location and privacy settings contain the actual trust permissions you have granted your iPhone during the initial time you connected it to your Windows PC. Thus, you might need to reset these settings to fix the problem.
It is important to remember that when you reset these settings, certain applications within your iPhone will actually ask for permission again so that they can utilize location services again. Here are the steps on how to do it:
Step 01 - Use your iPhone Settings applications and then press General.
Step 02 - Press “Reset.”
Step 03 - Press “Reset Location and Privacy.”
Step 04 - Confirm the action by tapping on “Reset Settings.”
Step 05 - Now, connect the iPhone to that of your Windows 10 PC.
Step 06 - Open iTunes.
Step 07 - Press “Trust” on the pop-up that is displayed on your iOS device. 
A distinctive directory made by iTunes is the Lockdown folder. This folder has different security certificates necessary to communicate with iOS devices you have previously connected to successfully. Similar to that of your trust permissions, you have to reset this folder. Here are the steps in order to do so:
Step 01 - Open Run by pressing Windows + R.
Step 02 - Type the following and then click OK: %ProgramData%
Step 03 - A window will be displayed. Open the folder named Lockdown.
Step 04 - On the directory of Apple, right-click the Lockdown folder and then press Rename.
Step 05 - Change the name of the folder in question to that of Lockdown.old.
Now that you have done this, you can relaunch iTunes. After this, connect the iPhone and then press “Trust” when you are prompted to do so.
If you are still facing the issue “iTunes could not connect to this iPhone… (0xE80000A),” then you must reinstall iTunes. Visit the Windows Start menu and then type in “apps & features.” Press Open and then remove the program related to iTunes making sure you follow the order.
First, you have to remove iTunes itself. Next, you have to uninstall the Apple Software Update. Then, go for Apple Mobile Device Support and then opt for Bonjour. Finally, go for Apple Application Support 32-bit and the same one for 64-bit.
After you have uninstalled all of this, you should restart your computer. Then, install iTunes back again. 
Apple has a version of its iTunes software located within the Windows Store. It appears the same as the actual iTunes software. However, there are differences with it, especially in terms of performance. The Microsoft Store version has better performance and shows up fewer errors as opposed to the usual desktop version.
If the first six solutions didn’t work, then you must try this one. Switching to the new Microsoft Store iTunes version might be better compared to the desktop version you downloaded through a web browser.
Migrating to this newer version is not that difficult. During installation, the music and included backups will be migrated automatically to the new iTunes software. To switch versions, simply visit the Microsoft Store using your Start menu and then type in iTunes. After this, click Install on the iTunes page.
Hopefully, after you’ve done the solutions above, the error “iTunes could not connect to this iPhone… (0xE80000A)” won’t show up. After you have successfully fixed the problem, you can simply connect the iPhone device to your computer and have iTunes recognize the said mobile phone.
As both Apple and Windows device users, it is important that we understand we are going to face issues like these in the future. Incompatibility errors and system issues are inevitable. That’s why we have to know what we should do in case we face this issue once again.
What’s your take on our article? Did you experience the same error with iTunes? How did you fix it? If you think you have a solution that’s not covered here, you can share it with us. Simply send in your comments below.
Leave a Comment
Comment

iPhone/Android Devices’ Maintenance Expert
Staying home, listening to music, writing tech articles
Many people asked me to repair their mobile phones so I have a lot of experience in mobile phone repair, and I know a lot about Android or Apple phones.
iOS System Recovery
Repair various iOS system errors back to normal status.
Free Download Free DownloadHot Articles
 /
/
INTERESTINGDULL
/
SIMPLEDIFFICULT
Thank you! Here' re your choices:
Excellent
Rating: 4.5 / 5 (based on 86 ratings)
