FoneDog Screen Recorder
FoneDog Screen Recorder
Special Offer
Special Offer


By Adela D. Louie, Last updated: November 8, 2019
For a long time, there has been a misconception when it comes to transferring data from one iPhone device to another and that is it is a complicated thing to do. An example of this is when you are sending ringtones from one iPhone to another iPhone device without getting to face any trouble.
The truth is, you can send data from one iPhone to another easily just by doing a direct transfer like transferring iPhone photos to hard drive. And one data that you can move over to another iPhone device is your ringtones. So if you are wondering how you can do this, we have provided you below some ways on how to transfer ringtones from iPhone to iPhone without having any trouble or difficulty at all.
Part 1: How to Transfer Ringtones from iPhone to iPhone Using Phone TransferPart 2: How to Transfer Ringtone from iPhone to iPhone Using iTunesPart 3: How to Transfer Ringtones from iPhone to iPhone Using OneDrivePart 4: Conclusion
This first method that we are going to show you is the easiest, the fastest, and the most efficient way on how to transfer ringtones from iPhone to iPhone device. And this method is by using the FoneDog Phone Transfer.
The FoneDog Phone Transfer is a tool that will help you in terms of transferring data across any device such as your iPhone device, Android device, and even to your computer. With the FoneDog Phone Transfer software, you will be able to transfer your ringtones in no time. Not only that, but this program also allows you to transfer other data such as your messages, photos, videos, and contacts.
So, for you to know how to transfer ringtones from iPhone to iPhone using the FoneDog Phone Transfer, here is a quick guide that you can follow.
First of all, get the FoneDog Phone Transfer and have it downloaded and installed on your PC. Then, the next thing that you need to do is to open the program and plug in your iPhone devices to your computer using your iPhone’s USB cable.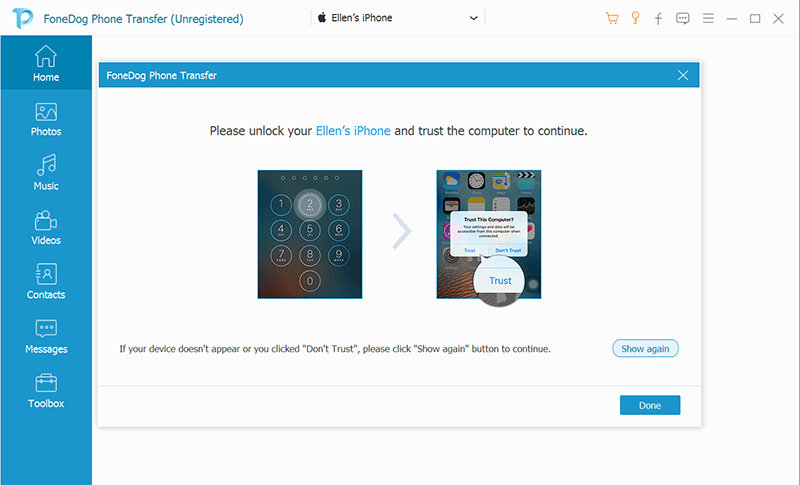
The FoneDog Phone Transfer will then start to detect your iPhone. And once that your iPhones have been recognized, details about your device will be shown on your screen.
Then, there is also a list of file types that the FoneDog Phone Transfer supports. Since you want to transfer your ringtone from iPhone to iPhone, then simply click on the Music option.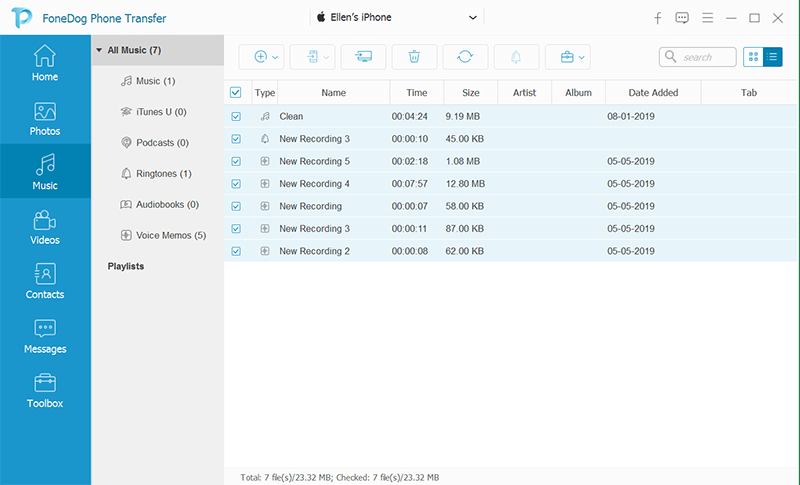
After that, all of the music or songs that you have on your iPhone device will show up on the right part of your screen. You will also see there all of the ringtones that you have on your iPhone device. So from here, just go ahead and click all of the ringtones that you would like to move to your new iPhone device.
NOTE: You can use the FoneDog Phone Transfer to create your very own ringtone and have it transferred over to your iPhone device as well. This way, you can customize your own ringtone for your iPhone device.
And once that you have chosen all of the ringtones that you like to transfer, go ahead and connect your other iPhone device to your computer and wait for the FoneDog Phone Transfer to detect it. After that, go ahead and click on the Export to Device button located at the top of your screen. Then wait for the program to finish the whole process of transferring your ringtone from iPhone to iPhone.
iTunes is known to be the default program for iOS devices such as an iPhone. That is why you can also use this when it comes to transferring the ringtone from iPhone to iPhone. But, this option can only be done if you are going to transfer purchased ringtones from your iTunes.
To know how to do this, here is a quick step by step instructions that you can easily follow.
Step 1: Launch the iTunes program on your computer and then connect your old iPhone to via USB cable.
Step 2: After that, choose the “File” option from the menu bar of the iTunes menu bar.
Step 3: And then, click on Device.
Step 4: Then choose Transfer Purchases from iPhone. From here, all of the ringtones that you have purchased will be moved from your old iPhone to your iTunes program on PC.
Step 5: Once that is done, unplug your old iPhone from your computer and then plug in your new iPhone device.
Step 6: And then click on the iPhone icon from your iTunes program and then choose “Tones”.
Step 7: Choose Sync Tones.
Step 8: Then choose all of the ringtones that you want to sync with your new iPhone device.
Step 9: After that, click on the Apply button to finish the process.
There are some downsides on using iTunes for you to transfer ringtones from iPhone to iPhone. Aside from the fact that you can only transfer purchased tones, you will also miss those custom ringtones that you have. Also, any existing custom ringtones that you have on your new iPhone will be overwritten. And you will not be able to selective transfer your ringtones.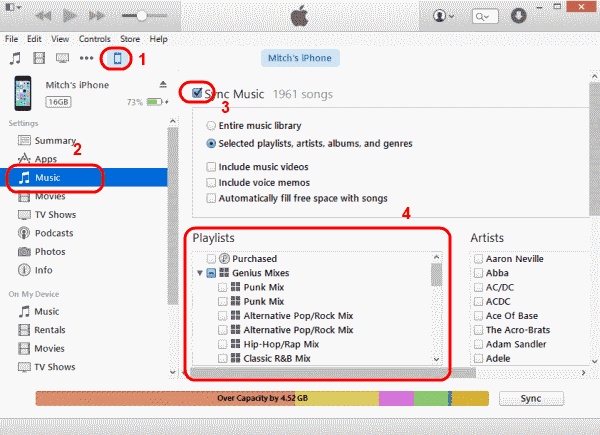
Another way on how to transfer ringtones from iPhone to iPhone aside from using the iTunes program is by using another software called the OneDrive. All you need is a stable internet connection for your work with this application. And to know more about how to use it, here is a quick guide you can follow.
Step 1: Have the OneDrive application downloaded on both your old and new iPhone devices.
Step 2: And then, open the application on your old iPhone and then tap on the plus (+) sign from the upper-right part of your screen.
Step 3: And then, choose all of the ringtones that you want to transfer to your new iPhone device.
Step 4: Once that you are done choosing your ringtones, go ahead and tap on the Upload button.
Step 5: Then, using your new iPhone device, launch the OneDrive application as well.
Step 6: And then, sign in the same credentials that you have on your old iPhone.
Step 7: Once that you are signed in, you can easily download the ringtones that you have uploaded from your old iPhone using the OneDrive app.
So there you have it. It is actually very easy on how to transfer ringtones from iPhone to iPhone. You can choose from the methods above on which for you is the most suitable one. But, if you would like to make sure that you are going to make a safe and satisfying transfer of ringtones, then you can go with the FoneDog Phone Transfer.
Leave a Comment
Comment

Tech Website Writing /Content Optimization
Singing, smiling, surprising every day!
So as a technical writer, it is my duty to gather effective and reliable solutions to answer questions on how to deal with the issues they are having with their devices.
Phone Transfer
Transfer data from iPhone, Android, iOS, and Computer to Anywhere without any loss with FoneDog Phone Transfer. Such as photo, messages, contacts, music, etc.
Free DownloadHot Articles
 /
/
INTERESTINGDULL
/
SIMPLEDIFFICULT
Thank you! Here' re your choices:
Excellent
Rating: 4.5 / 5 (based on 108 ratings)
