FoneDog Screen Recorder
FoneDog Screen Recorder
Special Offer
Special Offer


By Gina Barrow, Last updated: August 21, 2020
For those who are using Voice Memo, it is vital to be familiar with ways on how to transfer voice memos from iPhone to the computer. The Voice Memo is an ideal tool for recording information such as interviews or songs.
In case you do not want to keep the memos on your device since it will take up space, you can sync it with iTunes or send it to your email. Aside from these methods on how to transfer voice memos from iPhone to the computer, you can also utilize the Phone Transfer software by FoneDog.
Method 1: Using the Phone Transfer to Transfer Voice Memos from iPhone to ComputerMethod 2: Using An Email to Transfer Voice EmailsMethod 3: Using iTunes to Synchronize Voice Memos
If you want a quick way to transfer voice memos from your iPhone to a computer, the Phone Transfer software by FoneDog is the best choice. Although there are other options available, it ensures quick and efficient transfer of data.
As an overview, FoneDog Phone Transfer works by transferring data among Android, iOS, and PC. With this tool, you have the option to transfer and back up photos, messages, videos, contacts, and music on PC without any loss. Additionally, it includes a free ringtone maker and HEIC converter.
Phone Transfer
Transfer files among iOS, Android and Windows PC.
Transfer and backup text messages, contacts, photos, video, music on computer easily.
Fully compatible with iOS 13 and Android 9.0.
Free Download

A simple way on how to transfer voice memos from iPhone to the computer is to use the Phone Transfer software by FoneDog. By using this method, it is an easy and efficient option.
Let us now take a close look at the steps on how to transfer voice memos from iPhone to the computer using FoneDog Phone Transfer.
After downloading, installing and launching FoneDog Phone Transfer, link your iPhone to your computer using a USB cable. The software will recognize automatically your device and present relevant information in the interface.
Choose the type of data on the left side of the interface. You can check the voice memo files that you want to transfer. In the interface of Phone Transfer, you can view each item by its name, size, time created and more.
After selecting the voice memo files, start the transfer process from your iPhone to your computer by tapping on the “Export to PC” button on the upper section of the interface.
Now, please wait for the data transfer.
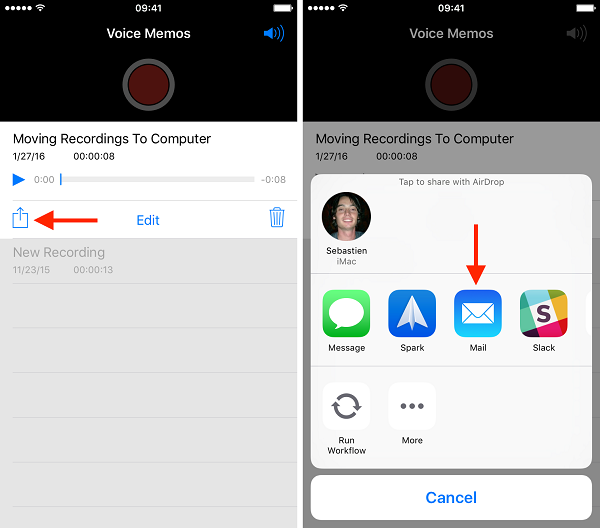
One of the easiest ways on how to transfer voice memos from iPhone to the computer is via email. The only issue with this approach is that you can only send one voice memo at a time. If you want to transfer several voice memos, you must repeat the process several times or try another approach by using iTunes.
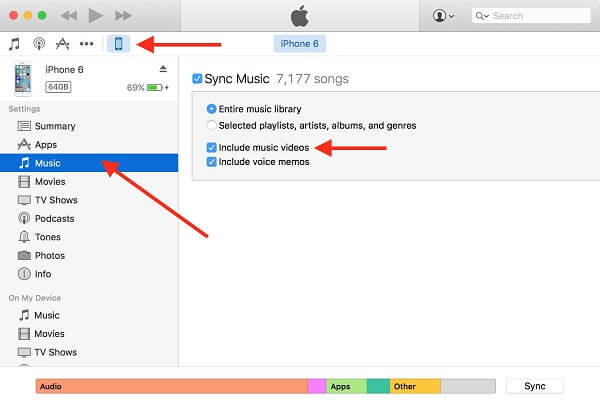
Another method on how to transfer voice memos from iPhone to the computer is syncing via iTunes. With this approach, it is straightforward. Simply connect your iPhone to iTunes.
Follow the steps below on how to import your voice memo files into iTunes. Remember that the process is the same whether you are using a Windows PC or a Mac.
Although this approach is simple, using iTunes to import your voice memos by your iTunes library. With this guide, it assumes that you link your iPhone to your iTunes library as well as syncing your music between iTunes and iPhone. Remember that there is a potential risk especially if you have songs on your iPhone, but none in your iTunes library since the syncing process might overwrite data on your iPhone.
This simply means that the process can potentially delete any music stored on your iPhone. It is vital to be careful and ensure that the music that is on iTunes is the music that you want on your iPhone. If not, a better solution is to email your voice memos so that they can be saved on your computer.
Once you have synchronized your voice memos with iTunes, they are added as a specific category – “Voice Memos”.
Choose the “Music” icon at the upper navigation bar in iTunes and choose Playlists. At this point, you can play the voice memos but you also have the option to drag and drop them to the desktop of your computer and store them in folders or even share via email.
For those who have a computer, you can locate your voice memos in:
For those who are using a Mac, you can locate your synchronized voice memos here:
These are the steps on what you must do to synchronize your voice memo files to your computer for storage. In case you accidentally deleted a synced voice memo on your iPhone, the file will be copied again when you will synchronize with iTunes.
Leave a Comment
Comment

Technical/Creative Writer
Kitchen, my safe space; black, my favorite color
Was a Technical Specialist for a while, troubleshooting Smartphone and Software-related issues until a writing stint caught my attention.
Phone Transfer
Transfer data from iPhone, Android, iOS, and Computer to Anywhere without any loss with FoneDog Phone Transfer. Such as photo, messages, contacts, music, etc.
Free DownloadHot Articles
 /
/
INTERESTINGDULL
/
SIMPLEDIFFICULT
Thank you! Here' re your choices:
Excellent
Rating: 4.7 / 5 (based on 94 ratings)
