FoneDog Screen Recorder
FoneDog Screen Recorder
Special Offer
Special Offer


By Vernon Roderick, Last updated: September 21, 2018
When it comes to recording things, like songs, lectures, or interviews, the Voice Memo app of iPhone is a great tool to use. But like any app on your device, it will eat up storage space and this could be a problem for you, especially if you also have a lot of other data on your iPhone and don’t have a big storage space for it.
The only way for the app not to eat space is to transfer the voice memos from the iPhone to the computer. It is not hard to do this, as you will just need to follow several steps to properly do it. In the next section, the article will be discussing the steps on how you can transfer the voice memos from the iPhone to the computer.
Part 1. How to Transfer Your iPhone's Voice Memos to the ComputerPart 2. Transferring Voice Memo from iPhone to Computer Using iOS Data Backup and RestoreVideo Guide : Using FoneDog Toolkit to transfer Voice Memo from iPhone to PCPart 4. Conclusion
People Also ReadTop 5 data transfer tools that transfer iPhone to PCHow to Transfer Photos from iPad to PC?
Transferring the voice memos from your iPhone to your computer, especially the older memos, is a needed move to free up more storage space on your device. It is not hard to do this, as the process is not a very complex one.
Now there are several ways that you can transfer your voice memos to the computer and the first one is via email or MMS. Now, this process is ideal if you’re only going to send a small size of the voice memo. If it’s a large file, then this process should not be your choice, but if its small, then this is the most convenient way.
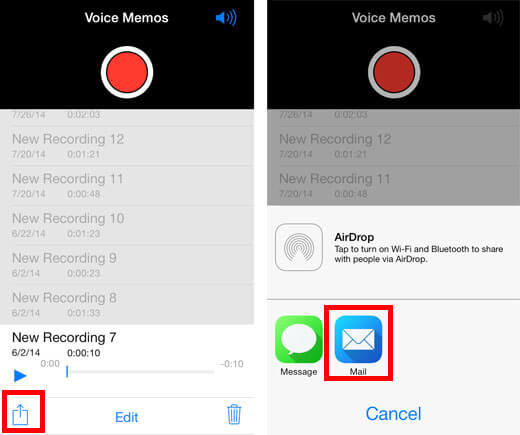
To begin transferring files:
1. Go to the Voice Memo app on your iPhone
2. Select the memo that you want to transfer to your computer (remember it should have a small size)
3. Click on the Share button
4. Here, you have a choice to send the voice memo via email or MMS
5. Follow the instructions given after choosing how you want to send your file
Whatever you decide to choose, both will do the trick. But as mentioned, this method is only effective if the size of the voice memo is small. If you the file your transferring is large, or you have more than one file to transfer, then the next method should do the trick.
The other method to transfer your voice memo to your computer is through iTunes. Apple doesn’t usually support transferring if media type files, like music and videos, from the iPhone to the iTunes. The only media type file that they allow that is actually the Voice Memo.To use this method in transferring your voice memo, you need to:
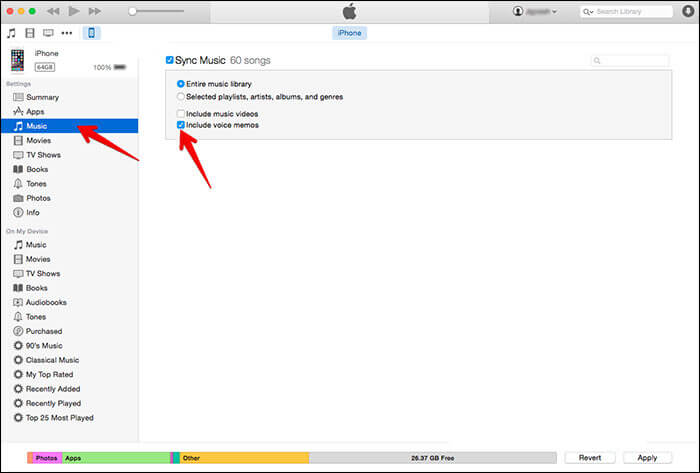
1. Connect your iPhone via the USB-cable to your computer
2. Open iTunes
3. Choose your iPhone device on the main menu
4. On the left sidebar, choose the Music option
5. Tick the Sync Music
6. Tick Include voice memos
7. Click Apply to synchronize the music and voice memo of your iPhone to your iTunes
Once it is done, your voice memos will appear on the music list. You can now access them on your computer through iTunes. Just open the iTunes on your computer every time you want to listen to your voice memos.But what if you don’t have an iTunes account, is it still possible to transfer voice memos to your computer? Yes, it is still possible with the help of a third-party provider.
One such provider is FoneDog Mobile Solution Provider.Their iOS Data Backup and Restore software is a great tool to use to help you properly transfer your voice memo from iPhone to your computer without the need to use iTunes. The beauty of this program is that it is easy to use and is 100% secure. So you’re assured that your data is protected during the entire process.
The FoneDog iOS Data Backup and Restore is designed to backup and restore your iPhone files and data. But it can also be used to transfer files from your iPhone to your computer, even your voice memo. The software backups all files and data contained in your iPhone, so your voice memos are likely to be copied and backed up as well.Let's start using the FoneDog Toolkit to back up the iPhone's voice memo to PC:
To do this you would first need to connect your iPhone device to your computer (it works for both Mac and PC) and install the FoneDog Toolkit – iOS Toolkit. Once it is installed, go to iOS Data Backup and Restore and click on iOS Data Backup.

You can choose whether or not it will be a Standard backup or an Encrypted one.
The Encrypted backup allows you to put in a password on the backup file. This ensures that only those who know the password can access the backup. Once you have made your choice, click Start.

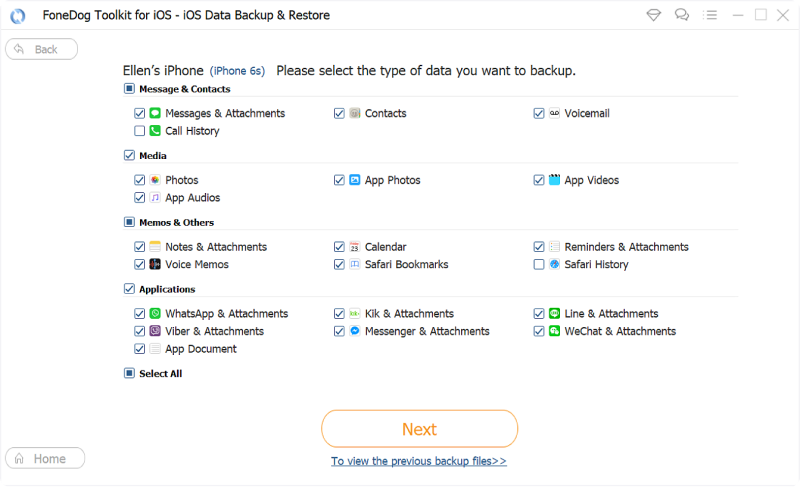
Since you only want to copy your voice memos, choose the voice memo data to be backed up. After choosing all of the voice memos you want to transfer to your computer, click Next, so the software can begin the backup process.
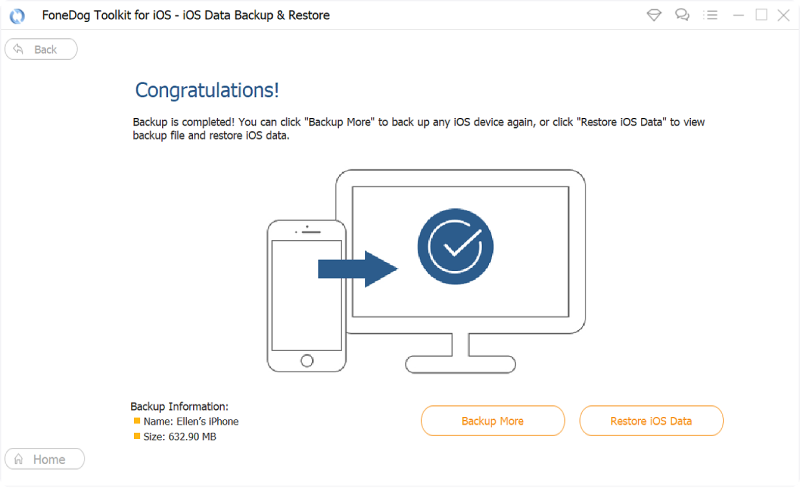
The process will only take a few minutes and once done, the software will display the name and size of the backup file.
You can click Backup More if you have more data to backup or Restore iOS Data to transfer the backed up files to your computer or to another iOS device.
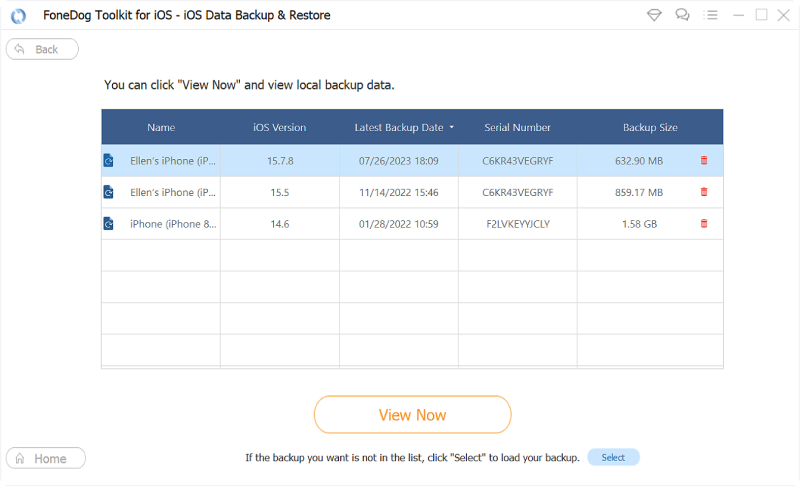
To transfer your voice memo to your computer, click on the Restore iOS Data and the software will display the all the backup files it has. Choose the file that you want to restore to your computer (in this case, it is the voice memo data) then click View Now.
The iOS Data Backup and Restore will scan the backup files. Once it is done, you will be able to view all of the files they found and see if you want to transfer that.Back up the voice memo on the iPhone, then start to restore it to PC.
Make sure your iPhone has connected to your PC. Then select iOS Data Restore from iOS Data Backup & Restore.
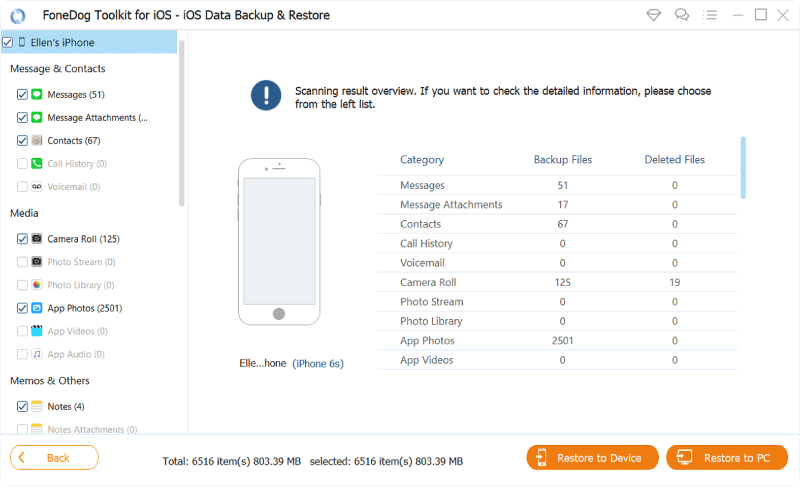
After you click iOS Data Restore, FoneDog toolkit will show you all your backups. You can see the Voice Memo and your file size. Choose the one you want to backup from, then click the "View Now" button.
FoneDog toolkit will begin scanning your backup files. You can see the progress on the windows and you can click "Pause" to pause or "Stop" to finish the process.

When the scanning is done, you can preview the backup data. You can preview each item from the left of the windows. Then selectively select which data you want to restore. Restore to Device or Restore to PC is both supported.
After choosing the files that you want to restore to your computer, the software program will then proceed to restore your file to your computer.
This will effectively transfer your voice memo from iPhone to computer without any problems at all and without needing to use iTunes. Don’t worry about lost data or your files getting damaged or overwritten, the iOS Data Backup and Restore software ensures the data on your computer is not accidentally overwritten and it is designed in a way that there won’t be any lost data during the backup and restoration process.
But the best part about the software is that you can try it out for free. FoneDog offers a free trial of the iOS Data Backup and Restore software to allow you to test it out and see if it is something that you will need or want. The free trial period is for 30-days, so you have a month to enjoy the software without paying for anything.
The Voice Memo app of Apple is one of the most interesting tools to have for recording things you want to keep, like interviews, songs, lectures, and more. The problem with this app is that, like any other app, it will eat up space in your iPhone’s storage.So if you use this app a lot, you are likely consuming a lot of storage space on your iPhone. Now to ensure that your iPhone will always have space, it is best that you transfer some of your old voice memos to your computer.
There are several ways that you can do this, one is through email or MMS, which is the most convenient way to transfer voice memo. The only problem is that this method is only applicable if the size of the voice memo you are transferring is small.If the size is big or there is more than one voice memo that you want to transfer, then you should do it through iTunes. This is easy and simple to do and is also a very convenient way to do it. The voice memo is also the only media type file that iTunes allows being transferred to a computer.
If you don’t have an iTunes account and you have no time to create one, then I suggest you try transferring your file using a third-party provider. I recommend using FoneDog’s iOS Data Backup and Restore software.It is an easy-to-use software that is designed to backup and restores the files and data of your iOS devices. But it can also be used to transfer files from your iOS device to your computer.
You will just backup the file you want to transfer using the software and then restore them to the computer. It is that easy.You don’t have to worry about losing any data as the software is 100% secure and FoneDog designed their software in a way that you won’t have to worry about lost data during the backup and restoration process. And the best part, you can try the software for free for 30 days. So you can enjoy the benefits that the iOS Data Backup and Restore software provides without any risk on your part for 30 days.
Leave a Comment
Comment

Technical Expertise for PC/Website Optimization
One of my passion is to develop software of my own
I write articles to share knowledge about IT technology and some experience in developing my own software, and developing my own software is one of my passions for work.
iOS Data Backup & Restore
Back up your data to PC and selectively restore iOS data from backups.
Free Download Free DownloadHot Articles
 /
/
INTERESTINGDULL
/
SIMPLEDIFFICULT
Thank you! Here' re your choices:
Excellent
Rating: 4.6 / 5 (based on 80 ratings)
