FoneDog Screen Recorder
FoneDog Screen Recorder
Special Offer
Special Offer


By Gina Barrow, Last updated: August 17, 2018
Are you using the iPad for photos most of the time? Do you have a hard time transferring them to your computer? If yes, find out how to transfer photos from iPad to PC in this brand new article.If your iPad works like a Pro camera for work or play, there are moments that you needed to transfer these amazing photos from the device to another. One of the quickest transfer options is the PC or the windows computer.Today we will discuss the different ways possible on how to transfer photos from iPad to pc. There are a lot of methods to do so but not all of them provide quick and easy results.
Here are the tactics you’ll learn about in this post.
Part 1. How to Transfer Photos from iPad to PC using Windows Photo App?Part 2. How to Quickly Transfer Photos from iPad ?Part 3. Conclusion.
We can import or transfer photos from iPad to PC by connecting the device to the computer via the Windows Photo app. follow these steps below:

1. For Windows 10:
Update iTunes on the PC. It requires at least iTunes version to allow the transfer
Connect the iPad to the computer via USB cable
If required, unlock the iPad with the correct pass code
Open the Windows Photo app by clicking the Start icon or the Windows icon and then click on Photos
Select Import and then choose From a USB device
Follow the onscreen prompts and select the desired photos you want to transfer
That’s it! You have successfully transferred photos from your iPad to the PC
2. For Windows 8:
If you are using a computer with Windows 8 running, follow these steps on how to transfer photos from iPad to PC.
Update iTunes on the computer
Connect the iPad via USB cable
Launch the Windows Photo app. Swipe from the bottom to see the app commands
When the Photos app has launched, choose Import
Choose the iPad among the device you want to import from
Choose the photos you want to transfer or you can click Select All
Select Import
You can create a new folder for all the imported photos or it will be automatically saved in the Pictures folder with the corresponding date
The most recommended method on how to transfer photos from iPad to PC is by using the program called FoneDog Toolkit- iOS Data Backup & Restore. This is an all in one iOS mobile solution that keeps all your files intact and restores them to any device selectively.
This software solution has all the astounding benefits you can find in any iOS device:
One click backup to the computer
File preview on backup and restore
Selective backup and restore option
No Data Loss
No Data overwriting upon restore
100% safe and effective
How to use FoneDog Toolkit- iOS Data Backup & Restore?
FoneDog Toolkit- iOS Data Backup & Restore is so easy to use. All you need is to first install and run the program on your Windows computer and follow the step by step guides!
Here is how to use FoneDog Toolkit- iOS Data Backup & Restore:
# 1. Backup iPad:On your computer, download the program FoneDog Toolkit- iOS Data Backup & Restore, which is free and then follow the installation procedure until you reach the main screen menu.
If this is the first time you will use the program, you will need to create a backup for all the iPad contents. Choose iOS Data Backup from the main menu.

In order to back up the entire iPad, you will need to select the best backup mode for you. There are 2 ways to back up the iPad, first is the standard and the next is encrypted.
The second option will ask you to provide a password for the backup content. Click Start to continue.

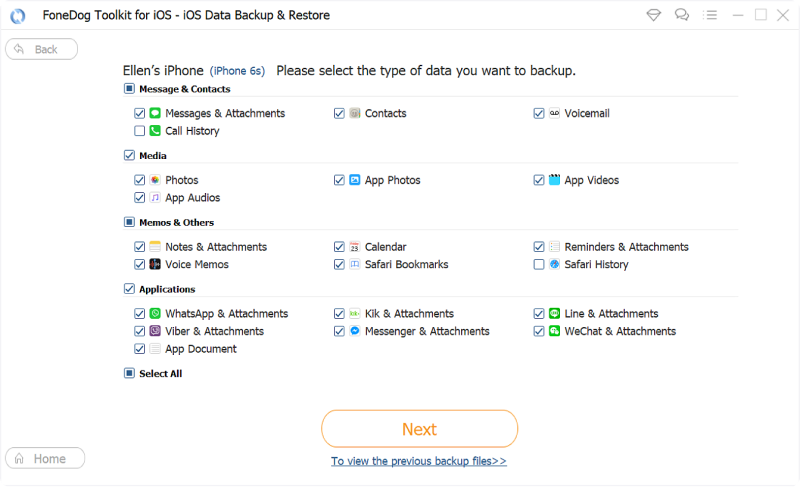
The software will now show you all the possible file types it can back up. What you will need to do now is to simply tick on the boxes you wish to backup.You can Select All or you can choose files selectively.
You can backup all media contents like photos, app photos and videos, and other audio files. Message and Contacts like SMS, phonebook, Voicemails, Call logs, WhatsApp messages and attachments, and more.
It also lets you backup other files such as Browser history, calendar, reminders, notes, and more. Click Next to continue.
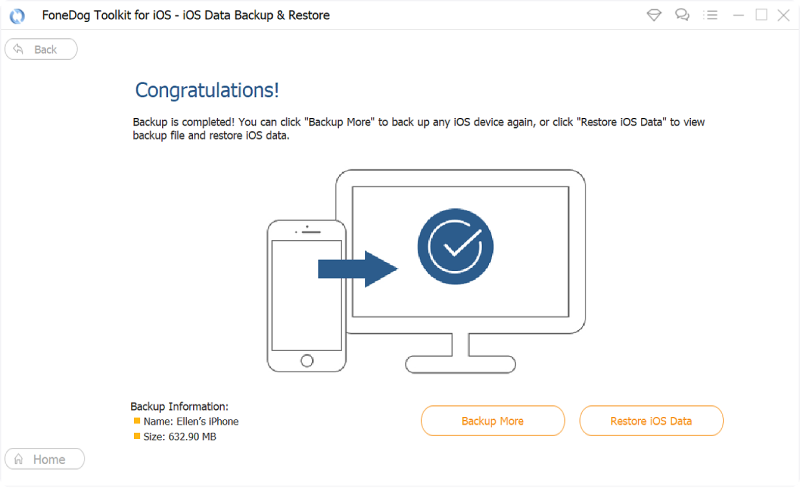
FoneDog Toolkit- iOS Data Backup & Restore will now create the backup file and it will save it in the program itself.
Once the backup process is done, you can now click on either Backup More or Restore iOS data. To restore iOS Data, it will be to the computer or to another iOS device you wish to transfer the backup contents.
# 2. iOS Data Restore.
Next thing you need to do is to restore the iOS backup to the computer. The process is as easy as the backup. Here’s how:
Launch the FoneDog Toolkit- iOS Data Backup & Restore
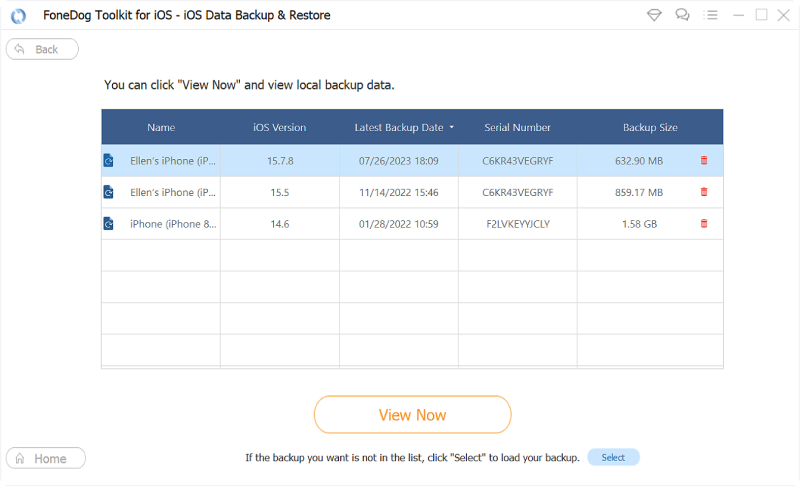
When you are ready to restore the iOS backup to the computer, launch the program FoneDog Toolkit- iOS Data Backup & Restore again and then this time select iOS Data Restore.
After you click the iOS Data Restore, the software will show you the list/s of backup stored in the system. Choose the desired backup file and let the program scan and extract the contents. Click View Now to continue.
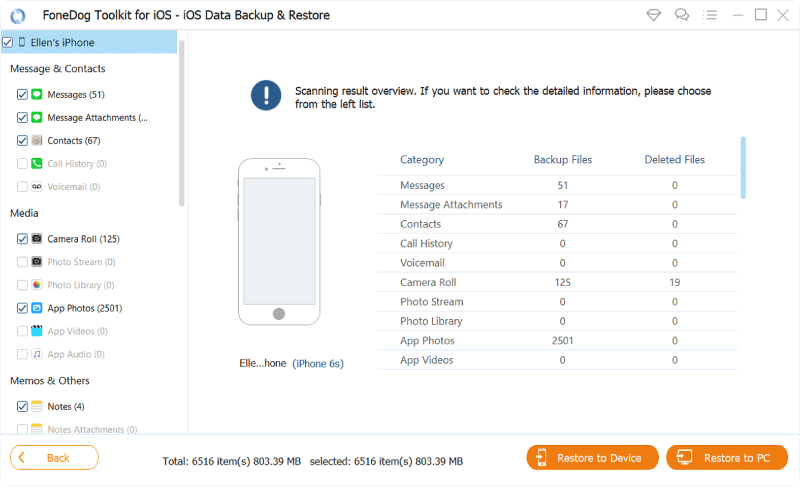
When the FoneDog Toolkit- iOS Data Backup & Restore finishes the scanning of the backup files, you will see the complete display of the contents on the screen.
From here you can choose to restore all of the files or you can selectively choose only the desired contents. Check the boxes for the desired files and then select Restore to PC to save them on the computer.
If you wish to save it on another iOS device, and then choose the other option, Restore to the iOS device.
That’s it! The steps are so easy on how to transfer photos from iPad to PC.
People Also Read:
How to Backup Photos to iCloud
You have just learned 2 easy methods on how to transfer photos from iPad to PC. Have you tried transferring your pictures already? How was it? Share us your experience in the comments below!
Leave a Comment
Comment

Technical/Creative Writer
Kitchen, my safe space; black, my favorite color
Was a Technical Specialist for a while, troubleshooting Smartphone and Software-related issues until a writing stint caught my attention.
iOS Data Backup & Restore
Back up your data to PC and selectively restore iOS data from backups.
Free Download Free DownloadHot Articles
 /
/
INTERESTINGDULL
/
SIMPLEDIFFICULT
Thank you! Here' re your choices:
Excellent
Rating: 4.6 / 5 (based on 61 ratings)
