FoneDog Screen Recorder
FoneDog Screen Recorder
Special Offer
Special Offer


By Adela D. Louie, Last updated: June 25, 2018
How to import photos from iPhone to Mac, MacBook or iMac? Read this article to know different ways to easily import photos from iPhone to Mac. Also supports importing photos from new iPhone X and iPhone 8.Because of this situation, we have gathered information on how you can fix this issue so that you will be able to import photos from iPhone to Mac.
Here are some tips of import photos from iPhone to Mac.
part 1. How to import photos from iPhone to Mac without data lossVideo Guide: How to Import Images from iPhone to MacPart 2. Different Methods to Import Your Photos from iPhone to MacPart 3. Conclusion
People Also ReadSMS Backup and Restore on iPhoneQuick Ways to Restore Backup to Your New iPhone
Now, aside from the mentioned above ways on how you can import your photos from your iPhone device to your Mac PC is having it backed up and restored using a third-party program. This is actually the easiest, fastest and safest way for you to be able to import your photos from iPhone to your Mac. This is by using the FoneDog Toolkit - iOS Data Backup and Restore.
The FoneDog Toolkit - iOS Photos Backup and Restore will let you backup your data from your iPhone device using your computer and you can also have it restore after to your PC or even to another iPhone. The software will also allow you to preview your data and restore any items from your backup file to another iOS device. It will also allow you to export anything that you want from your data to your computer. The program will not lose any of your data from your iPhone device during the restore process and as well as it will not overwrite any data so rest assured that everything will be kept safe on your end.
The FoneDog Toolkit - iOS Data Backup and Restore is the easiest program that you can use for you to import your photos from your iPhone to your Mac computer. All you need to do is, of course, to download the program for your Mac PC and then you are set to go.
Here are the simple steps on how you can backup and restore your data from your iPhone so that you will be able to import your photos from your iPhone to your Mac.
Once you have downloaded the FoneDog Toolkit - iOS Data Backup and Restore on your Mac PC, go ahead and install it and then connect your iPhone device using your USB cable.
Wait for the program to detect your iPhone and then choose "iOS Data Backup and Restore" from the main interface. After that click on "iOS Data Backup" for you to backup your photos.

Here, the FoneDog Toolkit - iOS Data Backup and Restore will then ask you to choose the mode for your backup file. You can choose "Standard Backup" for regular backup mode or you can choose "Encrypted Backup" for you to set up a passcode for your backup file for you to protect its privacy.
After selecting the desired backup mode and if you are ready to proceed, just go ahead and click the "Start" button.

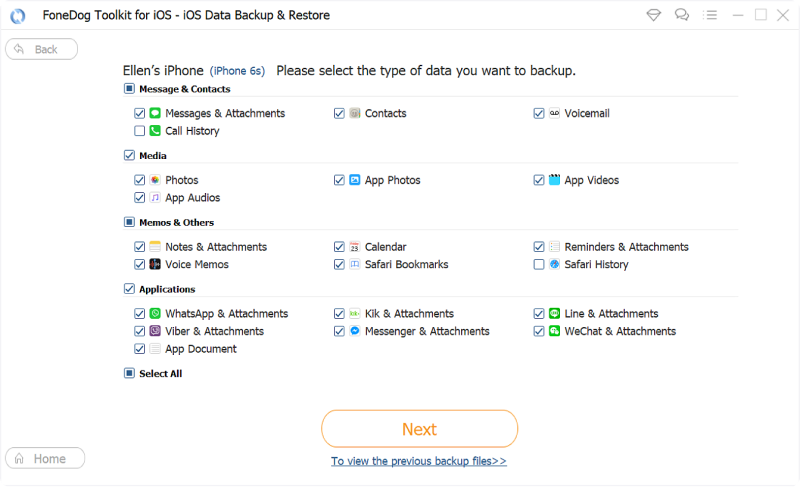
Here on the next step, the FoneDog Toolkit - iOS Data Backup and Restore will then ask you to choose the data that you want to backup from your iPhone device.
For you to import your photos from your iPhone device, go ahead and select "Photos" and then click on the "Next" button.
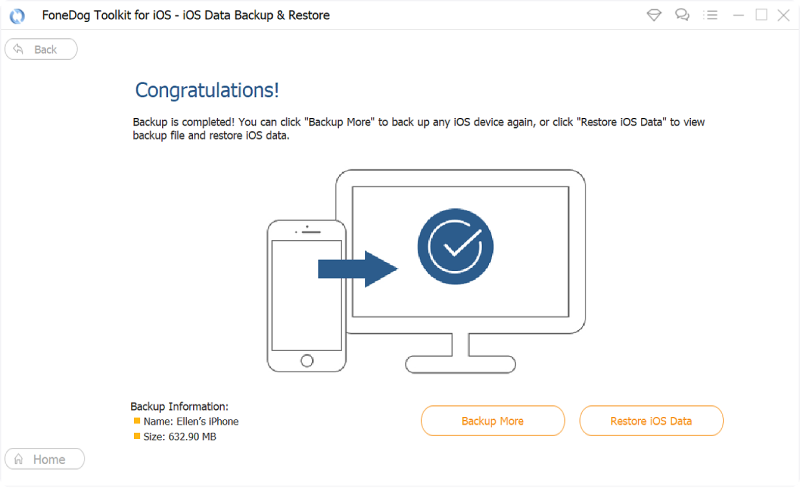
After that, the FoneDog Toolkit - iOS Data Backup and Restore will then start backing up your photos. Once the backup is done, the program will show you the size and the name of the backup file made.
You have the options to click on "Backup More" if you wish to backup more data from your iPhone device or you can choose "Restore iOS Data" if you would like to restore your backup file.
Launch the program on your computer and then connect your iPhone device using your USB Cable. And then click on the "iOS Data Restore" option.
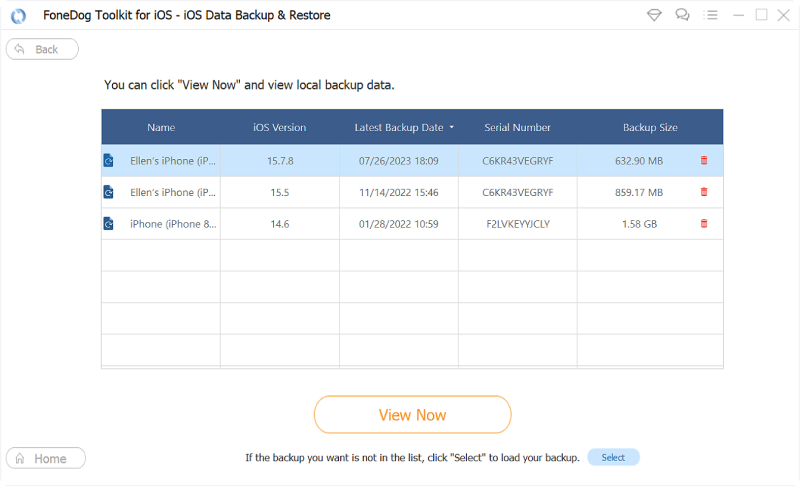
After that, the Fonedog Toolkit - iOS Data Backup and Restore will then show you a list of your backup file. Choose the most recent backup file that you made according to the time and the date shown on your screen.
After that, go ahead and click on "View Now" button.
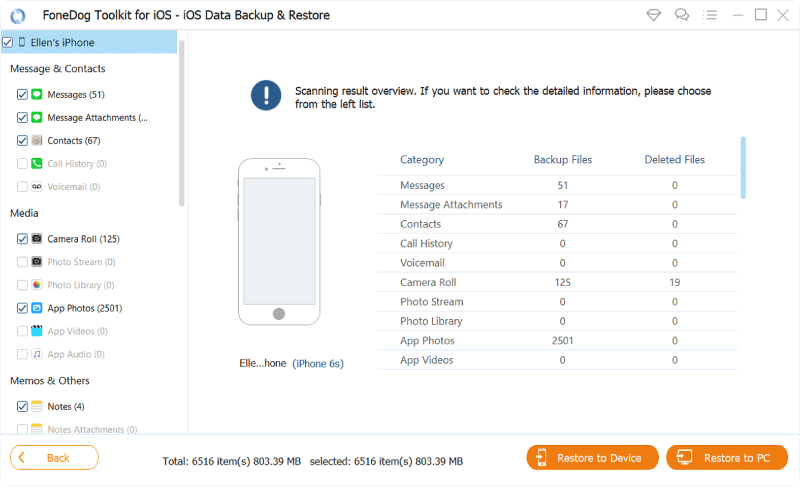
Once you have selected the backup file you wish to restore, the FoneDog Toolkit - iOS Data Backup and Restore will then start scanning your backup file and you will be able to see its progress on your screen.
Wait until the program is done with the scanning process.

Once the FoneDog Toolkit - iOS Data Backup and Restore is done scanning your backup file, you will then be able to preview them. You can preview them from the left side and you can also selectively choose the items that you want to restore. For you to import your photos to your Mac PC, go ahead and click on the "Restore to PC" button.
TIP:
If you want to restore your data to another iDevice, you can just go ahead and simply click on the "Restore to iDevice" option.
Click the player to watch what it did for you to import photos from iPhone to Mac.
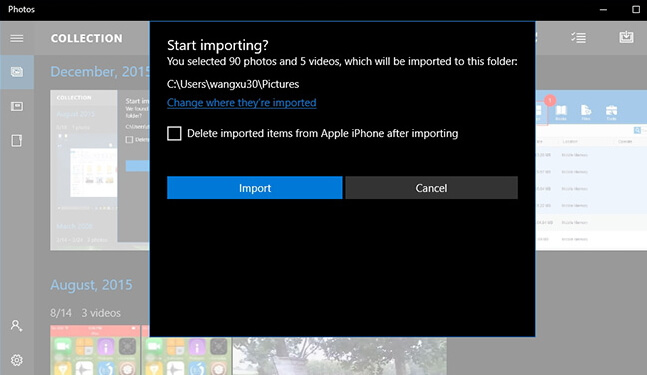
There is a default photo transfer that you can use for you to be able to transfer or import your photos from your iPhone to your MAC. You will also be able to transfer your photos from your iPhone to Mac in batches. For you to do all these, follow the simple guide below.
Step 1: Have your iPhone connected to your PC using your USB Cable
Step 2: Look for "Photos" from the Start menu and then have it opened
Step 3: Choose and click on the "Import" button found at the top right corner of your screen.
Step 4: Select your iPhone device for you to confirm doing multiple photo transfer from your iPhone to your Mac.
You can also try to do this method if you want to import your photos from your iPhone to your Windows 10 PC using the Windows Explorer. Follow the step by step method for you to be able to do this.
Step 1: Launch your Windows Explorer
Step 2: Once you have launched the Windows Explorer, just go ahead and select "This PC" located on the left side of the bar.
Step 3: Click on your iPhone's name
Step 4: From the folders shown on your screen, go ahead and choose DCIM folder under Internal Storage
Step 5: Press on Ctrl on your PC and then choose the photos that you want to import.
Step 6: Click on the right click button and then select Copy from the menu shown on your screen. Or you can just also simply press Ctrl + C button.
Step 7: After choosing the photos you wish to import, just go to your Pictures folder on your PC and then go ahead and paste your photos. iCloud helper!!!
Another great way on how you can import photos from iPhone to Mac is with the help of cloud services. These cloud services are Dropbox, OneDrive and iCloud. The great thing about using cloud services as a way for you to import photos from iPhone to Mac is that you do not need to connect your iPhone device anymore to your computer. You will be able to import your photos from your iPhone to your Mac computer just by syncing them.TIP:
For you to be able to sync your photos to your Dropbox and OneDrive, you must enable camera upload from the settings of your iPhone because it is easier doing it that way. Here is some step by step method on how you can import your photos from iPhone to Mac using these kinds of cloud services.

Step 1: Launch the OneDrive program
Step 2: Open Settings and then go ahead and select the folders for syncing
Step 3: Select the folders where your photos are actually located
Step 4: After that, go ahead and click on "OK" and then make sure that the app syncs the folder.
Step 5: Wait until the process is complete This may actually take some time depending on how large the photos you want to import from your iPhone device to your Mac.
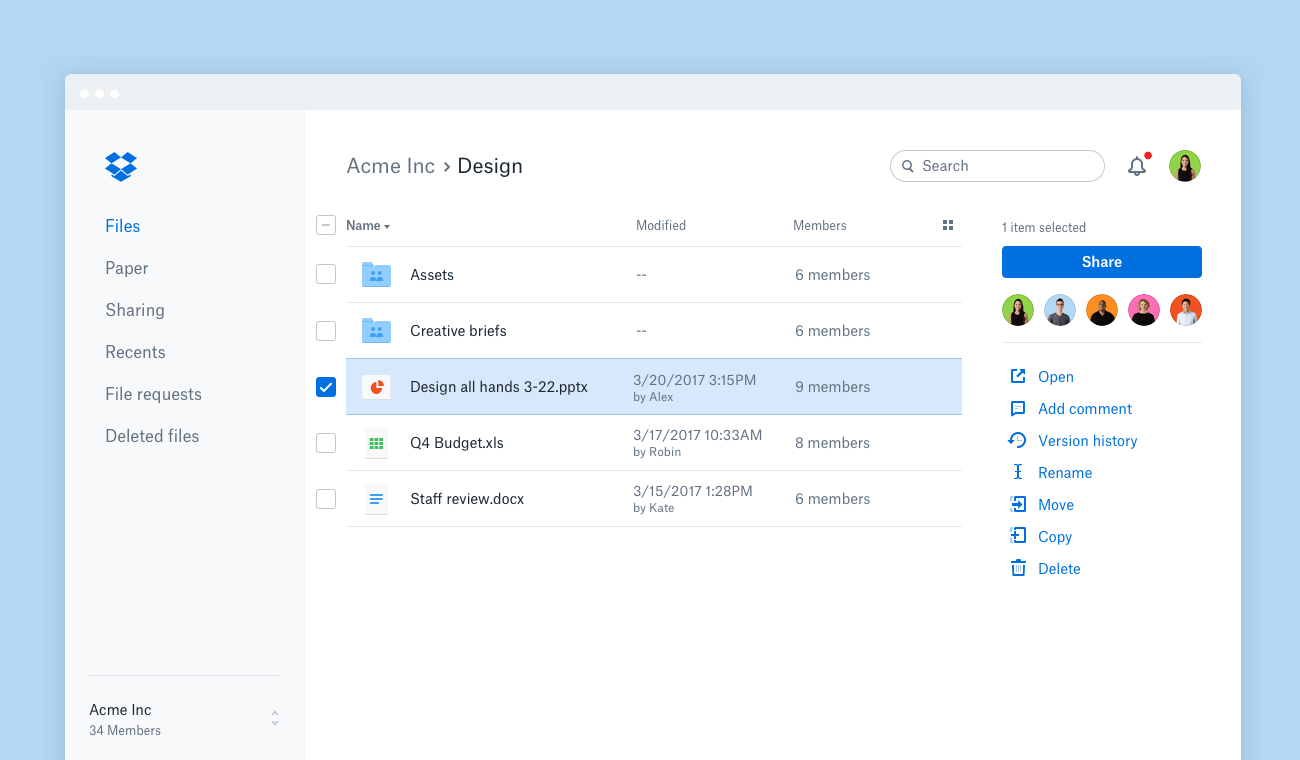
Step 1: On your Mac, go ahead and launch your web browser and then go to Dropbox.comDropbox.com
Step 2: After that, go ahead and download and install the Dropbox Desktop Sync
Step 3: Once you have installed Dropbox Desktop Sync, go ahead and choose the Dropbox icon from the right portion of the taskbar for you to be able to access your settings and then go ahead and choose the folders for syncing.
Step 4: Choose "Preferences" and then click on "Accounts" option for you to select Selectively Sync.
Step 5: After that, all your folders in your Dropbox will then appear on your screen. From here, go ahead and select the photos that you wish to import from your iPhone to your Mac PC.
Step 1: Have the iCloud downloaded on your Mac PC and then install it.
Step 2: After installing the program go ahead and launch it on your computer
Step 3: After that, go ahead and log in using your Apple ID and password
Step 4: Once you are successfully signed in, go ahead and locate your Photos folder and then tick the Options button.
Step 5: And then go ahead and mark the folder name "My Photo Stream" and then click on Upload new photos from my PC.
Step 6: Once you are done just go ahead and click on "Done" button and then hit "Apply" to complete.
This is how truly easy to import photos from iPhone to Mac by using the FoneDog Toolkit - iOS Data Backup and Restore. You will not have to worry on any data being overwritten or that you might lose them because the FoneDog Toolkit - iOS Data Backup and Restore will not allow you to lose any of your data and it will not overwrite them as well.
Very easy to do as you can see the simple steps shown on your screen and very efficient as well. You can also try to do the other ways on how you can import your photos from your iPhone to Mac but only FoneDog Toolkit - iOS Data Backup and Restore will be able to do this in the easiest way possible.
The program will also allow you to preview before you restore your data to your PC or to your iOS device. You can import other data from iPhone to Mac device with the FoneDog Toolkit - iOS Data Backup and Restore.
Leave a Comment
Comment

Tech Website Writing /Content Optimization
Singing, smiling, surprising every day!
So as a technical writer, it is my duty to gather effective and reliable solutions to answer questions on how to deal with the issues they are having with their devices.
iOS Data Backup & Restore
Back up your data to PC and selectively restore iOS data from backups.
Free Download Free DownloadHot Articles
 /
/
INTERESTINGDULL
/
SIMPLEDIFFICULT
Thank you! Here' re your choices:
Excellent
Rating: 4.7 / 5 (based on 109 ratings)
