FoneDog Screen Recorder
FoneDog Screen Recorder
Special Offer
Special Offer


By Nathan E. Malpass, Last updated: June 19, 2020
If you want to transfer files from iPhone to iPhone, we’ve got your back. We’ll help you learn to move files between these devices easily and without hassles!
Your iPhone is a very precious belonging that contains important files such as contacts, documents, photos, videos, and audio, among others. You must make sure these files are kept intact or transferred to a new iPhone if you bought an upgraded version.
Thus, you may want to transfer files from iPhone to iPhone easily without the hassle. In this way, once you get a new iPhone version, you can make sure that the data from your old iPhone is still there.
This guide will help you transfer files from iPhone to iPhone through detailed steps we will be putting out in the later sections of our article. The details will help you move your data from one device to another without having to worry about corruption or data loss.
Part 1: How Do I Transfer Everything from One iPhone to Another?Part 2: The Best Way to Transfer Files from iPhone to iPhonePart 3: Transfer Files from An Old iPhone to A New iPhonePart 4: Other Ways to Transfer Files from iPhone to iPhonePart 5: Conclusion
How do I transfer everything from one iPhone to another? To transfer files from iPhone to iPhone is easy if you have a third-party application to help you out. These apps usually file transfer applications that will help you move data. However, there are still ways to do this without using another type of software.
The other method involves backing up your entire data from an iPhone to another platform. Then, you have to move the files from that middle platform towards the new iPhone. This process can be very tedious and things can go wrong if you don’t know what you’re doing.
As such, there are many ways to transfer everything from one iPhone to another. And there are a lot of third-party applications that will help you do these as well. You simply have to choose the best one that suits your needs.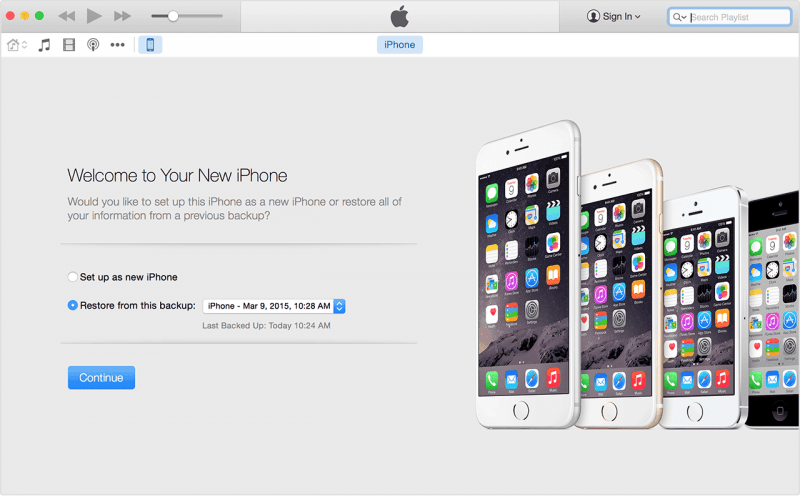
The best way to transfer files from iPhone to iPhone is through a third-party application that is specifically designed to do so. We recommend that you use FoneDog Phone Transfer as it is an excellent tool that literally gets the job done.
Phone Transfer
Transfer files among iOS, Android and Windows PC.
Transfer and backup text messages, contacts, photos, video, music on computer easily.
Fully compatible with iOS 13 and Android 9.0.
Free Download

FoneDog Phone Transfer allows you to transfer data among iOS, Android, and computer devices. Supported data types include messages, photos, contacts, video, music, and so on. It comes with a free ringtone maker and a HEIC converter as well. The latter is especially useful for saving photos, especially if you have an iOS device that saves in HEIC format.
A free trial is available for FoneDog Phone Transfer enabling you to test the waters before purchasing the product. Plus, you can easily switch data between the same platforms or between different platforms with the tool.
Here’s how to use FoneDog Phone Transfer in order to transfer files from iPhone to iPhone:
Of course, to use the tool, you have to download it first on your computer. Both Windows and macOS versions are supported. Then, open the installation package in order to run the installation and finish the process. Once that is complete, you should launch the software on your computer.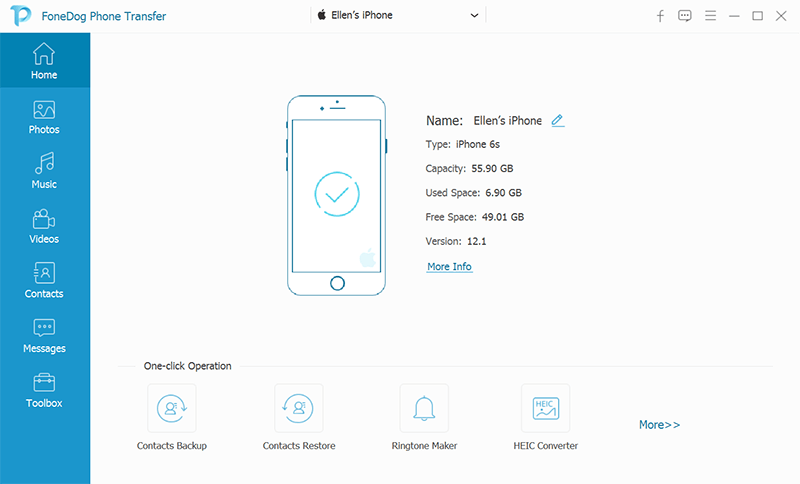
The next step is to connect the two iPhones towards the computer with a USB cable. FoneDog Phone Transfer will recognize these devices automatically. The information about the devices will be seen within the interface.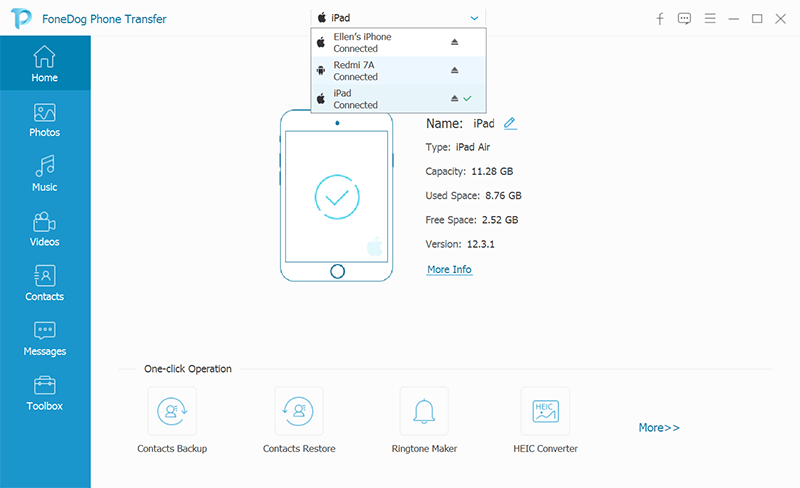
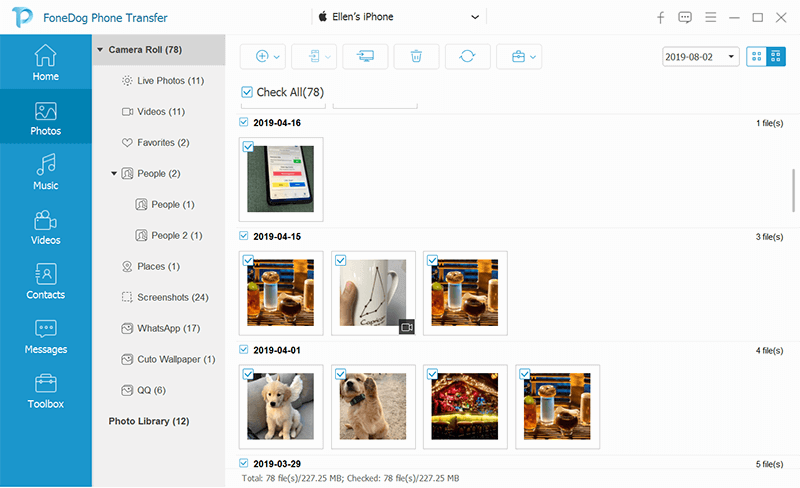
The third step involves choosing the file type you wish to transfer between the two iPhones. The data types available include Photos, Music, Videos, Contacts, and Messages. Choose the specific files you wish to transfer.
The next step would be to transfer the selected files to the second connected iPhone. Wait until the process is complete. Once done, you have finished implementing the process to transfer files from iPhone to iPhone. You can now eject the two iOS devices from the computer.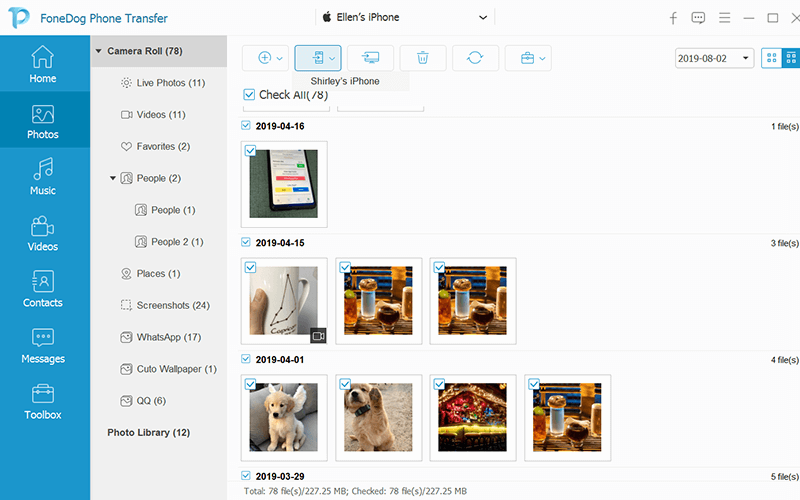
There’s another way to transfer files from iPhone to iPhone and this process can be very tedious. However, we’ll walk you through the different steps on how to do it. Check out the steps below.
The first step you have to do is to make a backup of the first iPhone on a platform or device. This is possible by backing up through iCloud, Finder, or iTunes. It is preferred to use iCloud since it enables you to access the data anywhere, anytime. However, the process with iTunes and Finder is faster compared to iCloud.
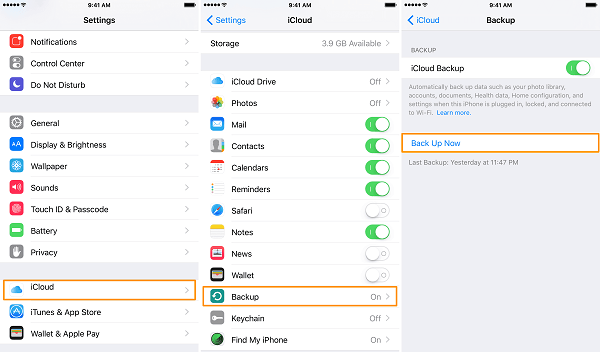
The second step would be to turn the new iPhone on (or the second iPhone). Then, follow the instructions on the screen in order to set your device up. These would take a few minutes only as long as you know what you’re doing.
Once you are logged into the second iPhone using your own Apple ID, it will ask you a question. It will prompt you to set your iPhone up as a brand new one. Or, it will ask if you wish to restore a backup through iCloud or iTunes.
To transfer files from iPhone to iPhone, you should choose “Backup From iTunes” or “Backup From iCloud”. Once you are on the new screen, you should choose the latest version of the backup you have made from your first iPhone.
Now, once you have done these steps, data, and various preferences from the first iPhone will be moved to the new iPhone. The time it takes to complete the process will vary depending on the number of files to restore. If you’re getting it from iCloud, the Wi-Fi speed will also be a factor in setting up the new iPhone.
There are other ways to transfer files from one iPhone to another. These “other” ways are great options if you prefer them for your convenience. As such, the said methods can be seen in our list below:
SHAREit is a file transfer application that can be used in Android, iOS, and computer devices. As such, you can use it to transfer files from iPhone to iPhone. You simply download the app on both devices and connect the two on the same Wi-Fi network.
Once this is done, you’re good to go and transfer your files between the two iOS devices. If you wish to use SHAREit to transfer from iOS to Android devices, it is possible as well. The same goes for transferring files between mobile devices and computers. This is a very versatile tool you can use for a lot of file transfer activities.
AirDrop is a feature among Apple devices that allows you to transfer files between devices. It uses Bluetooth and Wi-Fi technologies to implement the process on how to transfer files from iPhone to iPhone.
Here are the steps on how to use AirDrop for file transfer between two iPhones:
You can also use Dropbox, a popular cloud storage platform. It gives you about 2GB worth of storage space that can be used to transfer files from iPhone to iPhone. To use it, you simply have to download Dropbox on both iPhone devices.
After that, you have to log into the same account on both devices. Then, from the sending device, upload the files you wish to share on Dropbox. Wait until the upload process is complete. Then, on the receiving device, simply go to the Dropbox application.
Once in the Dropbox app using your receiving device, locate the files that have been uploaded previously. Then, simply download these files to transfer them to your second device. That’s it! If you’re sending a file that is larger than 2GB, you may want to use Google Drive instead.
Google Drive is similar to Dropbox in the sense that you have to upload the files using your first device. Then, you have to download the files from Google Drive using the receiving device. It’s a great way to transfer files from iPhone to iPhone, especially if you’re transferring a huge number of files with large sizes.
This is because Google Drive gives you 15GB worth of free storage space. However, if you want to transfer files larger than 15GB, you may want to use FoneDog Phone Transfer instead as it has no limitations on file size.
Phone Transfer
Transfer files among iOS, Android and Windows PC.
Transfer and backup text messages, contacts, photos, video, music on computer easily.
Fully compatible with iOS 13 and Android 9.0.
Free Download
It is important to note that the larger the number and the size of files you want to transfer between iPhones, the longer it will take to complete the moving process. As such, you may want to use the methods we have outlined here to transfer files from iPhone to iPhone.
The best method we recommend is FoneDog Phone Transfer. However, you are still free to choose what you prefer. We love FoneDog Phone Transfer because you can instantly transfer all files you want with a few simple clicks.
Plus, it comes with a free trial so you can check it out before purchasing. The tool enables you to transfer different file types so you won’t worry about the hassle of incompatible or unsupported data. Get FoneDog Phone Transfer now!
Leave a Comment
Comment

iPhone/Android Devices’ Maintenance Expert
Staying home, listening to music, writing tech articles
Many people asked me to repair their mobile phones so I have a lot of experience in mobile phone repair, and I know a lot about Android or Apple phones.
Phone Transfer
Transfer data from iPhone, Android, iOS, and Computer to Anywhere without any loss with FoneDog Phone Transfer. Such as photo, messages, contacts, music, etc.
Free DownloadHot Articles
 /
/
INTERESTINGDULL
/
SIMPLEDIFFICULT
Thank you! Here' re your choices:
Excellent
Rating: 4.8 / 5 (based on 69 ratings)
