FoneDog Screen Recorder
FoneDog Screen Recorder
Special Offer
Special Offer


By Nathan E. Malpass, Last updated: March 14, 2024
In today's fast-paced digital age, our smartphones have become repositories of memories, documents, and various digital clutter. Just like our physical spaces, our digital realms require occasional tidying up. If you're a Samsung phone user looking to reclaim valuable storage space and maintain a streamlined device, you're in the right place.
In this article, we will delve into the simple yet crucial task of how to empty trash on Samsung phone. Whether you're a tech novice or a seasoned user, mastering this process will not only free up space but also contribute to a smoother and more efficient mobile experience.
Part #1: Is There A Universal Samsung Trash Or Recycle Bin?Part #2: How to Empty Trash on Samsung PhonePart #3: Bonus Tip: Use FoneDog Android Data Recovery to Restore Deleted FilesPart #4: FAQs – How to Empty Trash on Samsung Phone
In the realm of digital devices, the notion of a trash or recycle bin is deeply ingrained in our understanding of managing files. However, the specifics can vary between different platforms and devices. Samsung, a major player in the smartphone industry, is no exception to this rule.
Unlike some computer operating systems that feature a universal trash or recycle bin where deleted files temporarily reside, Samsung phones employ a more nuanced approach. When you empty trash on Samsung phone, it doesn't immediately vanish into an easily accessible bin. Instead, Samsung utilizes a system that involves two primary stages: the Gallery app and the Samsung Cloud Recycle Bin.
While the Gallery Trash serves as a local repository, Samsung takes an additional step by integrating cloud storage into the equation. Samsung Cloud provides users with a Recycle Bin feature that acts as a secondary layer of protection for deleted files.
By mastering the art of emptying these digital bins, Samsung users can maintain an organized and efficient device, ensuring that deleted items don't linger unnecessarily. Stay tuned for the next part of our guide, where we'll explore advanced tips for optimizing storage on your Samsung phone.
Samsung's Gallery app serves as the gateway to managing and recovering deleted photos and videos on your device. The "Recently Deleted" folder within the Gallery acts as a temporary holding space before files are permanently removed.
Step #1: Open the Gallery App
Launch the Gallery app on your Samsung phone. This app is commonly pre-installed on Samsung devices and is the default application for viewing and managing photos and videos.
Step #2: Access the Recently Deleted Folder
In the Gallery app, look for the "Recently Deleted" folder. This folder contains files that have been deleted but not yet permanently removed from your device.
Step #3: Select and Review Deleted Items
Once in the "Recently Deleted" folder, you'll see a list of deleted photos and videos. Review the items to ensure you want to permanently remove them. This step allows you to double-check and avoid accidental deletions.
Step #4: Empty the Recently Deleted Folder
To permanently delete the files in the "Recently Deleted" folder, follow these steps:
Step #5: Confirm Deletion
A confirmation prompt will appear to ensure you want to proceed with the deletion. Confirm your choice, and the selected files will be permanently removed from your device.
Step #6: Check Available Storage
After emptying the Recently Deleted folder, it's a good practice to check your available storage to confirm that the deleted items have been successfully removed. You can do this by going to your device's settings and checking the storage section.
Samsung devices also feature a dedicated Files or File Manager app that allows users to handle a broader range of file types. This includes documents, downloads, and other miscellaneous files. Here's a step-by-step guide on how to empty trash on Samsung phone using the Files or File Manager app:
Step #1: Open the Files or File Manager App
Navigate to the Files or File Manager app on your Samsung device. This app is typically pre-installed and is used for organizing and accessing various types of files stored on your device.
Step #2: Locate the Trash or Recycle Bin
Within the Files or File Manager app, look for the "Trash" or "Recycle Bin" folder. This is where deleted files are temporarily stored before being permanently deleted.
Step #3: Access the Trash Folder
Tap on the "Trash" or "Recycle Bin" folder to view the files that have been deleted from your device. This folder functions as a temporary storage space for files awaiting permanent deletion.
Step #4: Review Deleted Files
Take a moment to review the files in the Trash folder to ensure you want to permanently remove them. This step allows you to double-check and prevent the accidental deletion of important files.
Step #5: Empty the Trash Folder
To permanently delete the files in the Trash folder, follow these steps:
Step #6: Verify Storage Space
After emptying the Trash folder in the Files or File Manager app, verify your device's available storage to ensure that the deleted files have been successfully removed.
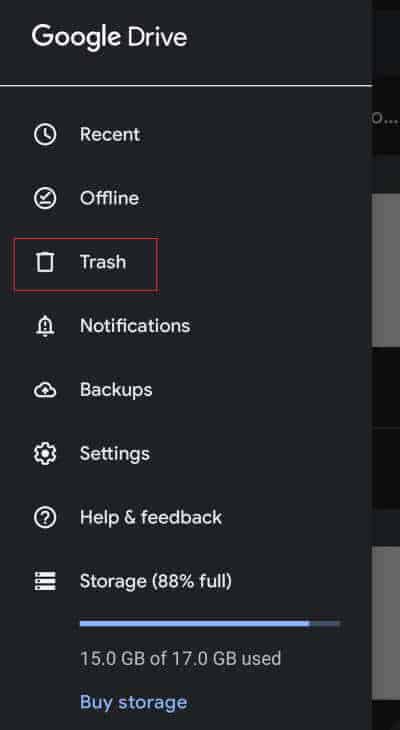
Many Samsung users leverage Google Drive for cloud storage, meaning you can restore backup data from Google Drive. If you've deleted files stored on Google Drive and want to ensure they are permanently removed, follow this step-by-step guide to empty the trash on Google Drive from your Samsung phone:
Step #1: Open the Google Drive App
Launch the Google Drive app on your Samsung device. This app provides access to your cloud storage and allows you to manage files and folders stored on Google Drive.
Step #2: Access the "Trash" or "Bin"
Within the Google Drive app, look for the "Trash" or "Bin" option. This is where deleted files from Google Drive are temporarily stored before being permanently deleted.
Step #3: Review Deleted Files
Tap on the "Trash" or "Bin" to view the files that have been deleted from Google Drive. Take a moment to review the items to ensure you want to permanently remove them.
Step #4: Empty the Trash on Google Drive
To permanently delete the files in the Google Drive Trash, follow these steps:
Step #5: Check Google Drive Storage
After emptying the Trash on Google Drive, it's advisable to check your Google Drive storage to ensure that the deleted files no longer count towards your storage quota.
Samsung Cloud serves as a convenient cloud storage solution for Samsung device users, providing a secure platform for backing up and syncing essential data. You can also retrieve files like pictures from Samsung Cloud. If you've deleted files on Samsung Cloud and want to permanently remove them, follow this step-by-step guide:
Step #1: Open the Samsung Cloud App
Launch the Samsung Cloud app on your Samsung device. This app is designed to manage your cloud storage, backups, and other related services.
Step #2: Navigate to the "Trash" or "Recycle Bin"
Within the Samsung Cloud app, locate the "Trash" or "Recycle Bin" section. This is where deleted files from Samsung Cloud are temporarily stored before being permanently deleted.
Step #3: Review Deleted Files
Tap on the "Trash" or "Recycle Bin" to view the files that have been deleted from Samsung Cloud. Take a moment to review the items to ensure you want to permanently remove them.
Step #4: Empty the Trash on Samsung Cloud
To permanently delete the files in the Samsung Cloud Trash, follow these steps:
Step #5: Verify Samsung Cloud Storage
After emptying the Trash on Samsung Cloud, it's advisable to check your Samsung Cloud storage to ensure that the deleted files no longer count towards your storage allocation.
Clearing app cache emerges as a valuable practice. App cache consists of temporary files stored by applications to speed up processes and enhance user experience. Over time, these files can accumulate, occupying valuable storage space. Here's a step-by-step guide on how to empty app cache on your Samsung phone:
Step #1: Open the Settings App
Navigate to the "Settings" app on your Samsung device. This app is typically represented by a gear icon and serves as the control center for various device settings.
Step #2: Access the "Apps" or "Application Manager" Section
Within the Settings app, look for the "Apps" or "Application Manager" section. The naming may vary slightly depending on your Samsung device model.
Step #3: Select the App Whose Cache You Want to Clear
Scroll through the list of installed apps and select the app for which you want to clear the cache. Tapping on the app will open its detailed settings.
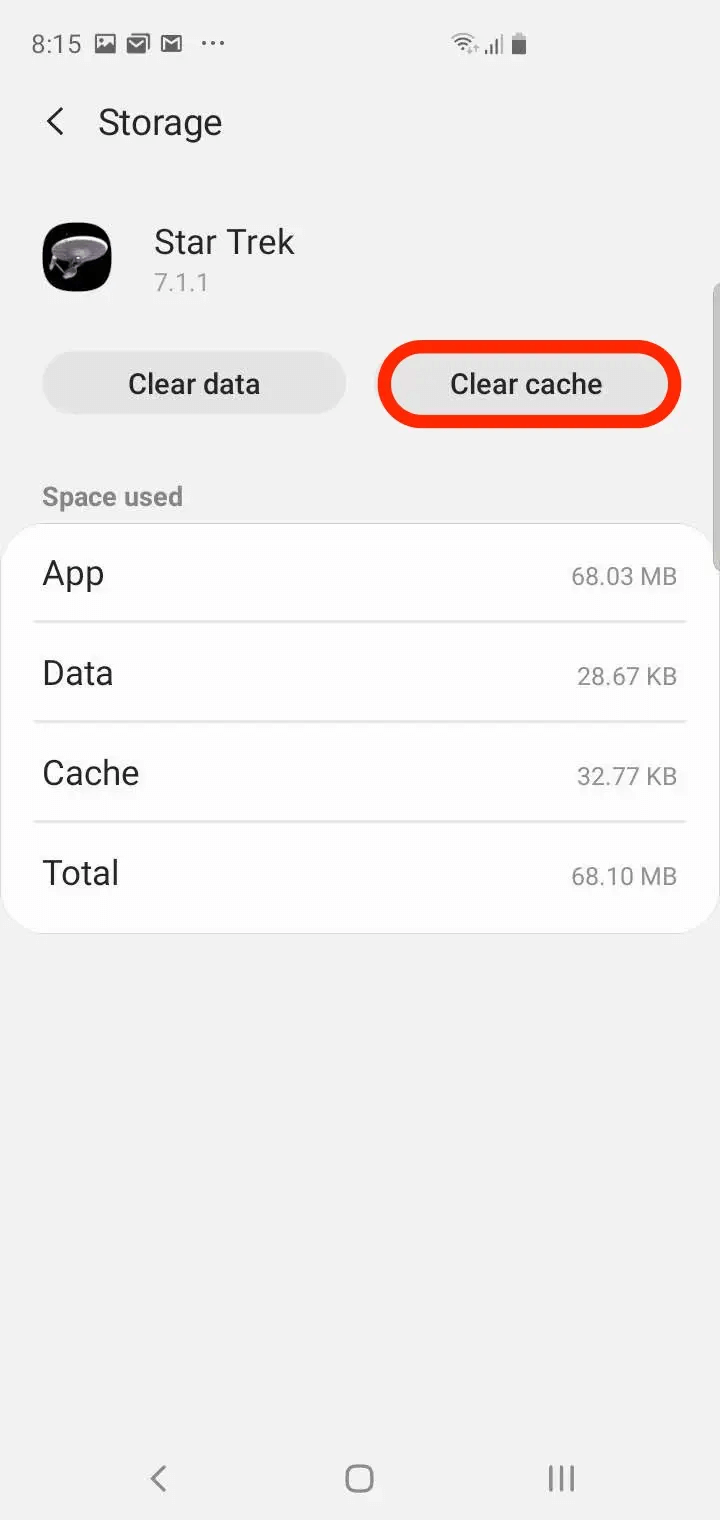
Step #4: Clear App Cache
Inside the app's settings, look for the "Storage" or "Storage Usage" option. Here, you'll find information about the app's storage usage, including the cache size. Tap on the "Clear Cache" button to delete the temporary files associated with the app.
Step #5: Repeat for Other Apps
Repeat these steps for other apps on your Samsung phone. Consider focusing on apps with larger cache sizes to maximize the impact on storage space.
Step #6: Monitor Storage Changes
After clearing the cache for selected apps, monitor your device's available storage in the Settings app. You should observe an increase in available space, contributing to a smoother and more responsive device.
How to get back deleted files when empty trash on Samsung phone? FoneDog Android Data Recovery is a powerful tool designed to help you recover lost or deleted files on your Samsung phone. Whether it's photos, videos, documents, or other types of data, this tool simplifies the recovery process, providing a safety net for your valuable information.
Android Data Recovery
Recover deleted messages, photos, contacts, videos, WhatsApp and so on.
Quickly Find Lost and deleted data on Android with or without root.
Compatible with 6000+ Android devices.
Free Download
Free Download

Steps:
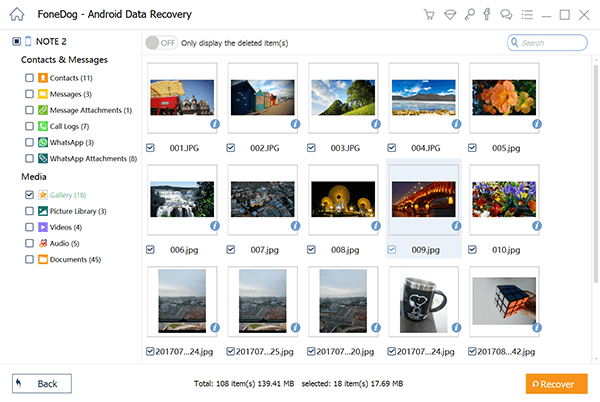
FoneDog Android Data Recovery emerges as a valuable ally in the quest to restore deleted files that may seem lost forever. With its user-friendly interface, selective recovery options, and compatibility with the latest Android versions, it stands as a reliable solution for users who find themselves in need of data retrieval.
People Also ReadHow to Restore Deleted Photos from Gallery on AndroidStep-by-Step Guide: How to Restore WhatsApp from Local Backup
Leave a Comment
Comment

iPhone/Android Devices’ Maintenance Expert
Staying home, listening to music, writing tech articles
Many people asked me to repair their mobile phones so I have a lot of experience in mobile phone repair, and I know a lot about Android or Apple phones.
Android Data Recovery
Recover deleted files from Android phone or tablets.
Free Download Free DownloadHot Articles
 /
/
INTERESTINGDULL
/
SIMPLEDIFFICULT
Thank you! Here' re your choices:
Excellent
Rating: 4.6 / 5 (based on 74 ratings)
