FoneDog Screen Recorder
FoneDog Screen Recorder
Special Offer
Special Offer


By Adela D. Louie, Last updated: February 20, 2024
You might have the experience in recording audio on Google Slides, but this post reveals the strategies for effortlessly capturing audio in PowerPoint presentations. Regardless of your level of experience in presenting, this guide about how to record PowerPoint with audio will help you create a great presentation.
We provide comprehensive assistance, ranging from microphone setup to seamless synchronization of your speech with slides. Enhance your ability to communicate effectively and convert your lectures into captivating and engaging encounters. Explore the realm of voice-enhanced PowerPoint and create a memorable presentation for your next speaking engagement.
Part #1: How to Record PowerPoint with Audio (Direct Method)Part #2: How to Record PowerPoint with Audio (Windows/Mac Method)Part #3: Best Method on Recording PowerPoint with Audio – FoneDog Screen RecorderPart #4: FAQsConclusion
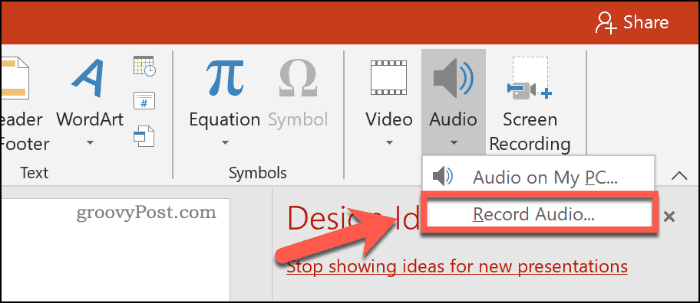
Capturing audio directly within the application provides a convenient method to incorporate narration or sound snippets into your presentation. Prior to commencing the recording process, ensure that your computer has an enabled microphone.
Verify your computer configurations to grant the necessary permissions for audio recording, or contemplate utilizing an external microphone attachment for enhanced recording quality. Follow these steps on how to record PowerPoint with audio within the software:
Delivering your ideas through a PowerPoint presentation proves impactful in connecting with your audience. However, when presenting remotely without face-to-face interaction, the persuasive impact may diminish. To address this challenge, a complete PowerPoint slide video coupled with audio serves as the ideal solution. Explore various software and techniques available to enhance your remote presentations and ensure your message retains its effectiveness.
Capture your PowerPoint presentation using OBS Studio by executing the ensuing steps:
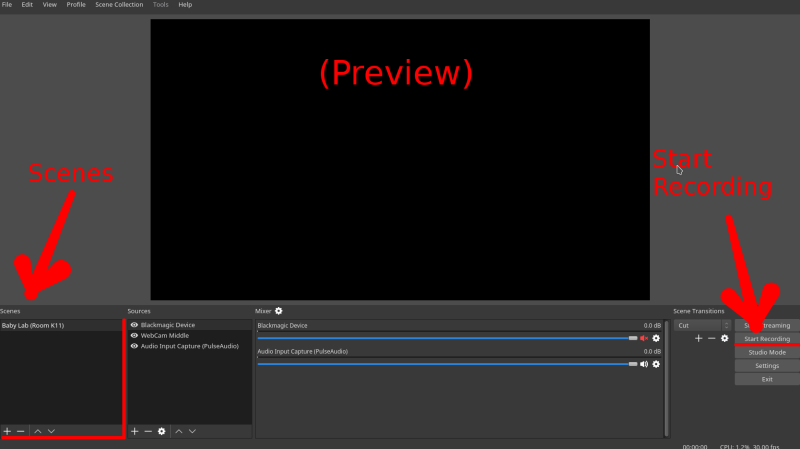
By meticulously following these steps on how to record PowerPoint with audio, you can seamlessly integrate OBS Studio into your PowerPoint workflow, ensuring a smooth and comprehensive recording of your presentation with both visuals and audio.
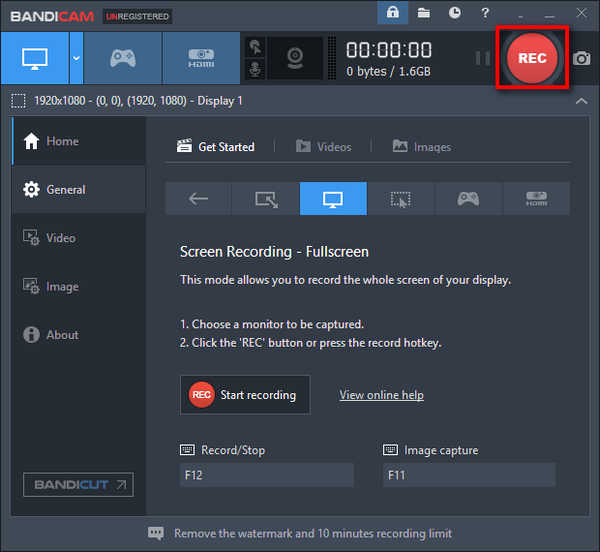
To record a PowerPoint presentation using Bandicam in Screen Recording mode, follow the procedures outlined below:
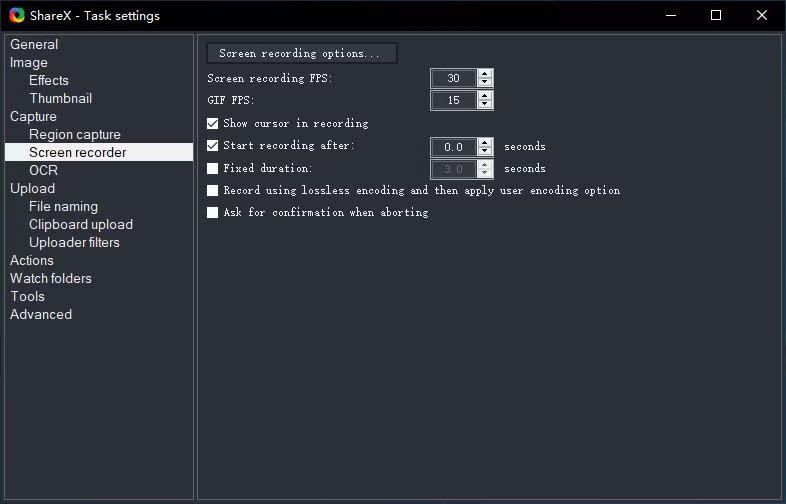
ShareX provides the capability to capture screen images and record custom-sized videos. Moreover, it facilitates easy sharing of images and screenshots with others through customizable hotkeys. Here's a guide on recording a PowerPoint presentation with audio using ShareX:
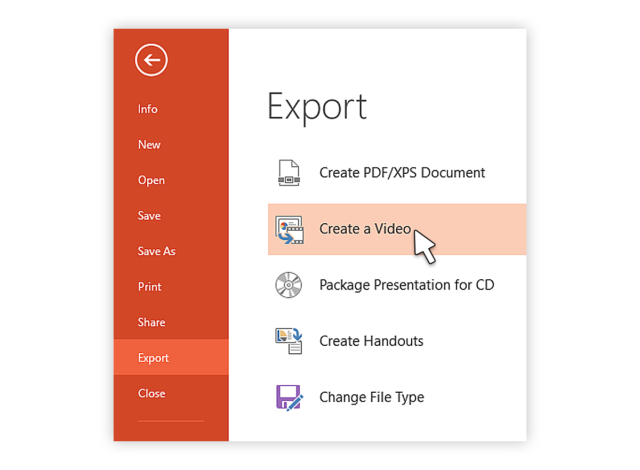
Once you've crafted your PowerPoint presentation, transforming it into a shareable video is a straightforward process. Follow these steps to record your presentation and convert it into such of a video:
FoneDog Screen Recorder is the top choice for capturing PowerPoint presentations with audio. This adaptable instrument effortlessly takes both images and sound, guaranteeing a thorough recording of your presentation.
![]() Free Download
For Windows
Free Download
For Windows
![]() Free Download
For normal Macs
Free Download
For normal Macs
![]() Free Download
For M1, M2, M3
Free Download
For M1, M2, M3
Equipped with several functionalities, it enables meticulous management of the recording procedure, encompassing microphone configurations and synchronized audio playback. The consistent performance of FoneDog Screen Recorder makes it the preferred alternative for making captivating presentations.
Enhance your PowerPoint experience with FoneDog Screen Recorder, a robust and user-friendly application that enables users to seamlessly combine images and audio, creating a memorable impression on their audience.
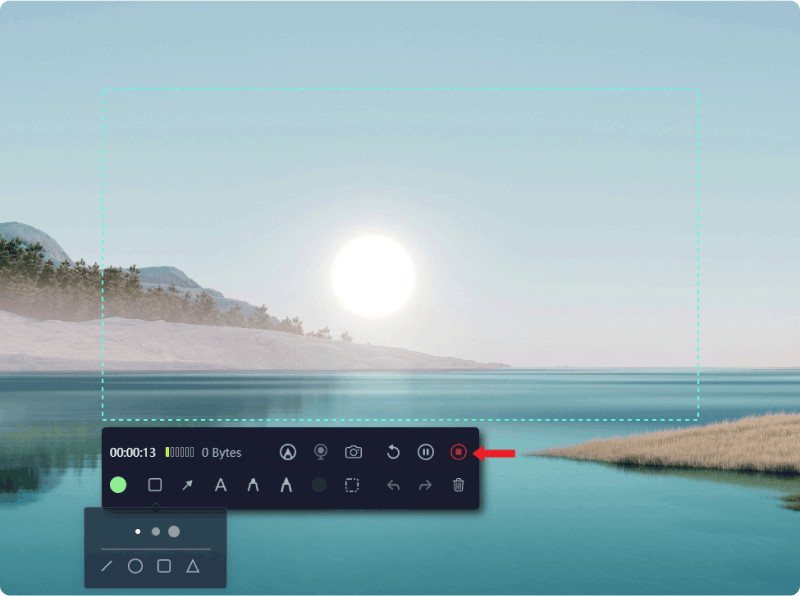
How to record PowerPoint with audio using this free screen recorder with zero watermark:
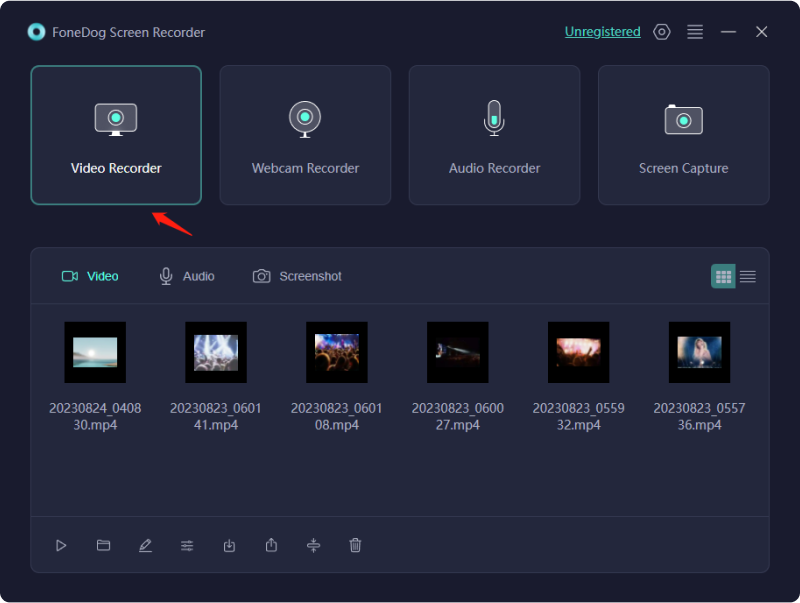
1. Download, configure, and launch the FoneDog Screen Recorder application on your Windows as well as Mac device.
2. Launch the FoneDog Screen Recorder application on your PC. Retrieve the "Video Recorder" feature from the main interface.
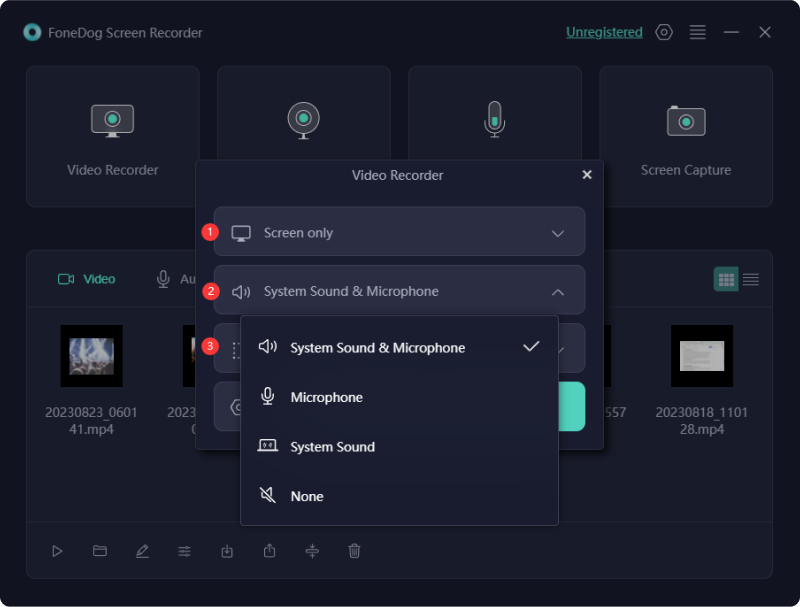
3. Select this such option to only record the screen ("Screen Only").

4. Select the option "System Sound & Microphone" to record both system and microphone sounds, or pick either "Microphone" or "System Sound" to record either one of them. If you do not like to have any sound recording, please choose the option "None".
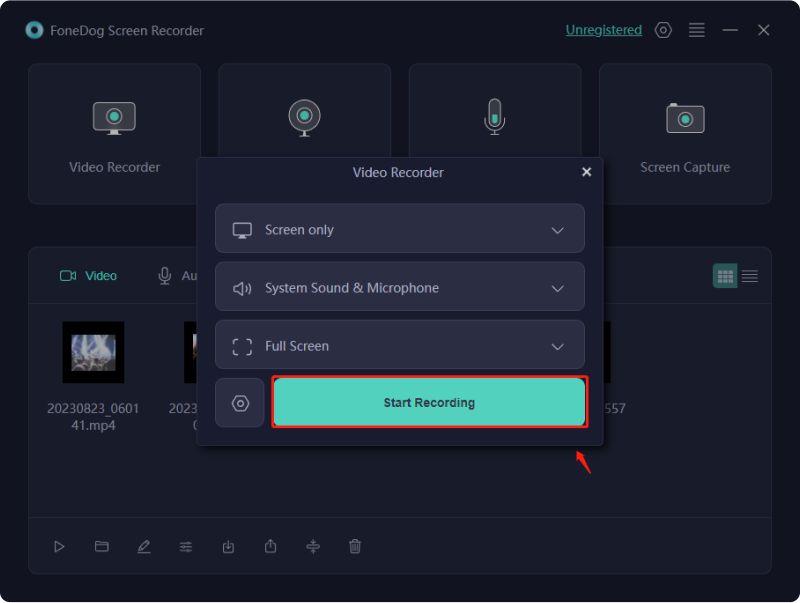
5. To begin recording your screen, click on "Start Recording". The program will automatically recognize the relevant window when selected.
6. Halt the recording by utilizing the "Pause" button, resume by clicking, or initiate a fresh recording by selecting the "Restart" button to overwrite the prior recording.
What Causes a Lack of Audio in My PowerPoint Recording?
To enable audio recording in PowerPoint, it's essential to grant microphone permission. Follow these steps: Launch the Settings application and navigate to Privacy. Locate Microphone on the left panel. Toggle the switch beside "Allow apps to access your microphone." If the switch is already enabled, troubleshoot the audio and restart PowerPoint.
If PowerPoint is having trouble recognizing my microphone, what can I do?
Verify the microphone's connection and functionality if PowerPoint still doesn't recognize it. After that, make sure you're using the right microphone by going into PowerPoint's audio preferences. Try resetting your computer or installing the latest audio drivers if the problem continues.
People Also ReadEasy Ways to Screen Record Mac with Internal Audio2024 Effective Guide on How to Record FaceTime with Audio
In conclusion, knowing how to record PowerPoint with audio enhances presentations significantly. Whether using integrated tools like FoneDog Screen Recorder, the process provides a dynamic dimension to engage and captivate your audience. Elevate your presentations by embracing these recording methods, creating impactful and memorable communication experiences.
Leave a Comment
Comment

Tech Website Writing /Content Optimization
Singing, smiling, surprising every day!
So as a technical writer, it is my duty to gather effective and reliable solutions to answer questions on how to deal with the issues they are having with their devices.
Screen Recorder
Powerful screen recording software to capture your screen with webcam and audio.
Hot Articles
 /
/
INTERESTINGDULL
/
SIMPLEDIFFICULT
Thank you! Here' re your choices:
Excellent
Rating: 4.7 / 5 (based on 106 ratings)
