FoneDog Screen Recorder
FoneDog Screen Recorder
Special Offer
Special Offer


By Adela D. Louie, Last updated: January 19, 2024
Unleash the full power of your Mac screen recording experience by recording not just the images but also the rich internal audio. We reveal the secrets of screen recording on your Mac with crystal-clear internal audio in our thorough guide, boosting your video production or tutorial-making ventures to new heights.
This article is your go-to resource whether you're a multimedia developer, educator, or simply want to show your Mac screen with accuracy. We'll lead you through the steps on how to screen record Mac with internal audio, examining settings and tools that allow you to record your screen as well as the full audio that goes with it.
Part #1: How to Screen Record on Mac with Internal AudioPart #2: Best Way to Screen Record on Mac with Internal Audio – FoneDog Screen RecorderConclusion
Here are different methods to screen record Mac with internal audio:
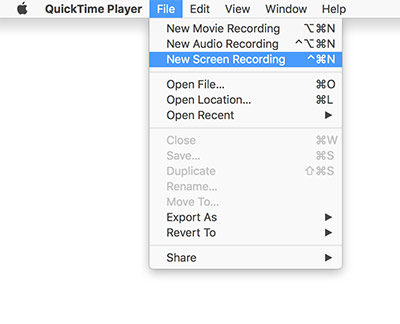
It's crucial to note that the effectiveness of these methods may depend on your Mac's operating system version and the specific applications you use. Additionally, always be mindful of the privacy and copyright laws when recording audio, and ensure you have the right to record and share the content. Check for updates and compatibility with the latest macOS versions for the mentioned software and drivers.
FoneDog Screen Recorder is recognized for its user-friendly interface and robust features, making it an ideal choice for users who want to screen record on Mac with internal audio. It is specifically designed to offer a seamless recording experience, allowing users to capture not only the visuals but also the internal audio of their Mac system.
![]() Free Download
For Windows
Free Download
For Windows
![]() Free Download
For normal Macs
Free Download
For normal Macs
![]() Free Download
For M1, M2, M3
Free Download
For M1, M2, M3
How to screen record Mac with internal audio using this online audio recorder:
1. To begin, you must then first download the FoneDog Screen Recorder application and install it on your computer. After you have finished configuring the tool, you will need to launch it.
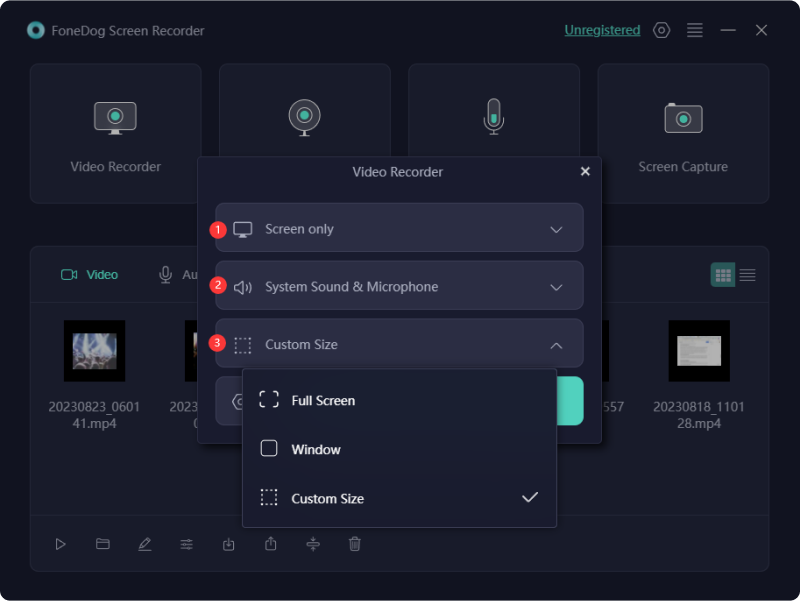
2. Using this, you may record in a variety of different ways. After that, you will have the option to select "Full Screen", "Custom", or "Record Webcam Only" according to your preferences.
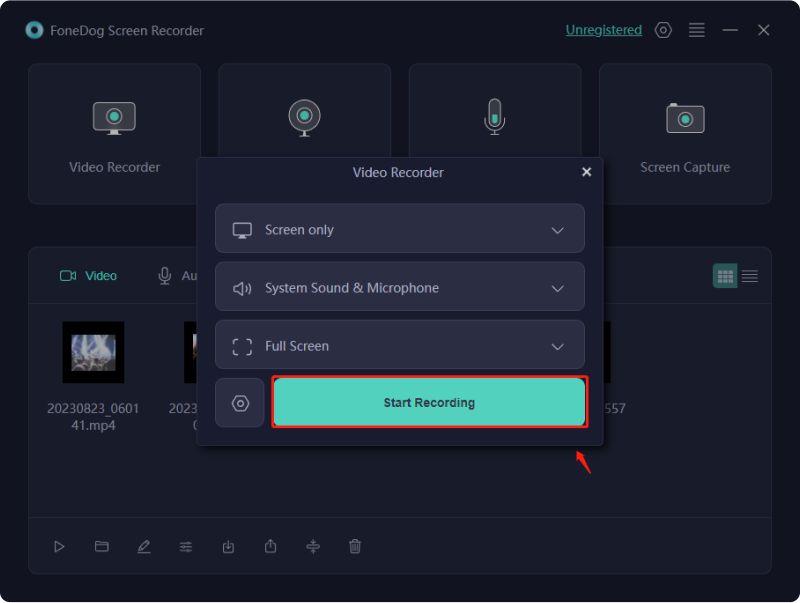
3. Simply hit the "REC" button on your keyboard to begin recording your screen. You may also program shortcut keys, which will make everything much simpler to use.
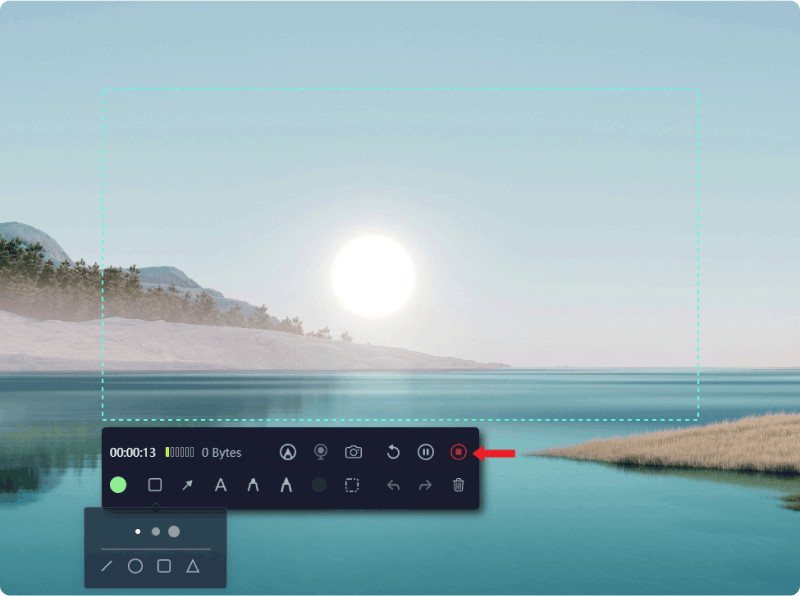
4. To stop and restart the recording at any time during the process, you may access the appropriate buttons by clicking on them. The FoneDog Screen Recorder allows you to annotate your video in real-time by adding text, lines, and a few different shapes to your annotations.
5. When you have listened to all of the news that you require, you may stop the recording by pressing the "Stop" button.
6. If you listen to the recording first, you will be able to make adjustments, such as cutting out sections that you do not want. You may upload the movie you just filmed to any one of a variety of websites if you want to share it as soon as it's finished.
People Also Read2024 Guide on How to Fix Error - Screen Record Not Working2024 Effective Guide on How to Record FaceTime with Audio
In conclusion, mastering successful screen record Mac with internal audio involves selecting the right tools, configuring settings effectively, and addressing common challenges. By adhering to best practices, optimizing recording environments, and exploring advanced techniques, you can elevate the quality of your content.
We encourage you to delve into the methods and tools, embrace a journey of experimentation fully unleash your creativity, and discover the unique ways in which internal audio enhances your screen recordings, creating a more engaging and immersive experience for your audience.
Leave a Comment
Comment

Tech Website Writing /Content Optimization
Singing, smiling, surprising every day!
So as a technical writer, it is my duty to gather effective and reliable solutions to answer questions on how to deal with the issues they are having with their devices.
Screen Recorder
Powerful screen recording software to capture your screen with webcam and audio.
Hot Articles
 /
/
INTERESTINGDULL
/
SIMPLEDIFFICULT
Thank you! Here' re your choices:
Excellent
Rating: 4.8 / 5 (based on 82 ratings)
