FoneDog Screen Recorder
FoneDog Screen Recorder
Special Offer
Special Offer


By Adela D. Louie, Last updated: May 31, 2022
Did you know about the assistive touch feature on your iPad or iPhone device? Did you know that it will be easy for you to navigate your device using it? So, if you would like to know more about this feature and how it works then this is for you. We are going to show you a quick guide on how to use assistive touch and know more about it as well.
The Assistive Touch on your iPad or on your iPhone device is one feature that you can use in order for you to use your device. If you are the type of person who apparently has some impairment such as motor control and coordination, then this feature will be of big help to you.
Using the Assistive Touch on your screen on your iPhone or iPad, it will be easy for you to make a gesture instead of going through your iPhone or iPad which can be a bit complex for you. All you need to do to navigate through your device is to press that virtual button on your screen. No need to press the Home button and go through the apps or settings of your device just to get to your targeted screen.
Since this is one great feature that Apple had made for their iOS devices benefiting those people who are physically impaired, then let us go ahead and show you how to use the Assistive Touch feature on your iPad or your iPhone and how you can enable it as well.
Part 1. How to Enable Assistive Touch?Part 2. How to Use Assistive TouchPart 3. How to Create Custom Gestures on Assistive TouchPart 4. Customize the Top-Level Menu of Assistive TouchPart 5. Conclusion
Now, for you to enjoy using the Assistive Touch on your iPhone or iPad, here are ways on how to use Assistive Touch.
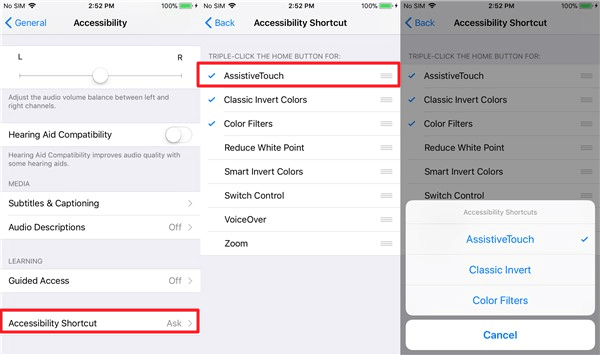
How do you customize your Assistive Touch? The first thing that you need to do before you can use it is for you to know on how you can enable it, of course. And to know how here are the steps that you will be needing to follow. So, go get your device and follow these steps.
Once that you have toggled it on, you will see a green-shaded bar beside it indicating that the feature is already turned on. Now, you are able to turn on the Assistive Touch on your iPhone or on your iPad and this will appear on any page or app that you open on your device. You can also tap on the Assistive Touch for you to move it around or for you to select an option that you would like to go to.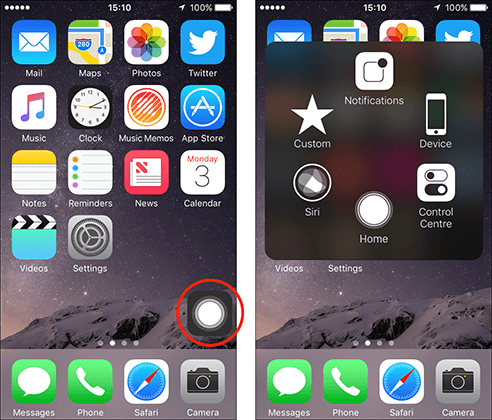
Using the Assistive Touch on your iPhone or on your iPad is actually very easy. All you need to do is to tap on it and select for an option that you want. With that, here are the options that contain the Assistive Touch feature.
The settings or options on your Assistive Touch can also be changed anytime you want to depend on what needs to be placed in your Assistive Touch.
If you wanted to customize your Assistive Touch on your iPhone and iPad, here is what you need to do.
Now, for you to add a button that you want on your Assistive Touch, here is what you need to do.
Of course, if you have an option to add a new function or button to your Assistive Touch, you can also remove an existing one that you no longer need. And to do that, here is what you need to do.
In removing a certain button or function from your Assistive Touch, there is no option for you to select on the specific button that you want to delete. What it does is that it can only choose those button that is near to the button on your screen. So, in case you have deleted a button that you need, you can just simply do the process on how to add a button for you to have the button back.
Using the Assistive Touch on your iPhone or iPad device is one great way for you to navigate your device without going through all the pages of your iPhone or iPad. And it really helps that you know how to use Assistive Touch on your device.
Leave a Comment
Comment

Tech Website Writing /Content Optimization
Singing, smiling, surprising every day!
So as a technical writer, it is my duty to gather effective and reliable solutions to answer questions on how to deal with the issues they are having with their devices.
iOS System Recovery
Repair various iOS system errors back to normal status.
Free Download Free DownloadHot Articles
 /
/
INTERESTINGDULL
/
SIMPLEDIFFICULT
Thank you! Here' re your choices:
Excellent
Rating: 4.5 / 5 (based on 104 ratings)
