FoneDog Screen Recorder
FoneDog Screen Recorder
Special Offer
Special Offer


By Vernon Roderick, Last updated: May 8, 2020
Snipping is a term known by most professionals that tend to rely on their desktops to take notes. It is what allows them to easily capture your screen. While the Print Screen feature on the computer is plenty helpful, it doesn’t serve as a great snipping tool.
What you should be looking for is a snipping tool that can actually offer features that you need. And that is why we are having this Snipaste review. To start this off, let’s begin with an overview of the said software.
An Overview of SnipasteSnipaste Review: User GuideFinal Thoughts
Snipaste is a popular snipping tool among users. It is somewhat simple, yet it provides powerful features that can easily be accessed. It’s what you’d normally expect from a snipping tool in the way that it provides a screenshot of your computer in detail.
The process is very straightforward, made possible with shortcuts that you can use for each command. In addition to the features that you can clearly see on its interface, there are also hidden features, but we’ll leave that to our next sections of this article.
What’s more, it is directly coming from the Microsoft developers so it is trustworthy and your files will be as secure as when you use the other Microsoft products. Another advantage of being a Microsoft product is that any updates that it may undergo will be available to you immediately, regardless of whether you decide to pay for it or not.
There’s not much to say about it except that it is a magnificent snipping tool. With that said, let’s proceed deeper into this Snipaste review.
Your first question when it comes to checking products is if you can use it or not, given your circumstances and resources. And that’s precisely what this section of Snipaste review is all about. Fortunately, you won’t have to worry about anything.
For one, as we’ve said before since it is a Microsoft product, you can get it from the Microsoft Store, which should be available to most Windows PC. Speaking of Windows, you can get it as long as you have a Windows or Mac, be it 32 bit or 64 bit. The app for Linux users is also currently being developed.
As for the price, it is normally free for all users. If you intend to make use of Snipaste to its full potential, then you will have to pay $20 for it. Consider it as a donation to the Snipaste developers.
There are differences between the two, but we’ll discuss that later. As for now, we’ll proceed to the snipping process which you’ll have to understand as soon as possible.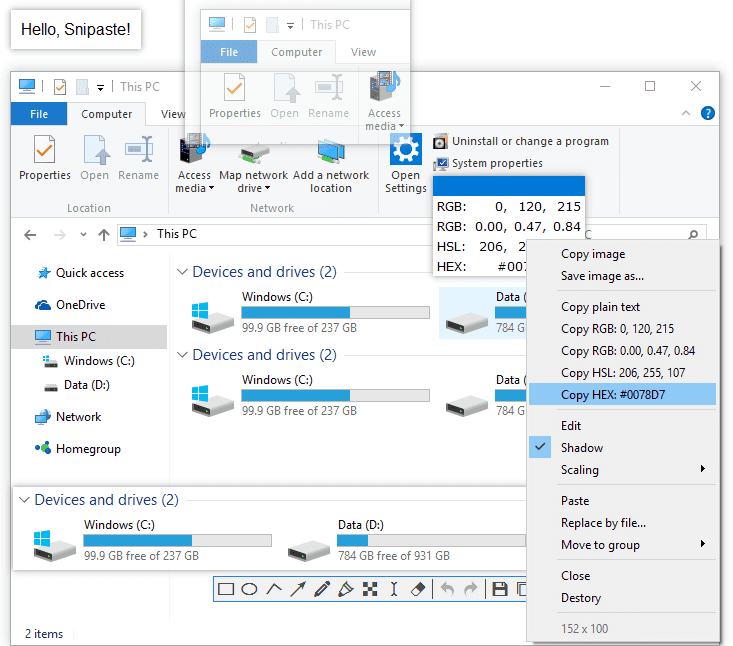
There’s not much to know about the snipping process with this Snipaste review. All you have to know is that it offers features that you don’t normally expect from such a tool. Here’s a look at some of the features that you’ll get to help you in snipping:
That’s pretty much everything you need to know about the snipping process. While we won’t be discussing the guide right now, this should serve as a basic idea of how it works.
In case you’re not aware, snipping is not all about simply getting a screenshot of your desktop’s current status. It also involves myriads of operations.
The previous section provides you with an idea of what Snipaste offers for snipping. However, that’s not the only thing this app is good at. There are also other features that can contribute to snipping indirectly. Here’s a look at those operations:
With this, you will be able to do your snipping business without any inconvenience. After all, since snipping is a quick task, you should be able to do it without taking too long. Now let’s proceed to another part of this Snipaste review regarding a specific operation that we didn’t include in this section.
There’s no doubt that the operations we discussed in the previous section are convenient when snipping, but image annotation can be considered as a necessity in such a task. It allows you to label your snippets as you see fit. Basically, you can manage them properly with this feature.
Lucky for you, the image annotation function of Snipaste is very well-thought. They’ve included different types of shapes for annotating and labeling snippets such as rectangles, circles, and even custom shapes made with pencils. Some other advanced annotations include erasers and mosaic. If you were to make a mistake with annotating, there’s also an Undo and Redo function.
Simply put, Snipaste remembers to always take care of their users, even to the point that they’ll make their jobs easier by including Image Annotation features.
This section of this Snipaste review refers to how the interface looks like. Luckily enough, Snipaste didn’t lose points for this one. For one, you can change the theme color for the app’s interface. Other designs that you may change include the icons, font style, font size, and more.
In addition to the customizations that you can do with Snipaste, the user interface itself have a pretty useful design. To start with, there are functionality options displayed in detail. There are also hotkeys that you may use in case you’re getting lost on the platform. That sums up everything you need to know about the customizations.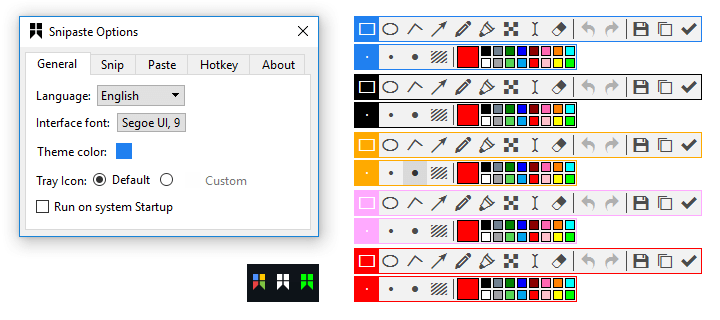
When using an unfamiliar app or software, one of the most important tips one can give you is to memorize the shortcuts. This allows you to not only access the files easily but helps you remember which keys to press.
There are three different categories of shortcuts you’ll have to remember. The first one is when you’re focusing on Snipping, the second one is with Pasting, and the third one is the shortcuts applicable to both modes. We won’t be discussing all the shortcuts, but here are some of the essential to help you out:
Ctrl + A for full screen, Enter for quitting snip mode at the same time copying the screenshot, Ctrl + T for pasting screenshot, Esc to abort snipping, and Right-Click to abort current snipping and do another
1 to rotate 90 degrees clockwise, 2 for rotating it in the same level but counter-clockwise, 3 for flipping the photo horizontally, 4 for flipping it vertically
Alt to use the magnifier, WASD keys to move curser by a pixel, Ctrl + C to copy, Ctrl + S to save, and Ctrl + P to print
These shortcuts should be enough to give you complete control of the platform. With that, we’ve discussed everything you need to know about the software. Now let’s proceed to some additional information you may need.
As we’ve said before, Snipaste is normally accessible to all users as it is a freeware. However, there’s a premium version where you will have to pay around $20. Obviously there are differences between the two, and that’s what this section of the Snipaste review is all about. Here’s a look at the features available on Pro version that isn’t on the Freeware:
There are many more differences between the Free and Pro version, but that’s all you have to know for now in this Snipaste review. We leave the others to your curiosity. With this comparison complete, we proceed to another.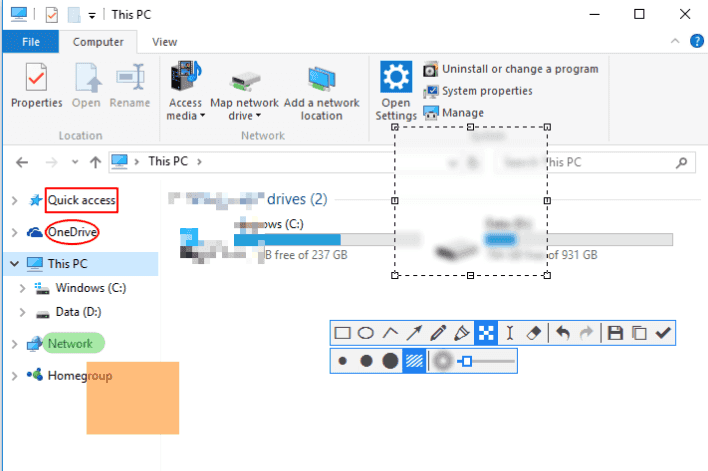
It may not be known to many, but the Mac version is actually a Beta version of the Windows Snipaste tool. Thus, they are bound to be different from each other. The Mac version, in particular, doesn’t have features that is normally found on the Windows version. Here’s a look at those missing features:
In addition to the missing features, there may also be bugs found on the Mac beta version. Let’s take a look at the bugs known by developers as of current:
Those are the main differences between the Windows version and the beta version from Mac. With that complete, we head to our last section of this Snipaste review.
It’s usually hard to learn how to use tools, but Snipaste makes it very easy. For one, the process is straightforward. Here’s how you can snip with Snipaste:
There are tons of tasks that you can do with Snipaste, though we will only focus on snipping. While it may be hard at first, you will have full control of the tool once you memorize the shortcuts and learn about this guide.
Many users tend to assume that they can’t do what they need to do, and more, with just one tool. This is especially true for snipping. However, there are actually tools that were designed for such a task, and Snipaste is one of them.
You may not have sufficient knowledge about the said tool before, but with this Snipaste review, you can figure out the ins and outs of the tool. Hopefully, this would also help you when opting for other snipping tools.
Leave a Comment
Comment

Technical Expertise for PC/Website Optimization
One of my passion is to develop software of my own
I write articles to share knowledge about IT technology and some experience in developing my own software, and developing my own software is one of my passions for work.
Free Online Photo Compressor
Hot Articles
 /
/
INTERESTINGDULL
/
SIMPLEDIFFICULT
Thank you! Here' re your choices:
Excellent
Rating: 4.7 / 5 (based on 77 ratings)
Free Online Photo Compressor
