FoneDog Screen Recorder
FoneDog Screen Recorder
Special Offer
Special Offer


By Adela D. Louie, Last updated: July 7, 2022
There can be times that you wanted to sharpen video especially if you have recorded a video using your shaky hands and it turned out to be blurry or sometimes dark. Well, if you are thinking that it is really a loss and you have to repeat shooting the videos once more, we have something that you will love. There are still ways that we can recover your video and make it as presentable as you always plan it to be. In this article, we will be discussing tools and methods you can use.
It would also be so helpful if you are a videographer and you wanted to have a clearer representation of your videos and make your video funny. Most problems for those who are still starting to be a videographer is sometimes the camera that you are using have presets that tend to result in a hazy or a dreamy video, this could be hard especially if the requirement needs to be clear.
At the end of this article, you will learn some of the techniques and tools as well as the steps to use them to sharpen video. It is also important to know these things even if you are just someone who is fond of video making, so let us start.
Part #1: What Can I Use to Sharpen My Videos?Part #2: To Summarize It All
If you are fed up with the blurry effect on your videos, and you really want to sharpen them, we have gathered some of the tools that you can try to improve. Some of which are free while some can be accessed online or through the use of the internet.
VideoProc Vlogger can be used to sharpen video since it is a free video editor with a lot of good features that you can enjoy. It is also said to be PC-friendly even if you have variants that are low in specifications, compatible with both Mac and Windows computers.
It can help you sharpen your video, edit the color, denoise, and make use of free templates too. It can also be used alongside GoPro, DSLR, 4K, UHD, HEVC, and smartphones. You can also expect a fast rendering of your videos while making sure that there is a full level of what they called “Hardware Acceleration”. Let us take a look at how you use it.

Step #1: Open the VideoProc Vlogger and then tap the “New Project” button.
Step #2: To start, you have to add the video that you wanted to sharpen. Go to the “Media Library”, and add the video.
Step #3: Then, you can drag and drop the video that you wanted to sharpen in the timeline, so you can start the editing process.
Step #4: Tap the video clip, and you have to be sure that you have selected it, then tap “Color” which is located in the toolbar.
Step #5: You have to enable the option to sharpen the video by putting a check on the “Sharpen” option within the “Color Editor” menu.
Step #6: You can now edit and adjust the parameters. There are three controls that are separated from each other. These are the radius, amount, and threshold.
The amount is defined as the intensity of the sharpening of your video. It is where you can adjust the contrast which you can do by editing the level of luminance of the darker and the lighter pixels of the video.
Radius, on the other hand, is what determines the scope of the edges of the video that you wanted to sharpen. It determines the size of the rims of the wide which will still depend on how you wanted to see your video when the process of sharpening is done.
And for the threshold, is the one that controls which is the starting point of the pixels that you wanted to sharpen depending on the level of contrast that you have set. If you have high values for the threshold it means that you are implying that areas with a high level of contrast should be the areas for sharpening.
Step #7: Now that you are done, you can begin exporting the video file. Tap the “Export” button once you have applied all the sharpening effects that were applied to your video.
Clideo is an option if you wanted to try tools that you can find online. You do not have to download anything, all you have to prepare is a stable internet connection, and the greatest thing that you must be grateful for here is, that it is free. It is also compatible with both Windows and Mac computers and can be accessed anywhere as long as you have a strong internet connection. Here’s how you use Clideo to sharpen video.
![]()
Step #1: Initially, you have to upload the video that you wanted to sharpen. Tap “Choose File” and then the blurry video will be uploaded on the site.
In case you have saved the video online, you can click the arrow down which is located in the right part of the interface, and then an option will be given to you if you wanted to upload the video using a Dropbox or a Google Drive account.
Step #2: Once you have made sure that you have uploaded the file, you can now go to the video editor portion. You can now adjust the saturation, color, brightness, contrast, and the other settings that you wanted to edit. If you wanted to cure the blurriness of the video you can edit the level of brightness and the contrast too.
Once you are satisfied with the edits that you have made, you can now choose an output format, if you wanted to play it on your mobile phone, you must select MP4.
Step #3: You can now check the video that you have edited if it is already within your preferences. In case you are not yet satisfied, you can still make some edits by going back to the previous steps.
In case you are already done with it, you can now click the “Download” tab. If you wanted to save your video in your Google Drive or Dropbox account, you can tap the down arrow that you will see on the screen.
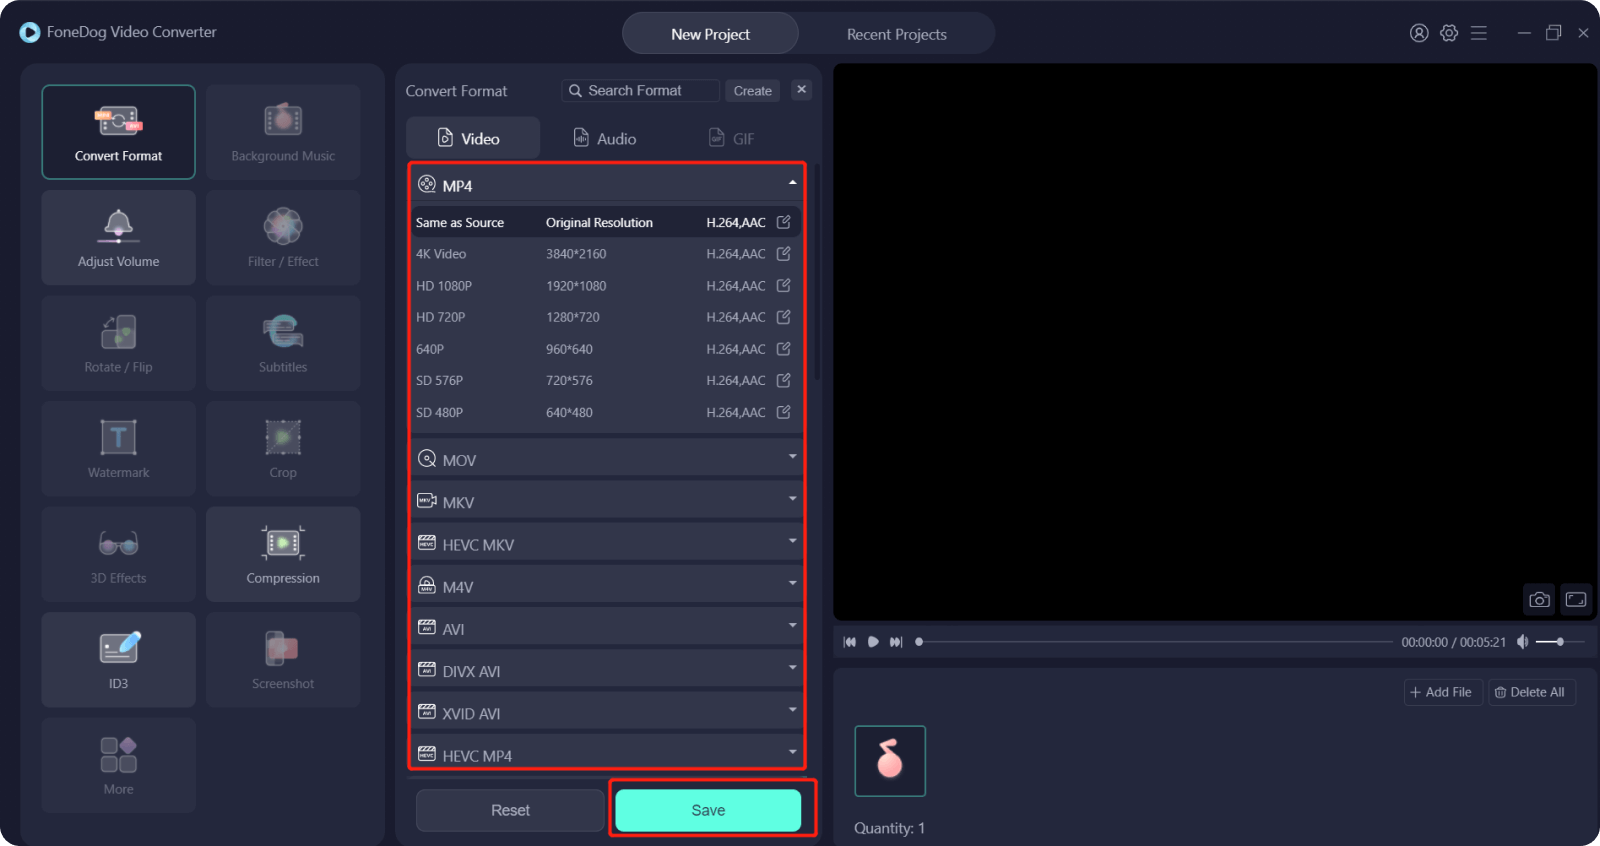
For our third tool, we have FoneDog Video Converter. It is easy-to-use software used for editing videos and audio files which also supports a lot of file formats while making sure that the output is of good quality. You can expect a very high-speed conversion wherein there is no quality of files that is compromised. This video editing tool is compatible with both Mac and Windows computers and is one reliable partner when it comes to the editing of your audio and video files.
Let us see what this FoneDog Video Converter can do for us.
Let us discuss the steps on how you convert your video files using FoneDog Video Converter.
People Also Read[Solved] Learning How to Rotate Video on Windows 10 in 2022How to Resize Videos: Quickest and Easiest Way
We hope that we have helped you find ways how to sharpen video. These tools are useful, you just have to make sure that you have carefully followed the steps one by one in order to have a good output. After all, we all deserved to watch the videos that we wanted without encountering any form of nuisance or distraction.
Leave a Comment
Comment

Tech Website Writing /Content Optimization
Singing, smiling, surprising every day!
So as a technical writer, it is my duty to gather effective and reliable solutions to answer questions on how to deal with the issues they are having with their devices.
Hot Articles
 /
/
INTERESTINGDULL
/
SIMPLEDIFFICULT
Thank you! Here' re your choices:
Excellent
Rating: 4.8 / 5 (based on 82 ratings)
