FoneDog Screen Recorder
FoneDog Screen Recorder
Special Offer
Special Offer


By Vernon Roderick, Last updated: December 30, 2019
Loss of data may happen on your computer which can be due to logical or physical disk failures, system crash, hardware or software issues, application errors, and many more. It is essential to always create a backup copy of your data in an external device so that in case of system failures, you can easily restore your data backup to your drive.
You can utilize the Disk Utility tool that comes with your Mac computer to create clones of your data. Clone Mac Hard Drive Disk Utility is a useful application that comes handy in case of a sudden disk failure. You do not need to worry as the Disk Utility tool creates an exact copy as the original and restores them to your device. An easier and more convenient tool that can help in recovering lost or deleted data is the FoneDog Data Recovery program that allows data recovery of any type of file from your devices. It is a reliable tool that helps restore files to any type of device in any kind of situation.
Part 1: What is Clone Mac Hard Drive Disk UtilityPart 2: How Clone Mac Hard Drive Disk Utility WorksPart 3: Bonus Tips: How to Get the Data Recovery on ComputersPart 4: In Summary
The Disk Utility application comes with every copy of the Mac operating system. It is free for users to create clones of your data from your Mac hard drive and restore it to another drive or external media. In cases of disk failures, you can easily restore the data by using the Disk Utility tool to create a clone of data from a source drive to a backup or destination drive.
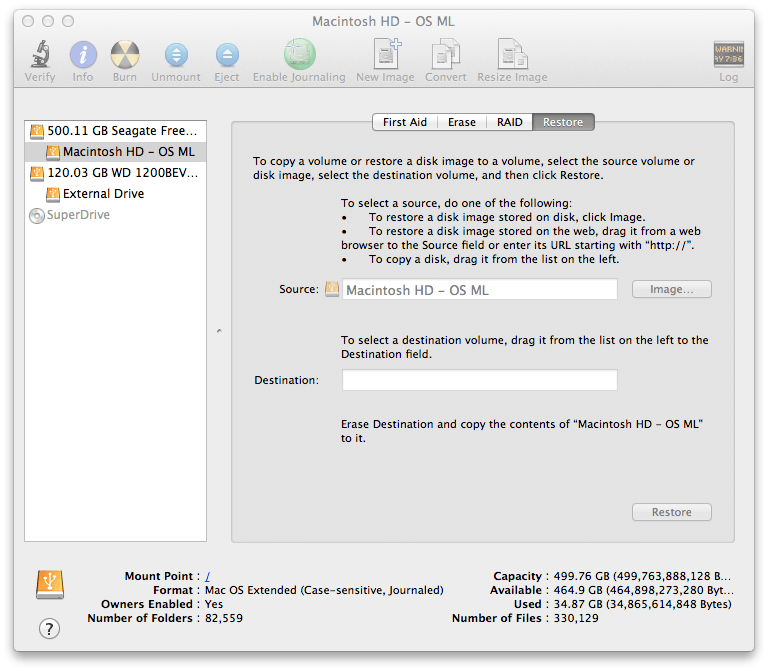
Using the Restore function of Clone Mac Hard Drive Disk Utility, you can be able to restore any data even from a storage device such as a USB flash drive, external hard drive, disk image, etc. Both source and destination drives must be un-mounted from your Mac device and make sure these drives are not in use to avoid changing the data and ensure smooth and successful restoration of your data. Creating a backup image of your drive using the Disk Utility from Mac will help protect your data from any loss. It creates an exact copy of the original data for backup.
This section provides a simple process to teach you how to perform Clone Mac Hard Drive Disk Utility using the Restore option. This will allow you to clone or copy the data of your hard drive in Mac and restore it to another disk or external device using Mac’s Disk Utility. A backup copy is a disk image that you can restore in case of a disk failure. Note that the backup copy that is created using the Disk Utility is not bootable.
When it comes to your data recovery needs, FoneDog Data Recovery is here to help you restore your deleted or missing data from any device. It is a reliable and professional tool with an easy and convenient to use wizard feature that allows you to quickly and safely recover your data files. Two scan modes are available for you. It allows a quick and deep scan of your files with a high success rate and secured data. You can choose to preview your files after scan and before the recovery. You can retrieve any type of file such as photos, audios, videos, emails, documents, archive and applications and recover from any device in any kind of situation such as partition recovery, file recovery, hard drive recovery, memory card recovery, flash drive recovery, and crashed Windows or Mac recovery.
A free trial version of the application is available for download with a 30-day money-back guarantee if you wish to purchase it. FoneDog Data Recovery supports both Windows and Macintosh operating systems. Recover your deleted data with three easy steps: Launch, Scan, and Restore. Detailed steps are provided below on how to use the FoneDog Data Recovery program.
Data Recovery
Recover deleted image, document, audio and more files.
Get deleted data back from computer (including Recycle Bin) and hard drives.
Recover loss data caused by disk accident, operation system crushes and other reasons.
Free Download
Free Download

Download and install the FoneDog Data Recovery program to your computer. To open the application program, you can go to the Start menu and search FoneDog Data Recovery from the Programs list. Also, you can double click its shortcut icon found on the desktop or click the pinned icon on your taskbar (if a shortcut is created or it is pinned to the taskbar).
On the main screen, choose the different types of files and the drives (hard disk or removable) where you wish to recover your data files. On the bottom right of the screen, click the Scan button to start scanning the data in your selected devices. You can restore any data type such as an image, video, audio, email, archive, application, and documents from any device in any situation and in different supported file systems.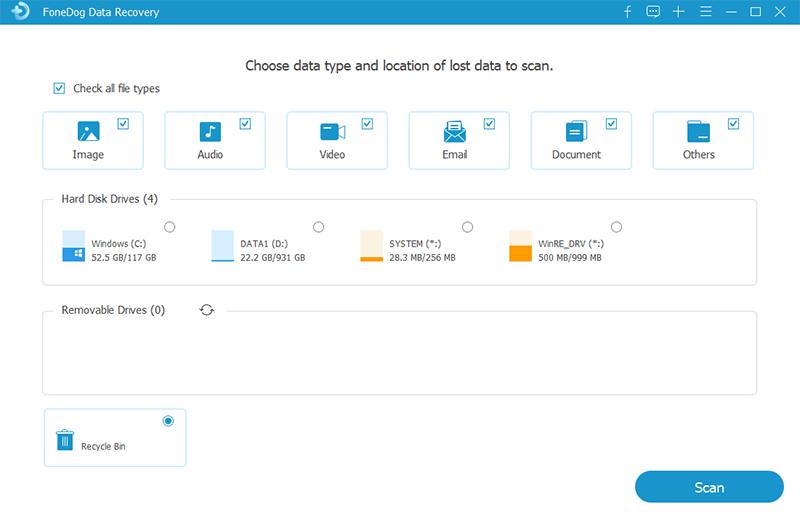
You can choose between the two scans: Quick Scan or Deep Scan. The first scan works at a faster speed while the second scan will take longer to finish but returns more content. In your search, you can apply some filters such as file names or file paths to narrow down the results and locate the files quickly. Wait until the data scan is completed and do not ever close the wizard while the scan process is in progress.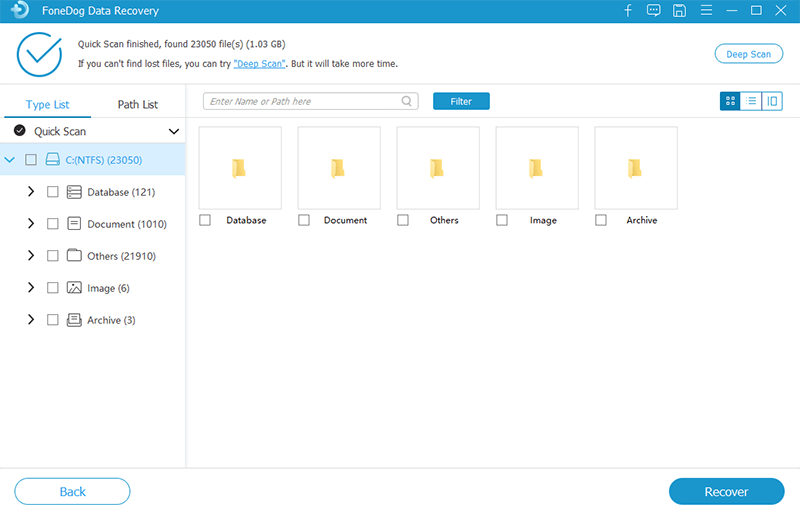
When the scan is completed, select the file results that you want to be recovered. The file results are shown by type or path. Click the Recover button to launch the data recovery process. Make sure that there is a stable connection between your computer and external media. Remember to be patient and never close the FoneDog Data Recovery window while the recovery is in progress. Wait until the data scan and recovery process is done. Also, do not switch off or reboot your computer unless told to do so in the wizard tool.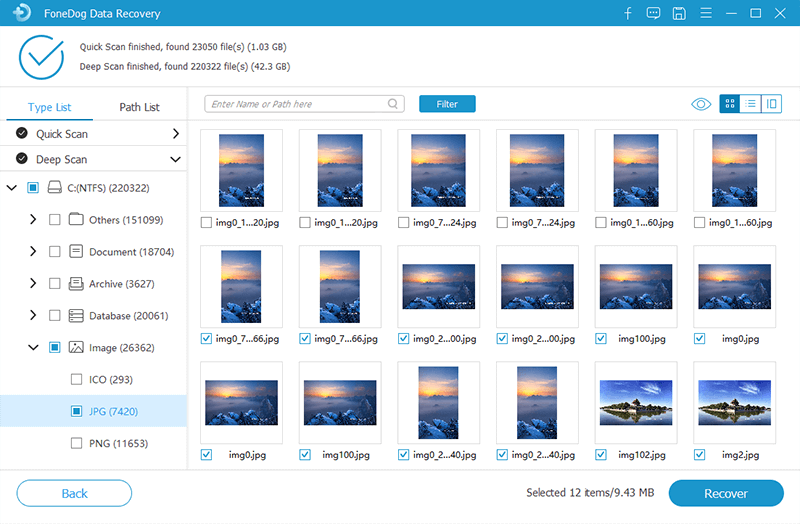
When you are using your computer, it is vitally important to always create regular backup copies of your data files. This is to ensure that whenever troublesome situations happen such as system or drive failure, you can easily refer to your backup copies and restore them to your device. Causes of such failures are due to logical or physical disk failure, system crash, system and application errors, malicious software attacks and computer viruses that can infect your hard drives, formatting errors and many more, hence, a need to create a backup or clone of your data. With Mac, you can utilize the Disk Utility application to do data recovery. You can perform Clone Mac Hard Drive Disk Utility using the Restore option.
Another highly recommended method to recover your important data files is the use of a data recovery tool like FoneDog Data Recovery program which can help restore any type of files such as your precious photos, videos, audios, documents, and applications. You can recover from any device such as a computer, USB flash drive, memory cards, etc., in any kind of situation. The FoneDog Data Recovery tool will work in both Windows and Mac operating systems. You are assured of your data to be secure without any loss.
Leave a Comment
Comment

Technical Expertise for PC/Website Optimization
One of my passion is to develop software of my own
I write articles to share knowledge about IT technology and some experience in developing my own software, and developing my own software is one of my passions for work.
Data Recovery
FoneDog Data Recovery recovers the deleted photos, videos, audios, emails, and more from your Windows, Mac, hard drive, memory card, flash drive, etc.
Free Download Free DownloadHot Articles
 /
/
INTERESTINGDULL
/
SIMPLEDIFFICULT
Thank you! Here' re your choices:
Excellent
Rating: 4.6 / 5 (based on 101 ratings)
