FoneDog Screen Recorder
FoneDog Screen Recorder
Special Offer
Special Offer


By Gina Barrow, Last updated: December 12, 2019
External hard drives are pretty much very handy in terms of portability and use. We can bring all our files wherever we go and just hook it up with any computer or device. You can read and write files on external hard drives.
Compatibility is no longer an issue today, however, there is one issue with connecting your storage device to computers especially on Mac, sometimes it appears as ‘external hard drive read only mac’ data.
If you are one of the users affected with an external hard drive that’s showing as read only error on Mac, then you better read this new post along! We will learn how to resolve this problem without losing any data. You don’t have to be an expert to manage this situation.
Part 1. Why Do External Hard Drives Show as Read Only Error?Part 2. Fix External Hard Drive Read Only on Mac without Losing DataPart 3. Fix External Hard Drive Showing Read Only on MacPart 4. Summary
There are many possible causes as to why your external hard drive appears as read only error. One of the most common possible scenarios is due to the way the Hard Drive is formatted.
Usually, the file is listed as NTFS, which means it is formatted in the Windows NT file system and only optimized for Windows and Mac computers are only able to read the file but are unable to write.
Most external drives come in preformatted as NTFS because there are more users connecting them on PCs. However, changing the file system and making it writable on Mac is easy. You just have to reformat the drive.
OS X sets up permission settings for any external drives for files and folders inside the system. Your external hard drive may not have been recognized or was not given access to the hard disk.
Because you need to reformat the external hard drive to make it compatible with your Mac computer, you might end up losing all the files saved inside this drive.
Fortunately, there is still a way to recover these files in just a few clicks. All you need is FoneDog Data Recovery software.
Data Recovery
Recover deleted image, document, audio and more files.
Get deleted data back from computer (including Recycle Bin) and hard drives.
Recover loss data caused by disk accident, operation system crushes and other reasons.
Free Download
Free Download

This software seamlessly restores your deleted files such as your documents, media files, and many more from different devices including your external hard drive.
FoneDog does:
To learn more how you can take advantage of FoneDog, check out this guide:
Downloading and installing FoneDog Data Recovery program is easy with onscreen prompts. Carefully follow the instructions and launch the software right away.
In the main menu, you will be asked to select the types of files you plan to recover such as your pictures, videos, audio files, documents, emails, and more. After that, you need to choose the storage device the files will be retrieved from. For this example, you can select your external hard drive listed under Removable Drives.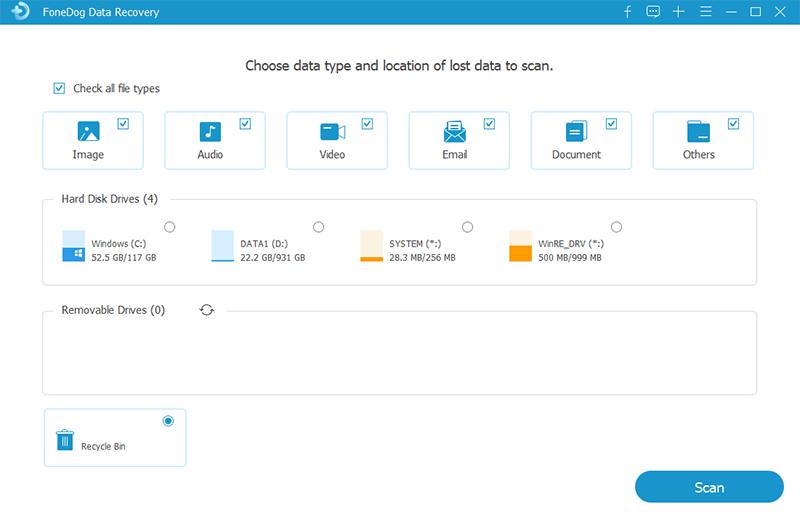
Now that you have selected the data types and storage device, next is to click the Scan button so you will be directed to choose what mode of scanning you plan to use.
There are two types of scanning available, the Quick Scan and the Deep Scan. After you have chosen your desired scanning mode, wait for the process to be completed or until all the scanned items are displayed on your screen.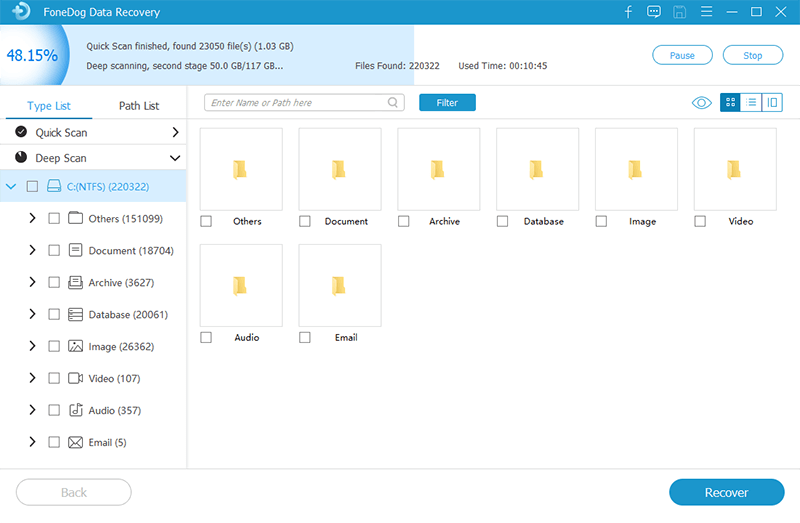
Once the scanning is completed, you will now have the chance to preview every item on each file category. You can opt to retrieve only a few files based on their importance or you can choose to recover them all.
Simply check the boxes of each file category and then click the Recover button to save them on your computer.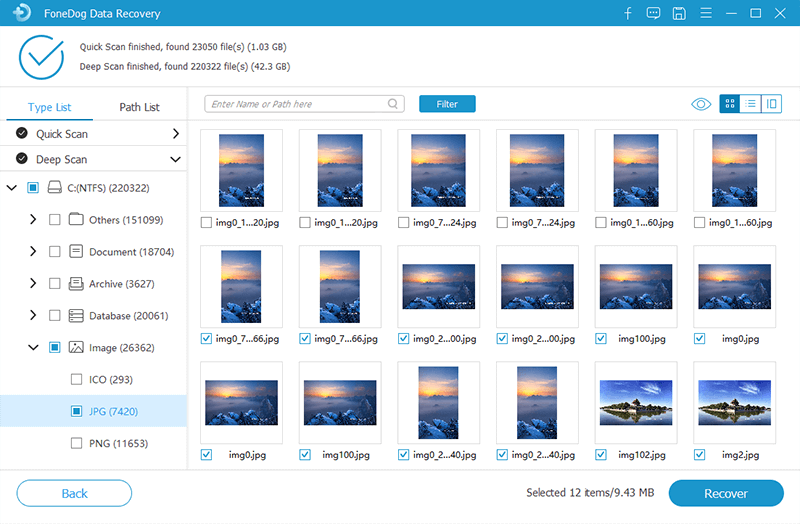
You can always repeat the process if in case you missed some files.
Correcting the read only filing system of your external hard drive requires you to format the device. This means you will lose everything inside your drive.
You can have the option to copy or backup the files into another drive or platform or use recovery software right after formatting.
Whenever you are ready, follow these guides on how to fix the external hard drive read only on Mac:

On another note, if the issue was caused by permission settings, then you can simply ignore it to make your external hard drive accessible to your Mac.
Use the Disk Utility feature to check for any hard drive errors that may cause the external hard drive read only issue.
Not all hard drives were set to be used in a cross-platform environment. Most of these devices are preformatted for Windows computers. However, making it accessible to Mac is pretty easy and simple.
At first, your external hard drive read only on Mac, but after you have fixed the issue, you will be able to use it on any type of computer. If you have lost your files along the way, you can always retrieve them by using FoneDog Data Recovery.
Leave a Comment
Comment

Technical/Creative Writer
Kitchen, my safe space; black, my favorite color
Was a Technical Specialist for a while, troubleshooting Smartphone and Software-related issues until a writing stint caught my attention.
Data Recovery
FoneDog Data Recovery recovers the deleted photos, videos, audios, emails, and more from your Windows, Mac, hard drive, memory card, flash drive, etc.
Free Download Free DownloadHot Articles
 /
/
INTERESTINGDULL
/
SIMPLEDIFFICULT
Thank you! Here' re your choices:
Excellent
Rating: 4.5 / 5 (based on 85 ratings)
