FoneDog Screen Recorder FoneDog Screen Recorder
Special Offer Special Offer
Only Only
$4.49 $4.49
to get a ONE-month license to get a ONE-month license
Sale ends in xx days Sale ends in xx days
Buy Now
sale

How to Find a Lost Word Document?

By Nathan E. Malpass, Last updated: September 17, 2025

Have you ever found yourself in the frustrating situation of losing a crucial Word document? Whether it's due to an accidental closure without saving, a computer crash, or any other unforeseen circumstance, the panic that sets in when you can't find your important file is universal. However, fear not! In this comprehensive guide, we'll walk you through various methods and strategies on how to find a lost Word document. From utilizing built-in features to employing third-party tools, we've got you covered. Let's embark on the journey to unlock and recover your valuable files together.

Part 1. Find a Lost or Deleted Word Document on MacPart 2. Find a Lost or Deleted Word Document on WindowsPart 3. Bonus: Recover Your Lost or Deleted Word DocumentPart 4. Conclusion

Part 1. Find a Lost or Deleted Word Document on Mac

Method 01. Use Spotlight Search

Spotlight Search is a powerful tool on your Mac that allows you to quickly locate files and applications. If you're wondering how to find a lost Word document, Spotlight makes it simple.

Here's a step-by-step guide on using Spotlight to find a lost Word document:

  1. Press Command + Spacebar simultaneously to open Spotlight Search.
  2. In the search bar, type the name of the lost Word document. Spotlight will start displaying results in real-time.
  3. Examine the search results to see if your document appears in the list.
  4. If you find the document, you can preview it by selecting it in the search results. Press Command + Enter to open the document in its associated application, which is Microsoft Word in this case.
  5. Utilize Spotlight's search filters by clicking on the category icons (e.g., Documents, PDFs) to narrow down the search.
  6. If you can't find the document in the search results, click "Show All in Finder" at the bottom of the Spotlight window. This will open Finder with a list of all matching files.
  7. In Finder, navigate to the potential folders where the document might be stored. Once found, open the document using Microsoft Word.

If your Word document was recently created or modified, there's a good chance you can recover it using this method. If you have any questions or if you'd like to explore another method, check out the next tip.

Method 02. Look in the Trash Bin

Sometimes, your lost Word document might have been accidentally deleted, and the Trash Bin is the first place to check when you're trying to figure out how to find a lost Word document.

  1. Click on the Trash icon located on your Dock. It resembles a waste bin.
  2. In the Trash window, use the search bar in the top-right corner to type the name of your lost Word document.
  3. Check the search results to see if your document is present in the Trash.
  4. If you find the document, right-click on it and select "Put Back." This action will restore the document to its original location.
  5. Sometimes, documents may be located in subfolders within the Trash. Explore any subfolders to ensure you haven't missed the document.
  6. If the document is not in the Trash, or if you have already restored it, you can close the Trash window. Remember that documents in the Trash are eventually permanently deleted, so it's crucial to act promptly.

Put Back Lost Word Document

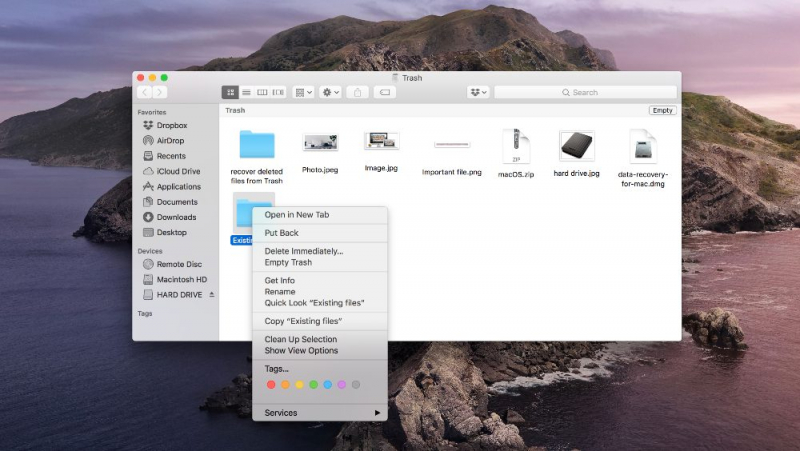
Checking the Trash is a straightforward yet often overlooked method for recovering deleted files. It serves as a safety net, especially if you accidentally moved your Word document to the Trash.

Method 03. Utilize AutoRecovery

Microsoft Word comes equipped with an AutoRecovery feature that automatically saves your documents at regular intervals. If you're wondering how to find a lost Word document after a crash or accidental closure, AutoRecovery can be a lifesaver. This built-in function stores temporary backups that can often restore unsaved work. Simply reopen Word, and it may automatically prompt you with recovered versions. If not, you can manually check the AutoRecovery folder.

Follow these steps to leverage the AutoRecovery feature and recover your lost content:

  1. Launch Microsoft Word on your Mac.
  2. Navigate to the "Word" menu in the top menu bar and select "Preferences."
  3. In the Preferences window, click on "Save" in the left sidebar.
  4. Look for the "AutoRecover files every" option. Note the folder path mentioned next to "AutoRecover file location."
  5. Open Finder and go to the directory specified as the AutoRecovery file location.
  6. Within the AutoRecovery folder, search for files that start with "AutoRecovery save of" followed by your document's name.
  7. Once you locate the AutoRecovery file that corresponds to your lost Word document, open it in Word to recover your work.
  8. After opening the recovered document, save it immediately to ensure you have the latest version.

Microsoft Word AutoRecovery

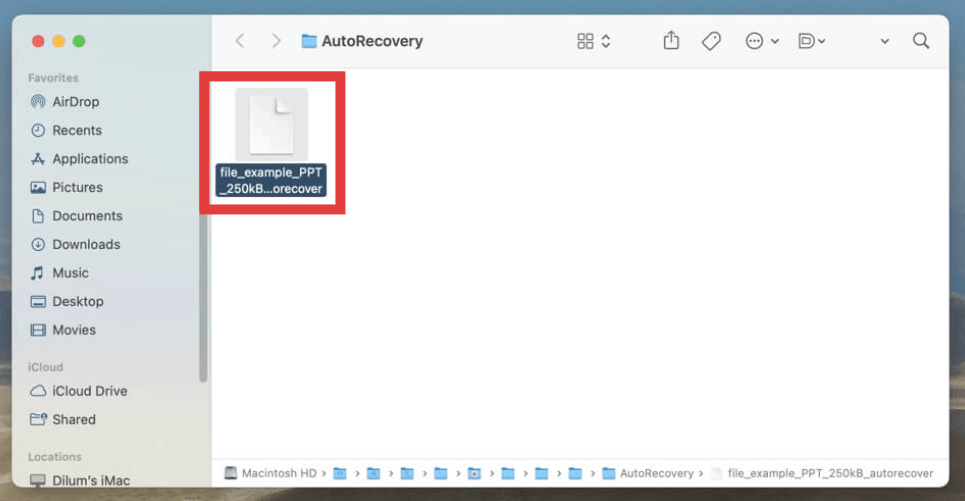
The AutoRecovery feature can be a game-changer, especially if your Word document was not manually saved before an unexpected event. By default, Word autosaves your work every 10 minutes, reducing the risk of data loss.

Method 04. Search in iCloud Drive

If you use iCloud Drive to store your documents, your lost Word file might be retrievable through iCloud. Follow these steps to search for your document in iCloud Drive:

  1. Open Finder on your Mac.
  2. In the Finder sidebar, click on "iCloud Drive."
  3. In the iCloud Drive window, use Spotlight Search to search for the name of your lost Word document.
  4. Examine the search results to see if your document appears.
  5. If you find the document, double-click on it to open it in Microsoft Word.
  6. If the document was recently deleted, check the "Recently Deleted" folder in iCloud Drive. Right-click on the document and choose "Restore" to return it to its original location.
  7. Confirm that your Mac is connected to the internet, and iCloud Drive is actively syncing.
  8. If you have other devices connected to the same iCloud account, check them for the lost document. It might be available on another device if iCloud syncing is enabled.

Searching in iCloud Drive is particularly helpful if you've been using cloud storage for your documents. iCloud ensures that your files are accessible across your devices, and you can use its search capabilities to quickly locate your lost Word document.

Part 2. Find a Lost or Deleted Word Document on Windows

Method 01. Search in File Explorer

One of the quickest ways to find a lost Word document on a Windows system is by using the built-in search feature in File Explorer. If you're not sure how to find a lost Word document, this method is simple and effective. Follow these steps to perform a search and locate your missing file quickly:

  1. Press Windows Key + E or click on the File Explorer icon in the taskbar to open File Explorer.
  2. In the upper-right corner of the File Explorer window, you'll find a search bar. Click on it to activate the search function.
  3. Type the name of the lost Word document into the search bar. Windows will start searching for files matching the entered name.
  4. Examine the search results to see if your document appears in the list.
  5. Use the search filters provided in the "Search" tab of the Ribbon (e.g., Date Modified, Size) to narrow down your search.
  6. If your document is not found in the initial search, make sure you are searching in the correct location. You can broaden the search to include the entire computer if needed.
  7. Once you locate the document in the search results, double-click on it to open it in Microsoft Word.
  8. If the document is not found through search, it's worth checking the Recycle Bin, as there's a possibility it was accidentally deleted.

Using File Explorer's search feature is a fundamental method that often proves effective in quickly locating files on your Windows system.

Method 02. Use File History

File History is a built-in feature in Windows that allows you to recover previous versions of files. If you've lost a Word document, especially due to accidental changes or deletions, File History might have a saved version. Follow these steps to use File History:

  1. Press Windows Key + E or click on the File Explorer icon in the taskbar to open File Explorer.
    1. Go to the folder where the lost Word document was stored.
      1. In the File Explorer window, click on the "Home" tab in the Ribbon at the top.
        1. Click on the "History" button in the "Home" tab. If the "History" option is not visible, it means File History is not enabled for that folder.
          1. File History will open, showing you a timeline of versions. Browse through the timeline to find the version of the document you want.
            1. Hover over a version to see a preview, or right-click and select "Restore" to recover that version.
              1. Once you've restored the version, open the recovered Word document in Microsoft Word.
                1. After opening the document, save it with a new name or overwrite the original to ensure you have the latest version.

                File History is a valuable tool for recovering previous versions of files, and it can be particularly helpful if you made unintended changes to your Word document.

                Method 03. Check Recent Documents in Word

                If you've recently worked on a Word document but can't remember its location, Microsoft Word keeps track of your recent documents. Follow these steps to check the list of recent documents:

                1. Launch Microsoft Word on your Windows computer.
                2. Click on the "File" tab in the top-left corner of the Word window. This will take you to the Backstage view.
                3. In the Backstage view, look for the "Recent" option on the left sidebar. This section displays a list of your recently opened documents.
                4. Examine the list of recent documents to see if the lost Word file is listed. Documents are usually sorted by the most recently accessed.
                5. If you find the lost document in the Recent list, click on its name. Word will open the document directly.
                6. Once the document is open, save it immediately to avoid losing any changes and to update its location in the Recent Documents list.
                7. To keep the document easily accessible, you can right-click on it in the Recent Documents list and select "Pin to list."

                Checking the Recent Documents list in Word is a convenient way to quickly access files you've been working on recently. It's especially useful when you can't recall the specific location of a document.

                Method 04. Use System Restore

                If you've recently made changes to your system or settings and lost a Word document in the process, System Restore can help you revert your computer to a previous state. Follow these steps to use System Restore:

                1. Press Windows Key + S to open the search bar. Type "Create a restore point" and select the corresponding result.
                2. In the System Properties window, go to the "System Protection" tab.
                3. Click the "System Restore" button. This will open the System Restore wizard.
                4. In the System Restore wizard, click "Next." You'll see a list of available restore points.
                5. Choose a restore point that predates the time when you lost your Word document. You can also check the description of each restore point for more details.
                6. Click "Next" and then "Finish" to confirm your chosen restore point. Confirm the warning that this action cannot be undone.
                7. Your computer will restart, and the System Restore process will begin. This may take some time.
                8. Once your computer restarts, check if the lost Word document has been restored to its previous location.
                9. If the document is recovered, open it in Microsoft Word and save it to a secure location.

                Windows System Restore

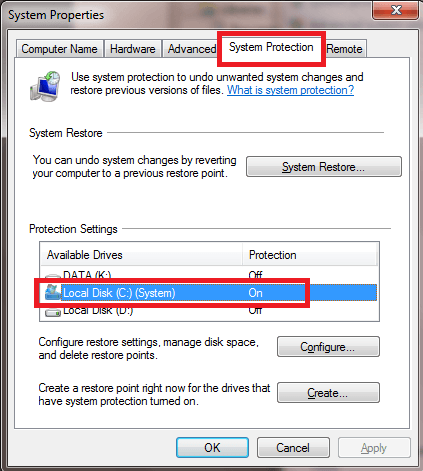
                System Restore is a powerful tool for reverting your system to a state where your Word document was still present. However, keep in mind that this method only works if you have previously created a restore point.

                Part 3. Bonus: Recover Your Lost or Deleted Word Document

                Now that you’ve learned how to find a lost Word document on Windows and Mac, we will recommend a tool called FoneDog Data Recovery. This tool is reliable for recovering deleted files from hard drives, external storage devices, and more. It is available for both Windows and macOS systems and is commonly used to recover files such as documents, photos, videos, audio, and emails. Whether your document was deleted, formatted, or lost due to other reasons, FoneDog provides an efficient solution to retrieve your valuable data.

                Data Recovery Recover deleted image, document, audio and more files. Get deleted data back from computer (including Recycle Bin) and hard drives. Recover loss data caused by disk accident, operation system crushes and other reasons. Free Download Free Download FoneDog Data Recovery

                Steps to Recover a Lost Word Document with FoneDog:

                1. Visit the official FoneDog website and download the Data Recovery tool. Install the software on your Windows computer.
                  1. Open the FoneDog Data Recovery tool on your computer.
                    1. Choose the file types you want to recover. In this case, select "Documents" or specifically "Word."
                      1. Specify the drive or location where the lost Word document was stored. Click "Scan."
                        1. FoneDog will perform a quick scan to locate recently deleted or lost files. After the quick scan, you can opt for a deep scan for more comprehensive results.
                          1. Preview the recovered files and look for your lost Word document. Select the document you want to recover.
                            1. Click on the "Recover" button. Choose a secure location to save the recovered Word document.
                              1. Confirm that the recovered Word document is accessible and intact by opening it in Microsoft Word.

                              Recover Lost Word Document

                              Part 4. Conclusion

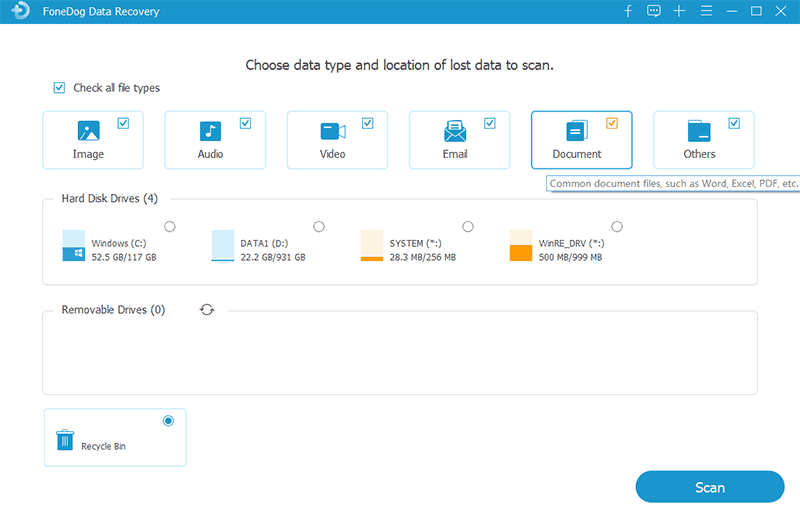
                              Losing a Word document doesn’t always mean starting from scratch. If you're wondering how to find a lost Word document, start by checking the Recycle Bin, using AutoRecover, or System Restore. When these basic options don’t work, advanced recovery tools like FoneDog Data Recovery can help. This reliable, user-friendly software is designed to recover deleted or lost files even from formatted or corrupted drives. Whether the file was accidentally deleted or lost due to a crash, FoneDog offers a strong last-resort solution to retrieve your work.

                              Free Download Free Download

                              Leave a Comment

                              Comment

                              Comment ()
                              author image

                              Nathan E. Malpass

                              iPhone/Android Devices’ Maintenance Expert

                              Staying home, listening to music, writing tech articles

                              Many people asked me to repair their mobile phones so I have a lot of experience in mobile phone repair, and I know a lot about Android or Apple phones.

                              Data Recovery logo

                              Data Recovery

                              FoneDog Data Recovery recovers the deleted photos, videos, audios, emails, and more from your Windows, Mac, hard drive, memory card, flash drive, etc.

                              Free Download Free Download

                              How Do You Like This Article?

                              Check icon/ Check icon

                              INTERESTINGDULL

                              Check icon/ Check icon

                              SIMPLEDIFFICULT

                              Thank you! Here' re your choices:

                              Rate This Article: Excellent

                              Rating: 4.7 / 5 (based on 63 ratings)

                              Data Recovery logo

                              Data Recovery

                              FoneDog Data Recovery recovers the deleted photos, videos, audios, emails, and more from your Windows, Mac, hard drive, memory card, flash drive, etc.

                              Free Download Free Download

                              FoneDog uses cookies to ensure you get the best experience on our website. Click here to learn more.