FoneDog Screen Recorder
FoneDog Screen Recorder
Special Offer
Special Offer


By Gina Barrow, Last updated: December 9, 2019
We have always heard and read about taking backups with all our devices because we don’t know what will happen the next time we use it. However, there are still a number of people who take this note for granted and end up cramming for the best possible solution.
The good news is, there is still a big chance that you can recover your data from a damaged Mac Book Pro hard drive. As long as the hard drive is fine, you can practically use it in any Mac computer and recover all your important data.
So we came up with this article to guide you on how to recover data from Mac Book Pro hard drive including the best data recovery software to use plus other relevant situations where data recovery is highly expected.
In this article, there are 4 common ways recommended for you to recover data from Macbook Pro hard drive. Among them, the most efficient one to do the data recovery is with FoneDog Data Recovery. Here are the steps in details:
Part 1. The Best Software to Recover Data from Mac Book Pro Hard DrivePart 2. 2 More Ways on How to Fix a Failed Macbook Pro Hard DrivePart 3. Summary
Before you head over to data recovery, the first thing you need to make sure is that your hard drive must still be working well when connected with a different Mac computer and should be recognized as external storage or hard drive.
After ensuring that this is possible, download for free FoneDog Data Recovery software. This recovery software is able to retrieve data from a crashed Windows or Mac computer and even deleted files.
It also performs recovery from hard drive, partition, SD/memory cards, and Flash drives. FoneDog Data Recovery ensures that you get all types of data stored inside your drives such as your pictures, archives, documents, videos, and many more.
So, how does FoneDog Data Recovery work?
Data Recovery
Recover deleted image, document, audio and more files.
Get deleted data back from computer (including Recycle Bin) and hard drives.
Recover loss data caused by disk accident, operation system crushes and other reasons.
Free Download
Free Download

After you have connected the Mac Book Pro hard drive to another Mac and been recognized, launch the program FoneDog Data Recovery and onset, select the types of files you wish to retrieve. By default, all these files are selected but you can always customize your choices.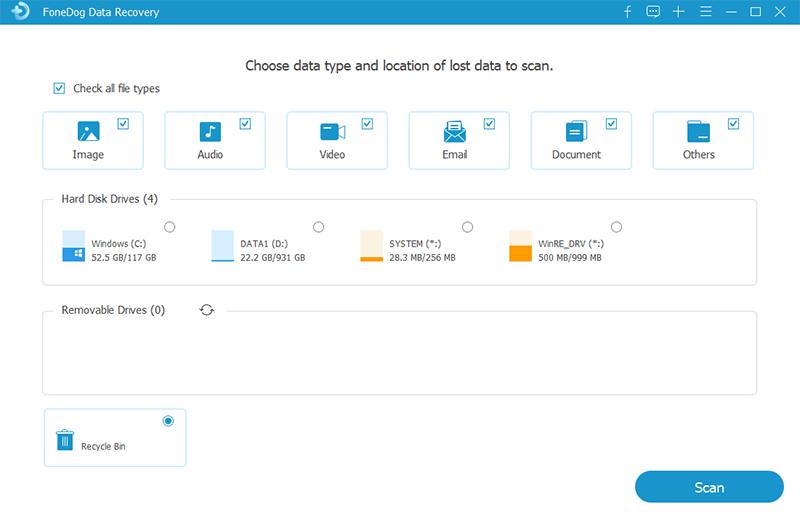
Under the file, types would be the recovery storage location. Since we are going to retrieve the data from the connected hard drive, it should be listed as Removable Storage. Select this option and then click Scan to proceed to the next step.
You will be given two scanning choices on the next screen. The Quick and Deep scan modes wherein you can select which mode fits your current situation. Deep scan mode runs an in-depth scan and actually takes a lot longer compared to the Quick scan mode.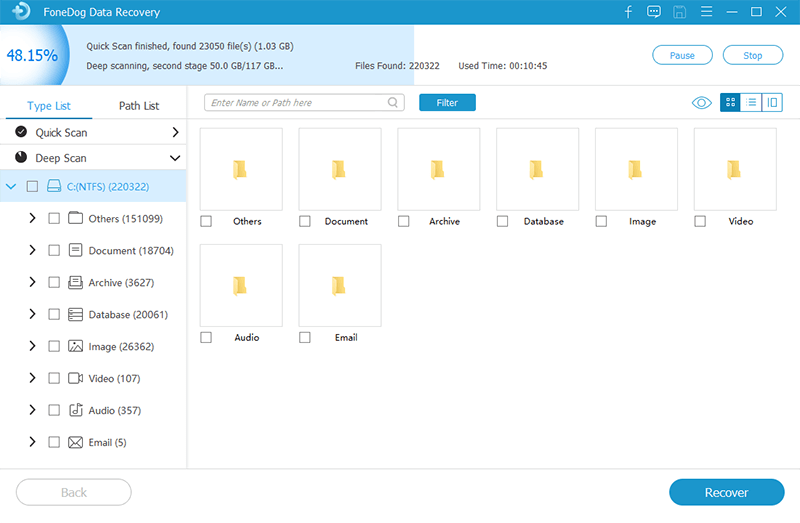
FoneDog Data Recovery will display all the scanned data on your screen based on its type list and path list. All files are sorted as well according to its format and category so you won’t have a hard time looking for your files.
From here, you can preview each item and highlight them for recovery. You can select them all or only choose those files you think are more important. Click the Recover button and confirm the action.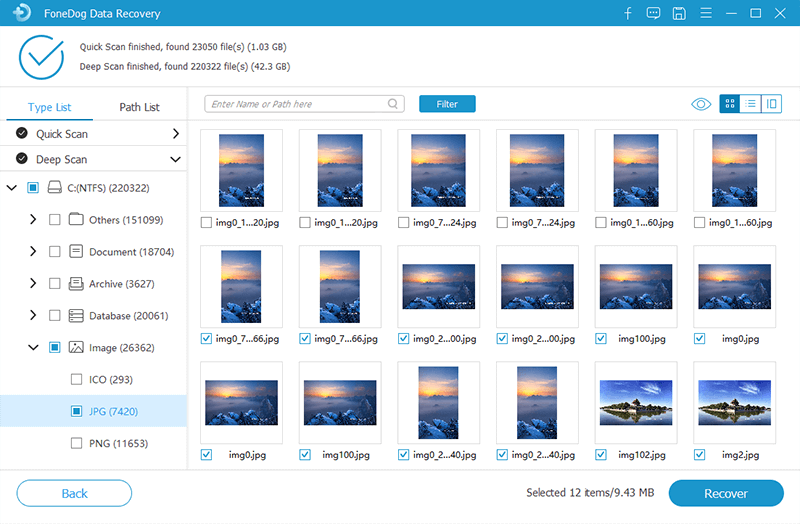
You can also set the destination location on your computer.
You have now successfully recovered your data from a Mac Book Pro hard drive! The best thing about FoneDog Data Recovery is you can use it in any other situation like recovering deleted files or restoring data from other storage devices.
If in another case your hard drive crashed and you discovered that it can still get repaired, then you can practically learn from this guide on how to fix it.
First, you just have to make sure that it is not beyond repair after that, follow these two solutions on how to resolve your hard drive issue.
In most troubleshooting cases, a reboot could alleviate any further issues and often fix whatever problems are dealing with.
The macOS recovery contains the latest version of the operating system installed on your make and has the options to fix various issues you are experiencing with the current one.
However, using macOS recovery will erase everything stored inside your Mac thus it is safe to keep a backup of all your files via Time Machine or whatever backup options deemed possible at the moment.
After you have created a backup, follow this guide on how to enter MacOS recovery:
Another option for macOS Recovery is to use the internet recovery method which restarts your Macbook directly from apple’s servers and then performs all the needed troubleshooting.
Follow these steps to enter Internet recovery:
Data Recovery
Recover deleted image, document, audio and more files.
Get deleted data back from computer (including Recycle Bin) and hard drives.
Recover loss data caused by disk accident, operation system crushes and other reasons.
Free Download
Free Download
You finally learned how to recover data from Mac Book Pro hard drive using FoneDog Data Recovery. This software provides a simple and upfront recovery process in just 3-steps.
Apart from data recovery, we also highlighted the solutions on how to repair your crashed hard drive using two default options.
Have you encountered a similar scenario before? What steps did you take to resolve it? Share it in the comments below!
Leave a Comment
Comment

Technical/Creative Writer
Kitchen, my safe space; black, my favorite color
Was a Technical Specialist for a while, troubleshooting Smartphone and Software-related issues until a writing stint caught my attention.
Data Recovery
FoneDog Data Recovery recovers the deleted photos, videos, audios, emails, and more from your Windows, Mac, hard drive, memory card, flash drive, etc.
Free Download Free DownloadHot Articles
 /
/
INTERESTINGDULL
/
SIMPLEDIFFICULT
Thank you! Here' re your choices:
Excellent
Rating: 4.7 / 5 (based on 61 ratings)
