FoneDog Screen Recorder
FoneDog Screen Recorder
Special Offer
Special Offer


By Vernon Roderick, Last updated: May 12, 2021
It is common knowledge that Windows is the most commonly-used operating system for personal computers. However, you will eventually encounter a situation where you will have to reinstall your desktop, and that would be the time when the need to look for various recovery methods arises.
This is what happens if you find out that there were actually important files lost upon reinstallation. It might be difficult to retrieve files after the reinstallation on other operating systems, but it’s a different story for Windows 10.
So today, we’ll be talking about three methods to recover files after reinstalling Windows 10. But before that, let us first discuss what it means to reinstall Windows 10. Here's a similar article about how to recover files after a factory reset on Windows 10, you can have a look.
Part 1. Three-Step Software to Recover Files After Reinstalling Windows 10Part 2. File History to Recover Files After Reinstalling Windows 10Part 3. System Restore to Recover Files After Reinstalling Windows 10
A lot of people know that reinstalling Windows 10 would inevitably lead to data loss, and learning how to recover files after reinstalling Windows 10 takes time. But still, we reinstall Windows 10 knowing the consequences. This is because there are concrete reasons for reinstalling Windows 10. Here’s a look at some of those reasons:
The reasons mentioned above are things you should avoid at all costs. By allowing such issues to occur, you are making yourself closer and closer to needing to learn how to recover files after reinstalling Windows 10. In such an event, you will have to be careful when trying to fix your problem, but first, can you solve the problem in the first place?
It is common for people to remember an important thing when doing something with their personal computers. It may be that they forgot to change the settings of installation. Or it may have something to do with the configurations. But most importantly, you may have forgotten that you have important files in your computer.
Due to this common occurrence, there have been tons of research done to figure out how to recover files after reinstalling Windows 10. And now, it is found out that these files aren’t actually deleted unless you overwrite them. And for that reason, the answer to your question is a big YES.
Now if you haven’t done anything to overwrite the files such as replacing, moving, renaming, files, then the only thing you have to worry about is how to improve your chances.
Fortunately, the ways to accomplish this can be easily done. Ultimately, we suggest that you avoid using your Windows 10 PC as much as possible as soon as you recognize data loss. This should preserve the presumably deleted files. Now that that’s settled, let’s proceed with our first method to recover files after reinstalling Windows 10.
The first method, which is also the one that we recommend the most, involves using data recovery software. We recommend this for many reasons. For one, it is already proven by many people to be very effective, especially if the software you choose is the right one. And for that reason, we recommend FoneDog Data Recovery.
FoneDog Data Recovery is a software designed to serve as a tool for those who want to recover their precious files, be it their family photos, memorable videos, confidential documents, and more. And for what it’s worth, it supports both Windows and Mac, including Windows 10.
This should be enough to convince you that FoneDog Data Recovery is your best bet to recover files after reinstalling Windows 10. Now here are the steps you need to follow in order to accomplish your goal.
You can download the app from the official website. We suggest using this link: https://www.fonedog.com/data-recovery/. That way, you won’t get tricked by anyone with ill intentions that want to corrupt your computer. Either way, after this, you should be able to proceed with the installation.
The first thing you’ll see once you open FoneDog Data Recovery is an interface with several options. Among these, there should be a row for the file type and another for the location. We suggest selecting Check all file types since it would increase the chances of recovering all lost files. As for the location, it should be up to you which drive you to want to retrieve first.
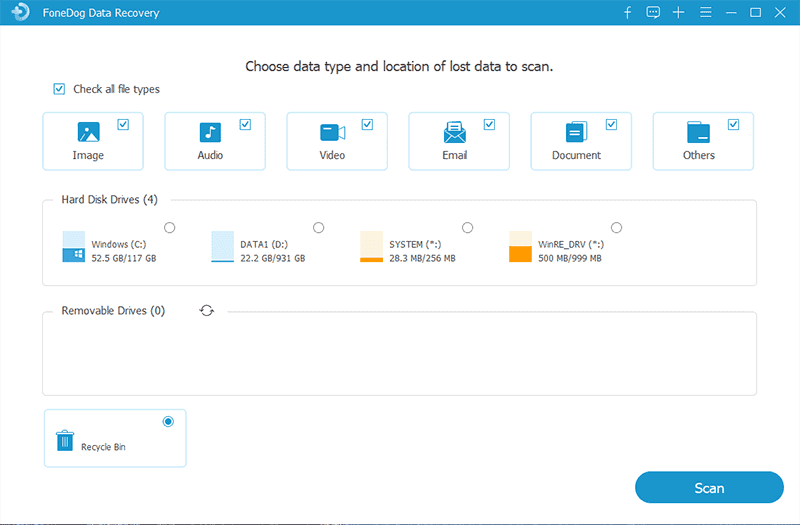
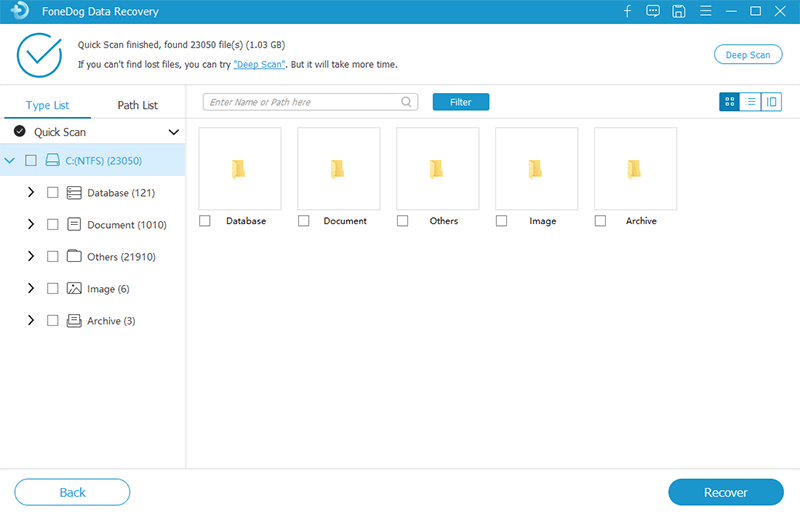
Upon finishing configurations, you should click on the Scan button. By doing so, the software will start the scanning process. By default, the process should be Quick Scan which focuses on speed rather than accuracy. However, you can do the opposite by selecting Deep Scan for more accurate results.
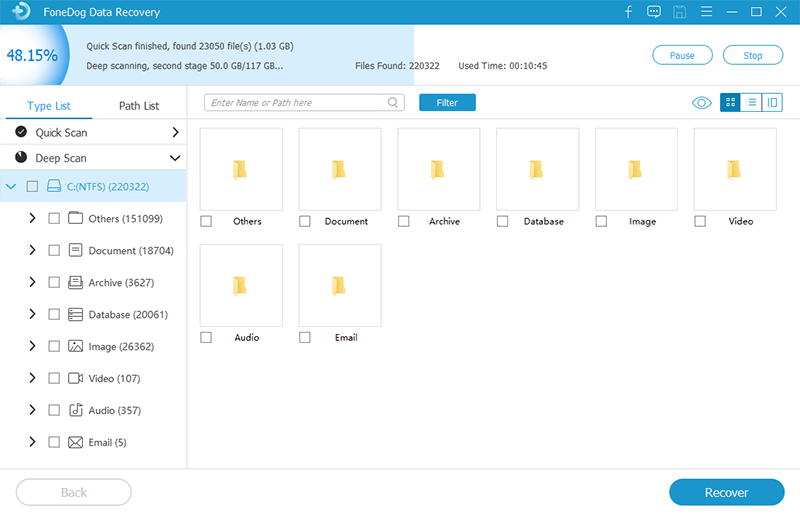
Once the scanning process is done, the files that you can recover will be listed on the right panel of the window. Here, you can select the files that you want to recover by clicking on their corresponding boxes. After selecting the files you need, click on Recover to start the recovery process.
You don’t have to worry about the reset once you click on Recover. Simply wait for the process to complete and you’ll get your files back good as new. The only downside to this is that you may need to understand the software first before trying to recover files after reinstalling Windows 10. You can also solve some problems about windows 10 by data recovery, such as "Folder Access Denied". With that said, we have another option that may be easier to understand.
The File History is a place where you can create backups of your PC as well as restore your PC with those backups. Another great thing about it is the fact that it is a built-in function, meaning you won’t have to worry about compatibility issues. Here’s how you can use the File History to recover files after reinstalling Windows 10:
On your Windows 10 PC, click on the Start button at the bottom-left corner of the screen. Now on the menu options, click on the gear icon which should take you to Settings. From there, select Update & Security followed by Backup. You now have access to all the features on File History.
On the Backup section, click on More options. Select this option then click on Add a folder. You will then get a window for selecting folders. Find the folder that you want to include on the backup then click on Choose this folder once you’ve selected a folder. If you added a folder by mistake, you can always select that folder then click on Remove.
On the same Backup section, there should also be an Add a drive option. Click on this option then select the drive that you want to put the backup into. If there’s not enough space on your hard drives, you can plug in external hard drives and select those. Either way, you have to wait for a while for the backup to complete. You now have a readily-prepared backup for you to use anytime.
Now if something goes wrong and it is time to recover files after reinstalling Windows 10, just go to the Backup section again. Next, select More options followed by Restore files from a current backup. Finally, click on the Restore button. The files that you selected in step 2 will be retrieved. Just wait for it to finish naturally.
Although this method to recover files after reinstalling Windows 10 allows you to recover all sorts of files, it has one big flaw, and that is the fact that you have to create a backup first. If you are already facing this problem without a backup, then perhaps the next and last method will be your last resort.
Restoring from a backup through File History requires you to predict when an issue will happen and prepare for it before it happens. System Restore, on the other hand, only requires you to set some kind of checkpoint and it will do the rest. That’s why it is more popular as a method to recover files after reinstalling Windows 10. Either way, here’s how you can use this function:
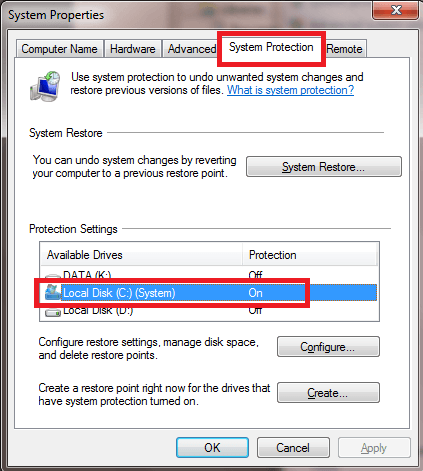
Take note that System Restore isn’t enabled by default, so you have to enable it yourself if it isn’t yet. For that, you have to click on the Start button then type in “Create a restore point”. Next, select the first option that shows up to open the System Properties window. On the System Protection tab, select Local Disk (C:) from Available Drives then click on Configure… Lastly, mark the Turn on system protection option then click on Apply. This should allow you to use System Restore as much as you want.
Since System Restore is enabled, your PC should create restore points automatically. However, sometimes you just need to make it more accurate by creating the restore point manually. You can do this by going to the same window as before, but this time, click on Create instead of Configure. Now type in a description for that restore point then click Create. Proceed to click OK. There should now be a restore point of your choosing.
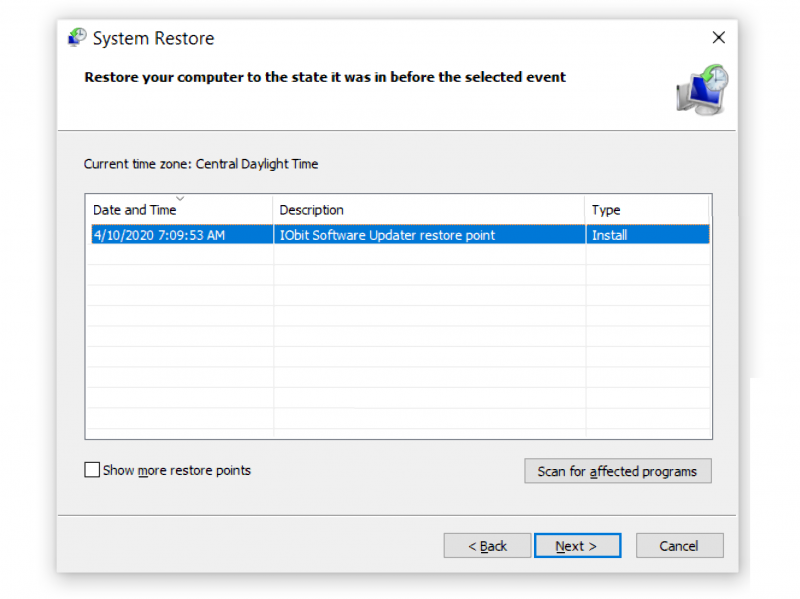
To use the Restore Point, you will again need to go to the same window. However, this time, click on the button at the top which should say “System Restore”. You should be taken into another window. Proceed by clicking on Next. There should be a list of restore points on the next screen. Highlight the one that you created then click on Next until the button says Finish, at which point the process should be finished.
While it may be similar to File History, it’s not. Depending on how you use it, you can exploit the System Restore feature to your advantage when trying to recover files after reinstalling Windows 10. If you feel like these three methods are too much for you, then perhaps not a solution, but prevention is needed.
While it is true that reinstalling Windows 10 will inevitably lead to data loss, there are ways to make the data loss less severe. For one, since there are different ways to reinstall Windows 10, you have to know which method suits your situation.
1. System Restore. Believe it or not, system restore is not only used to recover files after reinstalling Windows 10 but can also be used to reinstall Windows 10. Experts often use this when they want to reinstall the system because of the incompatibility of a single program, app, or driver. This is mainly because System Restore can turn back time for when that program still doesn’t exist from the system.
2. Reformat Your System.If you haven’t installed a program but are still facing a problem, then perhaps reformatting your system would be more ideal than using System Restore.
3. Recovery Drive.Using a recovery drive allows you to easily reformat your system. This time, however, you will be plugging in a storage media before doing the reformat process. In exchange, it would be faster and safer than normal reformatting.
4. Installation Media. If you don’t have a recovery drive, then installation media will do. It should be provided to you by the manufacturer the moment you buy it from them.
People Also Read4 Methods to Fix “CHKDSK is Not Available for RAW Drives”A Detailed Guide on Windows 10 Recovery Partition
With these four methods to reinstall your Windows 10, you should be able to avoid data loss as much as possible. After all, it’s always better to look for prevention rather than rely on the solution.
Rather than buying another computer, it is better to reinstall Windows 10. That way, you’ll be saving your resources. But even with such a convenient method, you will still face problems, one of which is data loss.
It might be difficult to resolve such an issue, but with the right method, you will be able to reinstall your Windows 10 without any worries. Either way, that concludes everything you need to know to recover files after reinstalling Windows 10. Hopefully, this will help you understand your Windows 10 more.
Leave a Comment
Comment

Technical Expertise for PC/Website Optimization
One of my passion is to develop software of my own
I write articles to share knowledge about IT technology and some experience in developing my own software, and developing my own software is one of my passions for work.
Data Recovery
FoneDog Data Recovery recovers the deleted photos, videos, audios, emails, and more from your Windows, Mac, hard drive, memory card, flash drive, etc.
Free Download Free DownloadHot Articles
 /
/
INTERESTINGDULL
/
SIMPLEDIFFICULT
Thank you! Here' re your choices:
Excellent
Rating: 4.7 / 5 (based on 64 ratings)
