FoneDog Screen Recorder
FoneDog Screen Recorder
Special Offer
Special Offer


By Gina Barrow, Last updated: January 1, 2020
Your Recycle Bin is where all the excess and unimportant files are stored. Although most of the files inside are not important anymore, there are cases where we need them the most.
Normally, you just go on deleting files that you have already used and are just a sore on your desktop, however, in some cases, you might need them back either for personal or work reasons.
Once the recycle bin folder is deleted, they are no longer accessible or visible, but the good news is, these files are still recoverable.
Each Windows partition has a separate recycle bin folder to store deleted contents. As long as the data is not yet overwritten, you can a reliable recovery program to retrieve your files back. FoneDog Data Recovery will help you restore your files by performing recycle bin recovery in just a few steps.
Part 1. How to Perform Recycle Bin Recovery Using Data Recovery SoftwarePart 2. How to Restore Files from Your Recycle Bin Part 3. Bonus Tips on How to Allocate More Space for your Recycle Bin FolderPart 4. Summary
FoneDog Data Recovery is a complete and comprehensive recovery tool that offers recycle bin recovery, hard drive recovery, deleted files, and many more.
Before we begin the recycle bin recovery, we will first explain two things; there are temporary files and permanently deleted files.
Temporary files are those you simply erased using the delete button on your computer or laptop while permanently deleted files happen when you have emptied the recycle bin, used the SHIFT + Delete keys, or large files that were marked for permanent deletion, and old files stored from the recycle bin.
Now the situation we are currently handling is the permanently deleted files wherein you can no longer access or view the files inside the recycle bin folder. This means that the files are off somewhere you cannot see.
These files are transferred in a hidden folder inside the hard drive and only recovery programs are able to perform recovery.
Data Recovery
Recover deleted image, document, audio and more files.
Get deleted data back from computer (including Recycle Bin) and hard drives.
Recover loss data caused by disk accident, operation system crushes and other reasons.
Free Download
Free Download

This is where FoneDog Data Recovery comes into the scene; it will help you retrieve all files from the recycle bin even if it’s permanently deleted.
The benefits of having a reliable recovery program such as FoneDog Data Recovery is the convenience that no matter what happens or whatever kinds of data loss that will come your way, you are assured that you will have them in no time.
Here is the detailed guide on how to use FoneDog Data Recovery:
After you have downloaded FoneDog Data Recovery software, launch it and onset of the program screen, you will be directed to select the kinds of files you wish to recover from the Recycle Bin.
Next is to find the drive or the file location, select Recycle Bin among the options. Click Scan to proceed to the next step.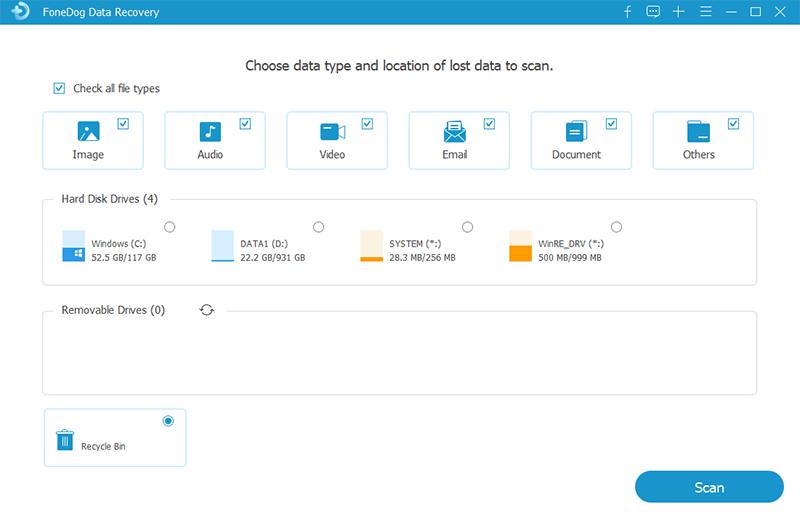
FoneDog Data Recovery will now scan the entire recycle bin folder to begin retrieving the deleted files. It’s up to you which scanning mode you plan to use.
The Quick scan may take a few minutes to complete while a deep scan can take longer time depending on the total amount of data you have submitted for recovery.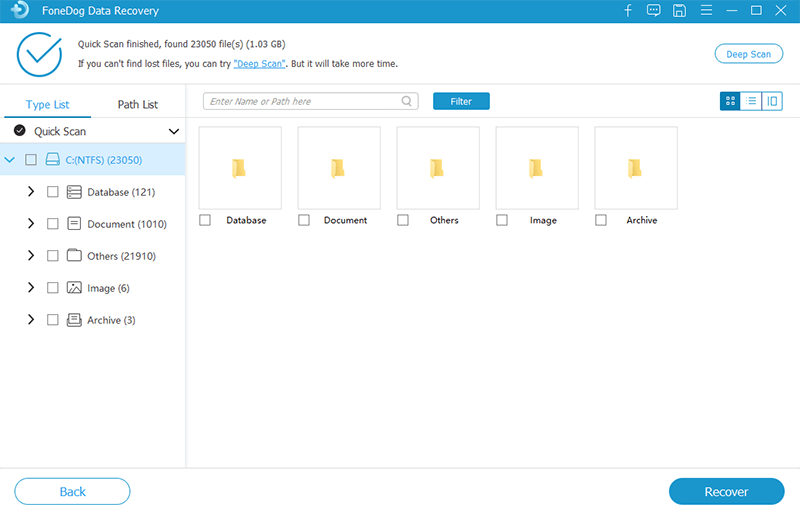
You will be able to preview all the files that were deleted from your Recycle Bin after the scanning is completed. From here, you can choose those that you wish to recover either to select them all or simply mark the files one by one.
Download and save the selected contents on your desired folder.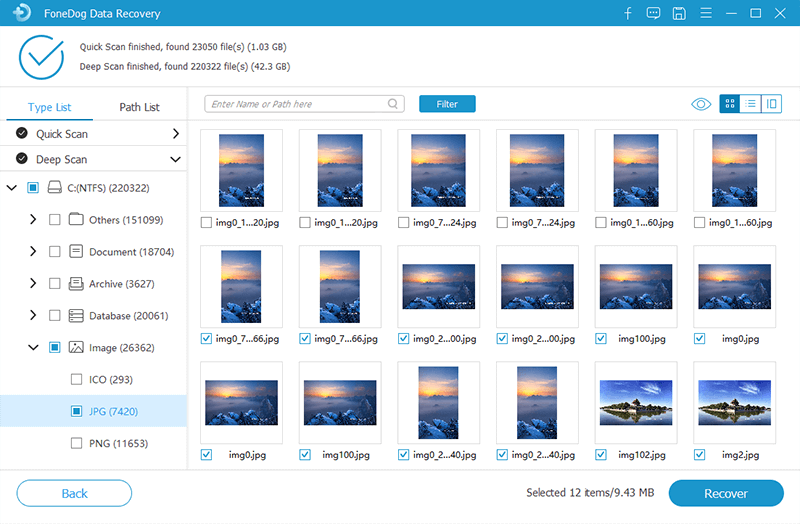
That’s it! You only need 3-steps to complete a recycle bin recovery and your files will be retrieved soon! What’s more interesting with FoneDog Data Recovery is that it is compatible to Windows and Mac computers. All you need is to download the compatible version.
If you have simply deleted the files on your computer by using the Delete button, you can easily restore them from the Recycle Bin folder. You just simply right-click on the file/s you need and select Restore.
Here is the complete step by step guide:
To avoid permanently deleted files, you can actually customize the space allocated by the Recycle Bin folder. The bigger the size of your recycle bin, the more files it can store and the easier it is for you to restore in case of data loss.
Follow this guide on how to do it:
By doing this tip, your recycle bin will be able to handle and manage more files plus it will be easier for you to recover any files without having to worry about data loss.
Data Recovery
Recover deleted image, document, audio and more files.
Get deleted data back from computer (including Recycle Bin) and hard drives.
Recover loss data caused by disk accident, operation system crushes and other reasons.
Free Download
Free Download
Doing a recycle bin recovery is simple and pretty straightforward when you use FoneDog Data Recovery software. You don’t have to endure a lot of complicated processes because this program has a modern interface and has a click-through based program.
What’s more interesting is that you can actually preview the recovered contents before you can purchase the software. This makes you more confident that your files are still inside the recycle bin folder and just waiting for you to recover them.
Have you encountered recycle bin data loss too? What recovery methods have you done so far?
Leave a Comment
Comment

Technical/Creative Writer
Kitchen, my safe space; black, my favorite color
Was a Technical Specialist for a while, troubleshooting Smartphone and Software-related issues until a writing stint caught my attention.
Data Recovery
FoneDog Data Recovery recovers the deleted photos, videos, audios, emails, and more from your Windows, Mac, hard drive, memory card, flash drive, etc.
Free Download Free DownloadHot Articles
 /
/
INTERESTINGDULL
/
SIMPLEDIFFICULT
Thank you! Here' re your choices:
Excellent
Rating: 4.5 / 5 (based on 83 ratings)
