FoneDog Screen Recorder
FoneDog Screen Recorder
Special Offer
Special Offer


By Gina Barrow, Last updated: December 30, 2019
“I am having a hard time repairing with my corrupted VHD and now my next concern is how to do VHD recovery that would totally retrieve all important files. Could you recommended me an effective and fast program to use?”
Your VHD or Virtual Hard Drive in Windows 10 plays a crucial role for saving the entire contents of a hard drive. It basically adds extra storage for any kinds of files and even create a dual-boot system without tweaking the current partition.
Like any other drives you use for file storage, there is also a great chance of file corruption, system damages, and accidental deletion that can trigger data loss.
If you are wondering how you are able to perform VHD recovery, we’ll help you retrieve your files by using a highly reliable program plus all the tips you can do to avoid experiencing this inconvenience in the future.
Part 1. The Best VHD Recovery Software to UsePart 2. Causes of VHD Corruption and RecoveryPart 3. Summary
Irregardless of how you lost the files from the VHD, you still have the option to restore your files using a VHD recovery software.
FoneDog Data Recovery program lets you perform VHD recovery without further data loss or data overwriting. All your files are guaranteed safe.
Data Recovery
Recover deleted image, document, audio and more files.
Get deleted data back from computer (including Recycle Bin) and hard drives.
Recover loss data caused by disk accident, operation system crushes and other reasons.
Free Download
Free Download

Features of FoneDog VHD Data Recovery that people like:
FoneDog Data Recovery has a modern and compact interface which highlights a user-friendly platform so anyone from entry level to experts can use it without any difficulties.
Here are the steps on how to performa VHD recovery with FoneDog Data Recovery program:
Once you have installed and launched FoneDog Data Recovery, select the types of files you wish to recover on the first part of the menu.
Next, is to select the drive or the storage device where you want to retrieve all these files from. For this example, you can choose your VHD. Click Scan to continue.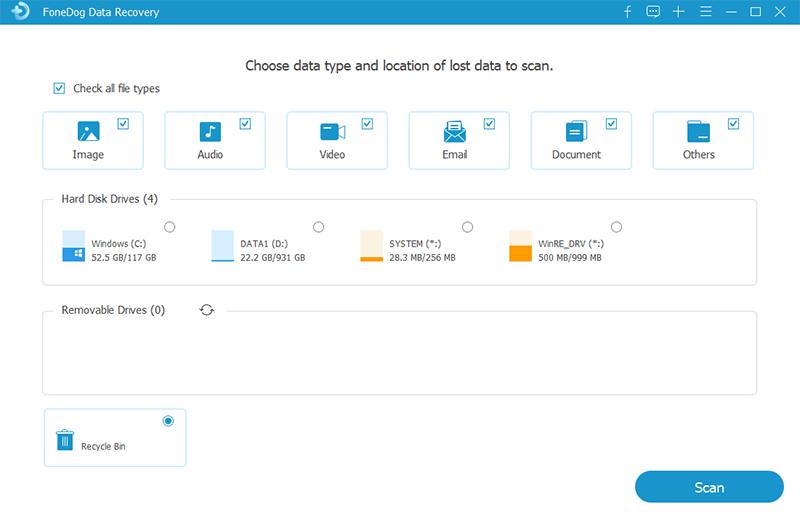
FoneDog Data Recovery will now run a scan on your VHD. You can choose between a Quick scan or a Deep scan mode.
The entire scanning takes a while depending on the data types you are retrieving.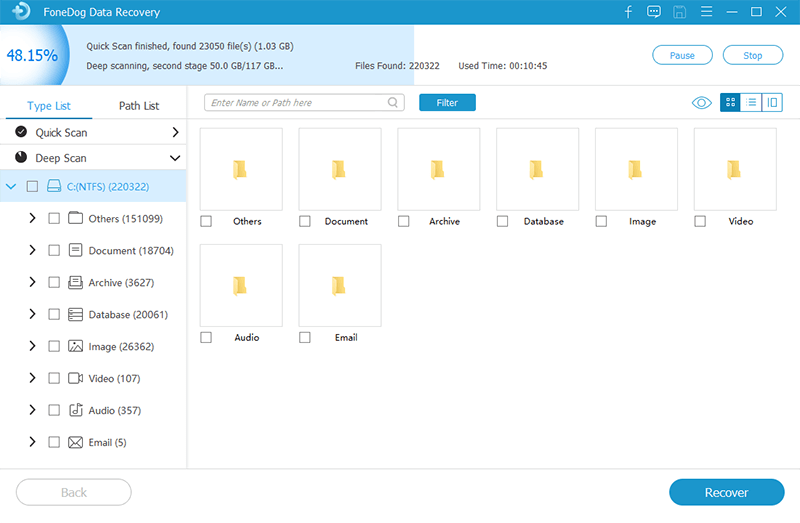
All files whether lost or deleted will gradually appear on your screen while the software is scanning the VHD. If you see your files, you can pause or stop the scan and preview the items.
Once you have verified the files you needed, you can always click Recover to let you save and download the files. You will be asked for the destination folder of these recovered items.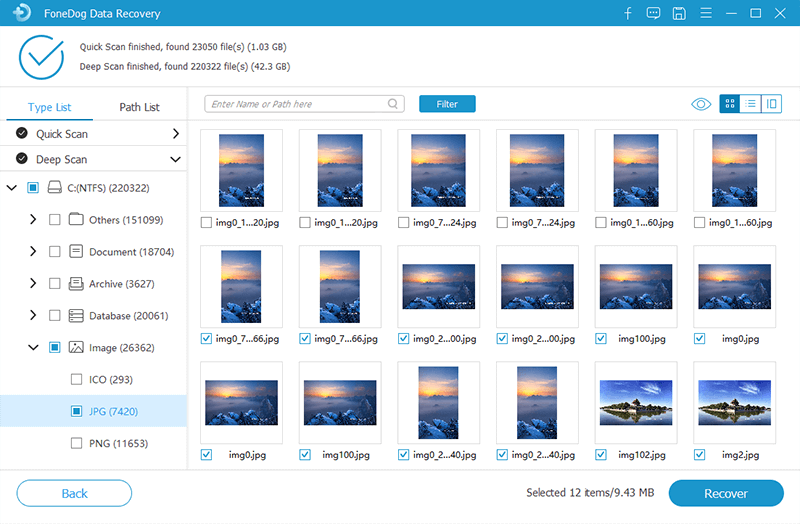
That’s it! You have just performed VHD recovery using FoneDog Data Recovery program. It’s fast, easy, and highly efficient. Recommended for those users who are always on the go and need a handy program any time.
To set a clear overview about VHDs, there are actually two types of your Virtual Had Disks. The first is the Fixed-sized and the other is the Dynamic.
The main notable difference between the two is the space allocation. Fixed-size has a specified amount of physical disk on your file system, it does this automatically; while the dynamic disks will only allocate space when needed.
Creating a virtual hard disk on your Windows 10 is easy; follow this walk-through guide on how to do it:
Now that you have created a VHD or VHDX on Windows 10, you need to create a partition and initialize the disk.
You have successfully created and setup your VHD/X on your Windows 10.
VHD or virtual hard disk is used in many ways just like your physical disk storage. And like any other storage drives, it is also prone to system damages, file corruption, and even data loss.
To summarize this article guide, we learned how to perform VHD recovery using FoneDog Data Recovery program. The program has a seamless interface with a walk-through process that any types of users can use the program.
Data Recovery
Recover deleted image, document, audio and more files.
Get deleted data back from computer (including Recycle Bin) and hard drives.
Recover loss data caused by disk accident, operation system crushes and other reasons.
Free Download
Free Download
Data loss happens every day and it chooses no one. So always be ready and be equipped with the most trusted recovery program online!
Have you performed VHD recovery before?
Leave a Comment
Comment

Technical/Creative Writer
Kitchen, my safe space; black, my favorite color
Was a Technical Specialist for a while, troubleshooting Smartphone and Software-related issues until a writing stint caught my attention.
Data Recovery
FoneDog Data Recovery recovers the deleted photos, videos, audios, emails, and more from your Windows, Mac, hard drive, memory card, flash drive, etc.
Free Download Free DownloadHot Articles
 /
/
INTERESTINGDULL
/
SIMPLEDIFFICULT
Thank you! Here' re your choices:
Excellent
Rating: 4.6 / 5 (based on 100 ratings)
