FoneDog Screen Recorder
FoneDog Screen Recorder
Special Offer
Special Offer


By Nathan E. Malpass, Last updated: August 22, 2019
How to delete photos completely and permanently on your iPhone devices? Because someone else told me even if you deleted some data like photos on your phone actually the space of a phone just didn't occupy. I want to speed up my iPhone devices, so tell me if you have a piece of advisable advice.
So the moment has come where you probably have decided to let go of your precious iPhone. Being with you throughout all those years, you decide to give the good old pal a rest after all the time it has served you graciously. To prepare, you may have already worked on deleting messages, contacts or anything personal on the iOS device. The question is, is this enough? Frankly speaking, no it is unfortunately not enough and extra steps are needed.
Now since there are some things we need to know before going through with this, here at FoneDog we have exactly what you need and important information all here on this article. Let us help get your iOS device ready for either a sale or a hand-me-down.
Part 1. Why Should You Ensure Complete Deletion of Your Photos?Part 2.Deleting Photos the Old Fashioned Way with iOS 8Part 3.The Most Effective Method: Using FoneDog - iOS Data EraserPart 4.Video Guide: How to Erase Photos on an iPhone PermanentlyPart 5.Conclusion and Other Recommendations
Since we have now found ourselves in the predicament of either selling or handing down our iPhone, we definitely need to prepare but why? It is simply because all of the data you may have deleted is in fact not 100% gone. What really happened is that the data was compressed and placed somewhere deep inside your iPhone’s memory. This memory is very much recoverable as long as it has not been overwritten by other new data. This is especially important if we are talking about pictures here since any person knowledgeable enough can recover them and see who the owner was and their private life. Yes, this is why we have seen photos and perhaps undesirable content appearing online without the consent of the owner, a risk taken when giving your devices to new owners or bringing them to a repair shop or pawn shop. This is something we definitely want to avoid at all costs.
With this in mind, we now know that it is highly importantly to completely wipe your iPhone from any private data and have it set like new out of the box. A powerful software is needed to perform such a task, or if you are not going to sell or hand down your iOS device then destruction is recommended. This calls for physical destruction such as using a hammer making it completely useless.
Our team at FoneDog understand this 100%, and we have designed a toolkit exactly for this predicament. This software is capable of completely wiping everything, even in the hardest to reach places. This will ensure that your device is ready for sale or anything else that you may wish to do to it.
Apple has provided the option to delete photos via their built-in system of the iOS 8. While it definitely it is the viable option, it may not be the most efficient as has been noted by the community. Nevertheless, we have provided you the method here, so let us get started!
Step 1: Find and tap on the “Photos” application on your iOS device.
Step 2: Go to the “Albums” option which you can find on the lower right side of the screen.
Step 3: Go into the “Recently Deleted” folder; this is where you have all your photos that you have deleted within the past 30 days.
Step 4: Press “Select” and begin selecting each photo you would like to have deleted.
Step 5: To confirm your deletion, press on “Delete” or “Delete Photo”. Your photo(s) will now be deleted permanently.
There you have it, this is the traditional way to have all your photos deleted. The only problem is, however, is that if you need to delete a whole batch of photos, you need to select every single photo individually. This is where the next method comes into play, where we eliminate that inconvenience completely and therefore speed up the process.
In order to the FoneDog - iOS Data Eraser, you will need to follow the steps we have provided. You will now be able to enjoy a fast and safe program which ensures everything plus the nooks and crannies are deleted permanently without any doubts and questions. So folks, let us get started!
First and foremost, we need to set up FoneDog - iOS Data Eraser on our computers. Both a Mac and a Windows version are available where you can try them for free. After you have downloaded the software, go ahead and have it installed.
Start up the program and have your iOS device connected and ready. It is imperative to use a properly working USB cable, especially one that is Apple certified. Also, make sure that your internet connection is stable and everything is set to go.
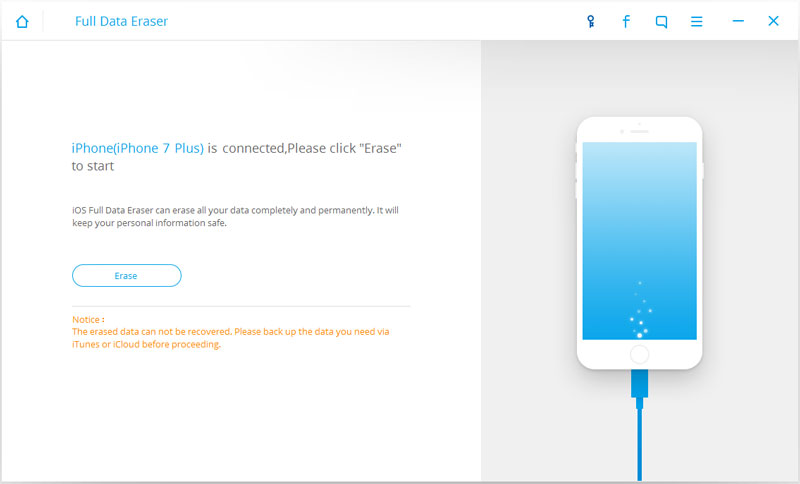
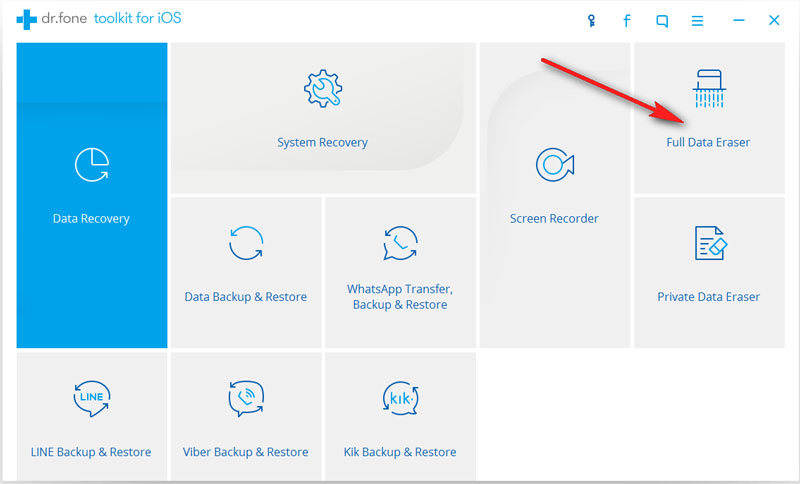
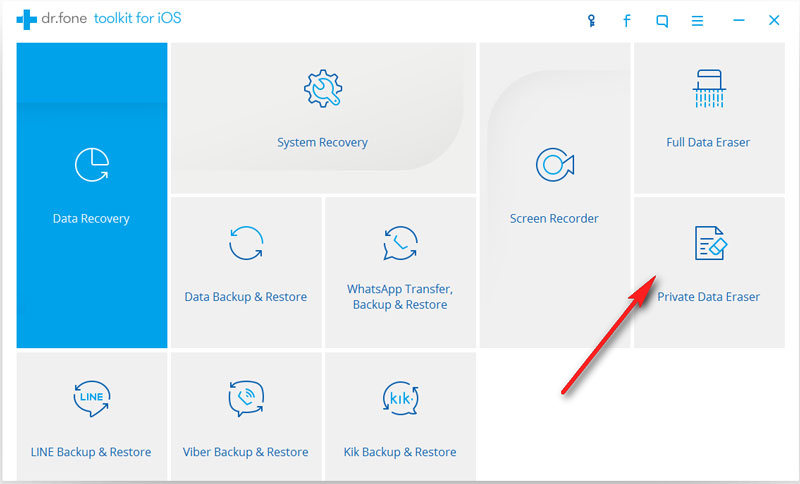
Once the connection is confirmed between your iOS device and the software, go ahead and enter the Private Data Eraser tab found on our easy-to-use interface. Your device will then be scanned right there and then.
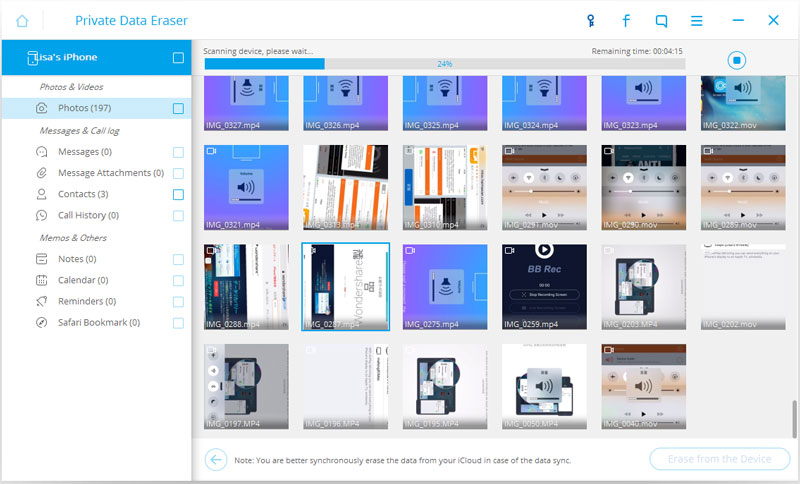
Depending on how big your data storage is, the scan times are varied. Once FoneDog - iOS Data Eraser has finished the process, you will be then met with a whole list of data which range from messages, contacts, call history, photos and everything in-between. From here you may now be able to select which photos you want to delete, forever. Select the photos either one by one, in a batch or wipe everything, the choice is up to you. When you have decided what to delete, simply confirm your choice by pressing “Erase from the Device”. It is as easy as that!
And there you have it, my fellow readers, we have now successfully deleted all of your photos. With successful deletion, they are also no longer recoverable, even using powerful software meant to recover data. An example of this would be our FoneDog - iOS Data Recovery Toolkit which does just that, but even for that tool, it is beyond its capability, so be rested.
While we are on the topic of our FoneDog - iOS Data Recovery, if you are looking to recover lost messages, photos, contacts or anything else then you have found just the software. FoneDog - iOS Data Recovery can recover everything you have that has not been permanently deleted like what we have done. Devices that have even been damaged or not used for a while are salvageable, so we definitely have you covered there!
Now, what if you wanted to fix your iPhone or iOS device back to normal? Once again we have you completely covered there. For that, we have our FoneDog - iOS System Recovery toolkit. Anything can be fixed from the occasional loops to major problems like the Red Screen of Death! All of this comes conveniently bundled in our toolkit which has various other options to pick from.
With that said, we hope that you have enjoyed our tips and methods and we recommend you to try out our products. Come and join the numerous others who have already been satisfied and swear by our toolkit!
Leave a Comment
Comment

iPhone/Android Devices’ Maintenance Expert
Staying home, listening to music, writing tech articles
Many people asked me to repair their mobile phones so I have a lot of experience in mobile phone repair, and I know a lot about Android or Apple phones.
iOS Data Recovery
3 Methods to recover your deleted data from iPhone or iPad.
Free Download Free DownloadHot Articles
 /
/
INTERESTINGDULL
/
SIMPLEDIFFICULT
Thank you! Here' re your choices:
Excellent
Rating: 4.6 / 5 (based on 81 ratings)
