FoneDog Screen Recorder
FoneDog Screen Recorder
Special Offer
Special Offer


By Nathan E. Malpass, Last updated: March 29, 2022
Options with questions such as, “Do I completely erase and destroy my iPhone?” “Do I sell my iPhone?”,or “Do I give my iPhone to a friend or family member?”. All of these questions have one common answer which is, “You need to erase and format everything.”
So, the moment has come, a day which all avid iPhone users perhaps dread, where our iOS device’s time is coming to a close. No, your iPhone did not die, but we do have options at our disposal for this specific moment.With the answer at hand, we now need the know-how to drive that answer and this is where we, the team at FoneDog, come in. We understand and know that this scenario will eventually become reality for every one of us, so for this, we have prepared exacting methods to undergo such an ordeal.
Part 1. Very Important - Why You Should Format Your iPhonePart 2. What Should We do to Format iPhone Data CompletelyPart 3. The Most Efficient and Easiest Method: Using FoneDog - iOS Data EraserPart 4. Video Guide: How Can We Format iPhone Completely?Part 5. Conclusion and Further Recommendations
This part here is very important to know as to why we should even bother to format our iPhone’s data. Most of it is simple logic. If you were to give your iPhone to a friend or relative, wouldn’t it be awkward for them to read all of your saucy messages and pictures? What more if you sold it off to a buyer online and shipped it to them? All of your personal information and life is exposed to those new prying eyes, and you only have yourself to blame. Has something to be done about this right?Hopefully, before you even gave away your iPhone, you decide to delete all of the important, personal things such as contacts, photos, messages, notes and more. Perhaps this is enough, however, unfortunately, it is not.
Why data didn't go away completely
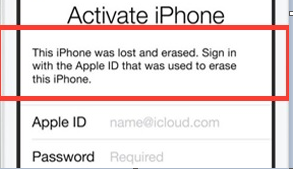
We have to keep in mind, and it is very important to note, that data we have deleted is in fact not 100% gone from our iPhones. Yes, due to this, our iPhones are still eligible to be data mined by those who know how, in which they will recover all of the photos, contacts, and messages you thought you have erased permanently. This brings us back into a state of panic.The reasonable question now is, why is data even still there in the first place? The answer is because of data, which you have deleted, is in fact simply compressed and stored deep in your iPhone’s memory waiting for it to be replaced by some other data. Yes, nothing has completely gone away.
What should we do actually?
Think of it as you using a paper shredder to destroy some highly classified data, however, the shredder only cuts vertical strips. While the newly shredded paper falls into the bin, and while it seems quite a waste of time for anyone to attempt to put them back together, anyone daring and dedicated enough can indeed recover information. Same thing applies to digital devices, however, it is made much easier with questionable programs.So what are we left to do now? Do not fret, because this is where the people are FoneDog are on your side to give you the means and know-how in order to make sale or hand-me-down with a relaxed mind. To start off, we will first go into the methods that are commonly used to prepare an iPhone. It is quite intensive, so be prepared for that, but what isn’t in this caliber? With that said, let us get started!
Preparing Your iPhone Manually + Erase All Content And Settings
Alright so here we are, be ready for a lengthy yet intensive guide. We want to provide you with thorough information and steps so let us begin!The usual way of erasing content in your iPhone is found when you go into the Settings and into the General menu. Tap on Reset, followed by the “Erase All Content And Settings.”Your iPhone now will ask for you to enter your passcode, then told that “this will delete all media and data, and erase all settings.” If you press the Erase iPhone button, iOS will ask you for your iCloud account password to “erase this iPhone and remove it from your account.”

You'll be shocked at how rapidly the iPhone is being cleared and as soon as you’ve entered your password and hit erase, you’ll get a notification email on your account’s other devices that Find My iPhone was disabled, and it should take only a couple of minutes for the wiped iPhone to display “Hello” and “Slide to Set Up” text.Hitting the Reset button leaves the former contents of your device all but completely impossible to recover by a subsequent owner. But you’ll be able to get everything back from your computer’s encrypted iTunes backup, should you need it.
Activation Lock + Disabling Find My iPhone
In order to work with the Activation Lock and eventually disabling the iPhone, go to Find My iPhone by going into the Settings app’s iCloud menu. You will now need to press and tap the Find My iPhone “On” button, flipping the Find My iPhone switch to off, and entering your iCloud password.However, if you used the Erase All Content And Settings option as was stated previously in the first step, then this step is automatically handled for you when you enter your iCloud password. Either method will disable your iPhone’s “Activation Lock,” the security system that allows you to locate, remotely wipe and send signals to an iPhone no longer in your possession. This step is quite important as it is usually the most important thing to do before you go off reselling it.
Apple Pay/Credit Card +Touch ID Fingerprint Wiping
If you are an owner of an iPhone 6 or newer model, erasing your iPhone will automatically delete any information and whatever credit cards and fingerprints you have on your iPhone.It may be the case where you may receive emails from your banks noting each “Virtual card” that has been “deleted from Apple Pay.” It is good that these e-mails are received so that you can confirm and be ensured that your financial data is fully wiped from your iOS device.
Carrier Lock + Clearing The ESN/IMEI/MEID
Usually, those who purchase used or second-hand or even third-hand Phones would like to avoid purchasing stolen, or perhaps even iOS devices that are still under contract with a cellular company.You can go ahead and check the status of any iPhone to be checked using a device-specific serial number which is the IMEI (International Mobile Equipment Identity) number, ESN (Electronic Serial Number), or MEID (Mobile Equipment Identifier). Expect a fourteen or fifteen digits long number which can be found in Settings > General > About > IMEI or MEID.iPhones and iOS devices that are fully paid or directly bought without the use of a cellular company are not locked. If the cell phone is indeed locked, then you should contact the carrier first have request your iOS device to be unlocked.
If you bought your iPhone used or were given the phone by a family member, this free serial number checker can let you know if the serial number is clear, giving you a sense of reported ownership/theft issues with your device. If your phone’s serial number isn’t clear, contact your cellular provider to get the device paid off.Also, it is good to note that we should avoid iPhones that are indeed stolen, this will only cause problems to the owner and the new soon-to-be owner.
Apple ID: Manage Trusted Devices
Yet again we have another medium where your iPhone is linked, and once again via online channels. This is Apple’s identity verification web site at AppleID.apple.com. First off, we need you to go into your account, which may be protected with two-factor identification, a password on your Mac, then another one-time password sent to your choice of “trusted devices” you can then go on into Password and Security to “Manage your trusted devices” by hitting the “Add or Remove Trusted Devices” button. Your old iPhone will probably be on this list, and you can remove it by hitting the “Remove” button. Doing this will allow you iPhone to be completely free!
iTunes in the Cloud
In one of its all the more befuddling marking endeavors, Apple in 2011 presented both iCloud an email, reinforcement, and information synchronizing administration and iTunes in the iCloud. This is basically a virtual media locker that enables you to download already obtained iTunes content for nothing, seriously not too shabby yet can be annoying.Shockingly, expelling an iPhone from iCloud doesn't expel it from your iTunes in the Cloud account. To do that, you'll have to open iTunes, go to your record, look down to iTunes in the Cloud, and pick Manage Devices. When you see your old iPhone on the rundown, hit the remove button. This will free up one of your 10 dispensed media sharing spaces, and empower the iPhone to be enrolled by another person for iTunes in the Cloud. We believe they deserve a well scrubbed iOS device from the inside.
iCloud
Erasing your iPhone only removes it from your iCloud accounts to a limited extent. In order to do this fully, as well as it only being limited to Mac computer users, you use your Mac and go to OS X’s Apple menu. Next, you need to choose System Preferences, then choose iCloud and click Account Details. Select the Devices tab, then highlight your iPhone, and choose Remove From Account. Then hit Done. I found my iPhone 6 Plus on the list twice, for reasons unknown.
Remove The SIM Card
Now that you have done all of the above, which was fully scrubbing and cleaning your iPhone’s internals, it is then now time for something more external and highly important. We need to of course remove the SIM card from your cellular provider. This should be a no-brainer yet it may be overlooked on accident which in turn may cause some risks. There are always cheeky people out there looking to get any kind of salvageable information for their gain, so it is best we stay safe!
Physical Cleanliness
Finally, now that the SIM card is fully removed, we must now go into the full exterior of our former workhouse cellular smartphone. Without a doubt, when selling, buyers would love to know the condition of your device.If you are able to get it shiny and smooth, almost as if it was newly bought, then the higher the value it will be. This is without a doubt and we should keep physical appearances as a priority in getting our devices sold. No one wants to buy a beat up and run down item, even if it functions beautifully - so let us get on out there, get that glass fixed up, get those curves smoothed out and the whole nine yards!
The easiest way is using our FoneDog - iOS Data Eraser and we recommend it 100%, however, if you would like to DIY or do it yourself, then we will also provide the steps here. Remember, if at anytime you feel the DIY path is too difficult, our FoneDog - iOS Data Eraser is there to pull you out of the fire.So, with that said, let us now tell you about why it is important to erase and format your iPhone and then we will go into how to actually do it.Welcome! You have made it to the easiest way to get your iPhone prepared for sale, or you simply wanted to skip everything and go directly to something more time-efficient. Well for sure, we can guarantee you that, so without further ado, here are the steps to using our in-house FoneDog - iOS Data Eraser!
First, we would need to download the toolkit. We need to set up FoneDog - iOS Data Eraser on our computers. Both a Mac and a Windows version are available where you can try them for free. After you have downloaded the software, go ahead and have it installed. Start up the program. Also, make sure that your internet connection is stable and everything is set to go.
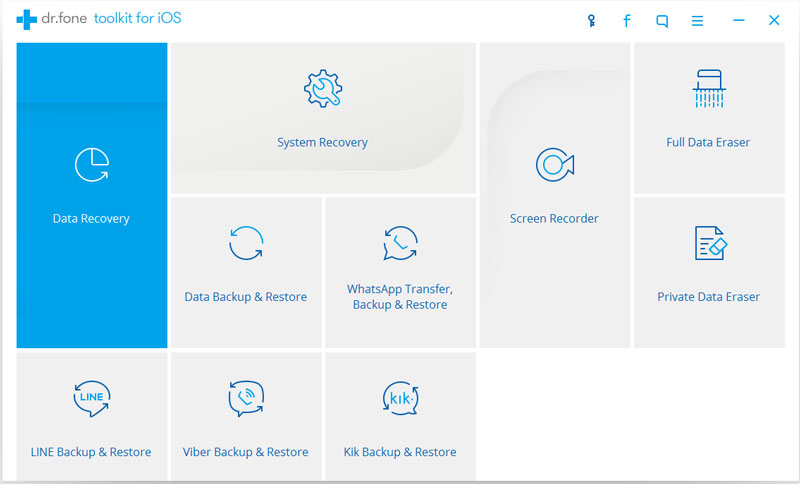
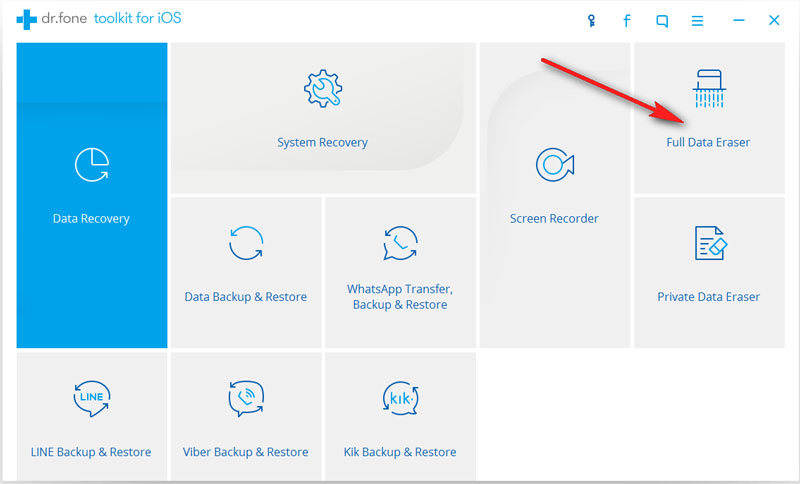
Now you need to connect your iPhone or iOS device to your computer via an Apple certified USB lightning cable. Have the program open as stated and then select the “Full Data Erase” option on the interface.
Once the toolkit has recognized your iPhone or iOS device, a prompt will appearing indicating that you can begin deleting data by clicking the “Erase” button. It is imperative to note that in order to confirm your deletion, you need to type in “delete” into the prompt.
NOTE: Make sure you have all applications closed in the background as well as updates that are ongoing to be completed.

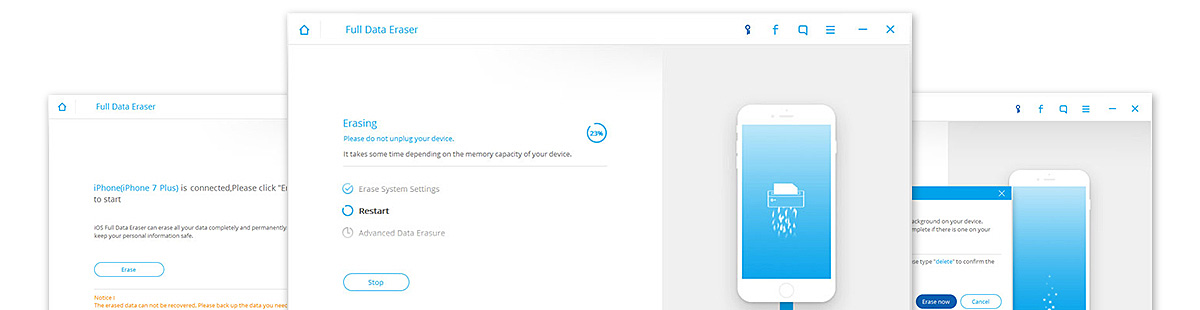
All we need to do now is to simply wait for the process to finish. The progress bar will show how far it has gotten to getting your iPhone 100% clean as if it was fresh out of the box! Remember that it is very important that the USB cable should never be pulled out or touched while the process is ongoing.
Once you get a message saying “Erase completely”, you are finally done! All personal and important information has been successfully deleted from your iPhone or iOS device and you are now ready to have it for sale!
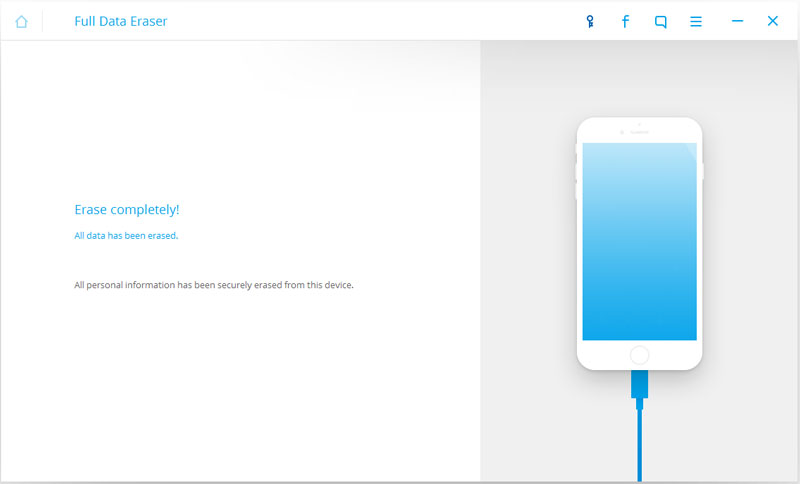
There you have it, all of your personal data and important documents are securely and permanently deleted from your iPhone, and you are now prepared to have your iOS device ready for sale or whichever option you prefer. One should know that since the contacts have been erased completely, they are no longer recoverable ever, not even by powerful software such as our FoneDog- iOS Data Recovery toolkit.
While we are on the topic of the FoneDog - iOS Data Recovery toolkit, we would like to recommend our readers this software in order to get all of your data back, whatever it is, back 100%. May it be that you have lost important messages, contacts and/or especially photos, everything is retrievable through the use of our toolkit. Never again would you have to worry about lost data. The only thing left is for you to give it a try!
If you are looking to have your iPhone or Android smartphone fixed of issues such as the Red Screen of Death, constant looping of the Apple Logo, errors such as Error 7, then you are in luck as well. We have just for those situations, our in-house FoneDog - iOS System Recovery toolkit or FoneDog - Android System Recovery toolkit respectively. All of your smartphone problems will be fixed in a jiffy with a few clicks with our software! Go on and give them a go and be part of the many already satisfied customers!
Leave a Comment
Comment

iPhone/Android Devices’ Maintenance Expert
Staying home, listening to music, writing tech articles
Many people asked me to repair their mobile phones so I have a lot of experience in mobile phone repair, and I know a lot about Android or Apple phones.
iOS Data Recovery
3 Methods to recover your deleted data from iPhone or iPad.
Free Download Free DownloadHot Articles
 /
/
INTERESTINGDULL
/
SIMPLEDIFFICULT
Thank you! Here' re your choices:
Excellent
Rating: 4.5 / 5 (based on 81 ratings)
