FoneDog Screen Recorder
FoneDog Screen Recorder
Special Offer
Special Offer


By Nathan E. Malpass, Last updated: May 5, 2020
Forgetting the passcode on your iPad will lead to it being disabled. This can be a bothersome experience that can make you think of ways to fix the issue. Thus, if you are in this type of situation, being frustrated is not the right reaction. There are multiple methods you can do in order to unlock your iPad without using iTunes. Some of these methods involve using a Windows PC or a Mac computer.
This article will go through an iPad disabled fix without iTunes. They said fixes will allow us to work our way around iTunes using Siri, iCloud, and third-party system recovery software, FoneDog iOS System Recovery, among others. We will add more fixes to troubleshoot the problem but we’ll start with the best one
Way1. Top iPad Disabled Fix without iTunesWay 2. Unlock Your iPad Using SiriWay 3. Unlock Disabled iPad Remotely through iCloudWay 4. Unlock iPad Using Auto Erase FeatureTo Wrap It All up
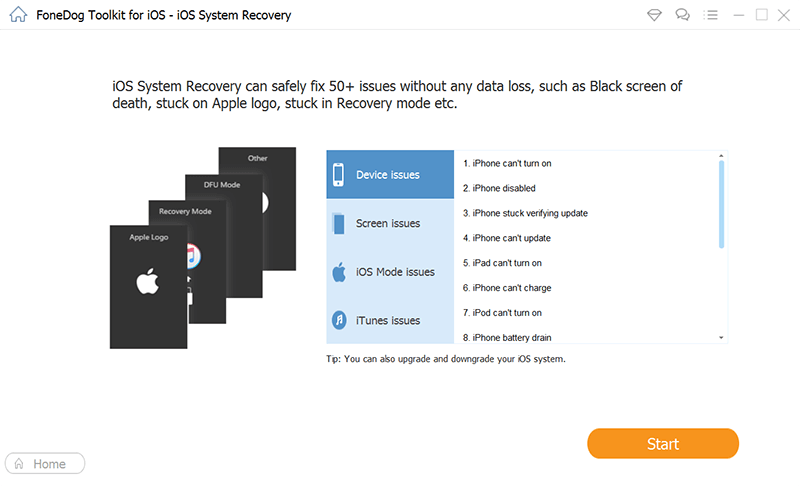
This tool is a great way to repair your iPad back to its normal state without having to lose data. Issues fixed by FoneDog include disabled iPhones (or iPads); being stuck on Apple logo, DFU mode, and recovery mode; being stuck within the frozen status; continuously restarting iPhone or iPad; and black, red, and blue screen, among others.
iOS System Recovery
Fix with various iOS system issues like recovery mode, DFU mode, white screen looping on start, etc.
Fix your iOS device to normal from white Apple logo, black screen, blue screen, red screen.
Only fix your iOS to normal, no data loss at all.
Fix iTunes Error 3600, Error 9, Error 14 and various iPhone Error codes
Unfrozen your iPhone, iPad and iPod touch.
Free Download
Free Download

With the said tool, falling in line in the Apple Support Center is not necessary. You simply use the tool to fix the errors we have stated above. After the repair process is complete, your iPad will be back to normal like nothing happened.
Below are the steps you should follow in order to use FoneDog iOS System Recovery to fix a disabled iPad without using iTunes:
This is used to unlock iPads with the version iOS 10.3.2. There are a lot of people who doubt this method. They don’t believe that Siri has the ability to be an iPad disabled fix without iTunes. However, this will work only if Siri can recognize your own voice. Here’s how to do it step by step:
Step 04 - After this, you should wipe over the active task within the front screen in order to unlock your iPad. 
How do I disable my iPad without iTunes? Find My iPhone is another feature on iOs devices allowing you to have an iPad disabled fix without iTunes. This is done by logging into the website of iCloud. And, it can only be implemented if you have actually activated “Find My iPhone” previously.
Here are the steps on how to do it:
The disadvantage of using this fix is that you still need your Apple ID and corresponding password in order to sign in to your iCloud account. If you forget the Apple ID and its password, then this won’t work for you. Plus, this method will only work if you have activated Find My iPhone earlier (before you actually got disabled).
When you want the iPad disabled fix without iTunes or without computers, then Auto Erase is aw good method to use. This feature can be turned on when you set your passcode up. In addition, it will work when you input the incorrect passcode for about 10 different times.
Thus, in order to unlock the iPad, you must simply enter the wrong passcode for about 10 times. Auto Erase, after this, will wipe out all the data within the iPad and the passcode will be removed too. Once you restart the iPad, it will be like brand new.
Here’s how to set it up on your iPad:
In this guide, we’ve given you an iPad disabled fix without iTunes using FoneDog iOS System Recovery. We also have given other methods to unlock your iPad when necessary. As such, you should simply pick the method that will work for you or that you have set up previously.
How about you? What do you do to fix a disabled iPad without iTunes? How do you prevent an iPad from being disabled in the first place? Let us know in the comments section below.
Leave a Comment
Comment

iPhone/Android Devices’ Maintenance Expert
Staying home, listening to music, writing tech articles
Many people asked me to repair their mobile phones so I have a lot of experience in mobile phone repair, and I know a lot about Android or Apple phones.
iOS System Recovery
Repair various iOS system errors back to normal status.
Free Download Free DownloadHot Articles
 /
/
INTERESTINGDULL
/
SIMPLEDIFFICULT
Thank you! Here' re your choices:
Excellent
Rating: 4.8 / 5 (based on 69 ratings)
