FoneDog Screen Recorder
FoneDog Screen Recorder
Special Offer
Special Offer


By Vernon Roderick, Last updated: June 10, 2017
How to fix Stuck Headphone Mode Issue in iPhone Device? In this piece, we'll discuss why it happens, as well as some troubleshooting steps on how to get out of a stuck case of headphone mode in iOS.
You’re sure that you don’t have an earphone or headset plugged into your iPhone device, but you constantly getting the “Headphone Mode” message that appears to be stuck. This issue is very troublesome as your phone won’t make any sounds for calls, messages, applications and notifications until you plug in an earphone or headset. But even after using one or doing a hard reset, the issue doesn’t go away.
If you’re the type who regularly engages in many, different daily activities wherein you heavily rely on your iPhone device to receive calls, messages, e-mails and other important notifications, you’ll truly get frustrated for not hearing your phone as you receive them.
Furthermore, you’ll risk missing important messages or alerts from your work or at home, which can lead to getting more stress and making you look like you’re becoming unproductive. Prevent this from happening by exploring the possible causes of such issue and how you can fix it to use it again without problems.
Part 1: Causes of Stuck “Headphone Mode”Part 2: Common Solutions for the Stuck “Headphone Mode” IssuePart 3: Fixing the Stuck “Headphone Mode” Issue using FoneDog – iOS System RecoveryVideo Guide: How to Resolve Stuck Headphone Mode Issue in iPhone Device
As we dig more into this issue, let’s take a look at the possible reasons why such issue is happening on your iPhone device, so we can perform correct solutions to solve the problem.
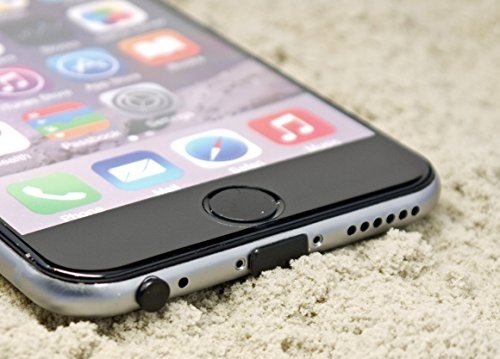
If you remember taking a quick dip in a swimming pool with your phone in your hand, or you had run some miles to break a sweat with your device to aid you in measuring your distance and steps, it’s possible that water or sweat has clogged into your phone’s headphone jack.
This is more likely to happen in older iPhone models because they don’t have water-resistant qualities, but even the latest models that are marketed to be water-resistant, their headphone jacks can still get damaged when dipped into too much water or sweat.

You might wonder how this can happen, but dust and lint can accumulate well inside the headphone jack that can block off communication between it and your earphones or headset. This can happen when you don’t use your headphones that much, living the headphone jack always open.
If you’re also frequently staying or going to dusty places, your phone can easily accumulate dust that can lead to blockage on the headphone jack, affecting how it reads your earphones.
Small stones can also build up inside the headphone jack, in which the phone might be detecting that an earphone or headset is being inserted into the port.
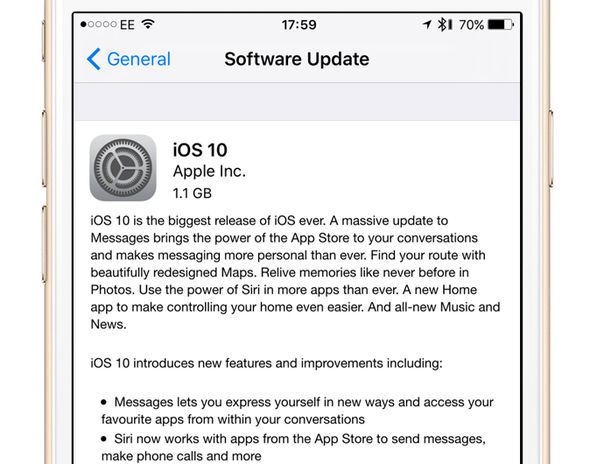
It’s also possible that a recent software update you’ve performed has affected the phone’s internal operations for the headphones. You can search online about this issue and see if your current iOS version has something to do with it.

Hardware damage happens when the phone was misused or it was accidentally dropped. If you recently suffered from this unfortunate event, it’s high likely that the headphone jack has been damaged due to that hard fall or when your device’s lower portion has been crushed or exposed to extreme heat.
Now that we have identified the possible reasons as to why your iPhone is suffering from the stuck “Headphone Mode” issue, here are the following common fixes for you to try:
If your iPhone has been soaked in too much water and sweat, and you believe this is the cause of the malfunctioning headphone jack that triggers the stuck “Headphone Mode”, here are the things you can do to dry up your mobile device:


If you believe there are dust and lint stuck on the headphone jack of your iPhone, check the port for such particles using a flashlight. If there is, use a Q-tip, a needle or a pin with a dry piece of cloth on its end tip. Insert it into the headphone jack and start cleaning off the dust and lint that has accumulated inside.
If you have seen that there are somewhat larger particles inside the headphone jack, don’t put a cloth on the tip of the Q-tip, needle or pin, as this might push them more inside, triggering the “Headphone Mode” more and getting it stuck on your phone forever. Blow a small amount of the wind inside the headphone jack using a straw, so the stuck particles inside will move and be easily removed once they get dislodged.

If a software update error has caused the stuck “Headphone Mode” issue to happen, the best thing you can do about this is to get the latest software update from Apple, by going to Settings > General > Software Update.
You can also revert back to your previous iOS version wherein the said issue is not happening. To downgrade to the last iOS version you have on your phone, get an IPSW file of that iOS version and install it to your device using iTunes, but don’t forget to perform a backup of your phone before anything else.
If your iPhone got a major bump or a serious fall, it could have gotten the headphone jack damaged. What you can do with such hardware damage is to bring your device to a professional mobile repair center and have your phone checked. Be ready though that you might not get a free repair on your phone, as such hardware damage might be expensive. But if your phone warranty is still up, bring it first to a local Apple store or customer service center and verify if the warranty can cover such damage.

The iOS system is truly a powerful mobile operating system that gives off security and assurance to users that they will get the best and most reliable mobile experience when they use an Apple device. But even if it’s iOS, it can still be prone to software-related issues such as the stuck “Headphone Mode”.
This issue is annoying to have, but don’t fret – we have our FoneDog toolkit – iOS System Recovery to help you out in repairing your phone’s current iOS system and fixing the said issue that blocks you off from being alerted or informed when getting calls, messages, and notifications. Follow the steps below on how to use our FoneDog toolkit:
Get your desktop computer or laptop ready and download our FoneDog toolkit application. Once you have downloaded it, install it on your computer. After the installation, launch the program and see if it’s showing to you the main menu window. While doing so, connect your iPhone device to the computer.
After launching the program and connecting your mobile device to the computer, make sure that FoneDog toolkit has detected your iPhone. This is an essential step to do so the program can proceed to the next steps of iOS system recovery or repair.
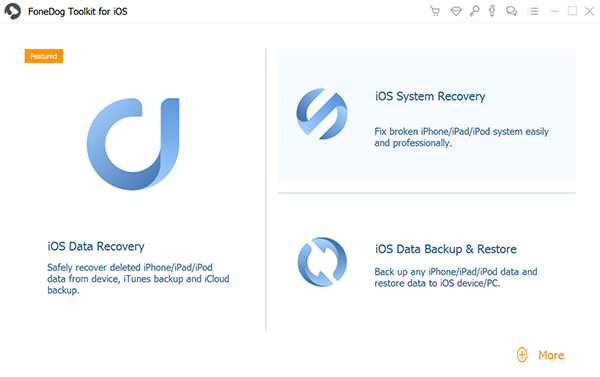
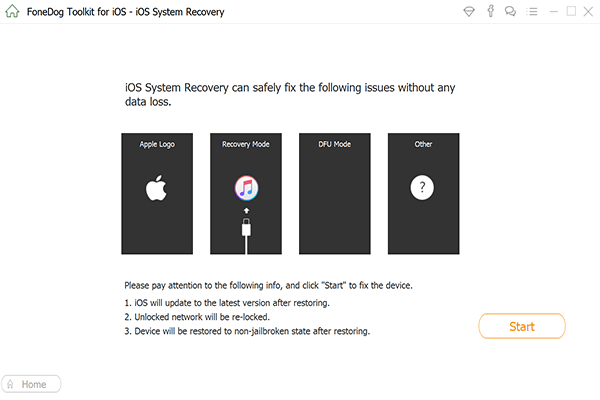
Our dr.fone toolkit features several menus depending on your needs for your iPhone device, which also has the same set of features for Android devices. Since your goal is to repair phone and get rid of the stuck “Headphone Mode” issue, you’ll need to go to the “iOS System Recovery” module. This menu is represented by the gear icon with a wrench inside of it. Select this menu to proceed to the next page and review the reminders to take note before doing the repair process.
Before proceeding to the next step for iOS recovery, take note of the following important points given by FoneDog toolkit:
After taking note of these reminders, click the “Start” button to proceed.
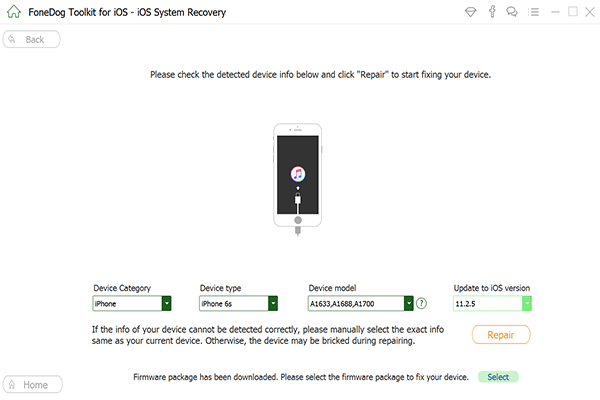
Our FoneDog toolkit’s “System Recovery” module has the ability to locate and download the firmware package that is most compatible with your iPhone device, and it executes these using the values set on the dropdown fields it has, which correspond to your iPhone’s device type, model, serial number and current iOS version.
This is the reason why on the second step, you’ll need to ensure that FoneDog toolkit has successfully detected your phone because the program will use these specifications to find the correct firmware to install on your device. To proceed on this, click the “Download” button, and wait for the program to finish downloading the package for your mobile device.
Alternatively, there’s the “Copy” button that allows you to download the firmware package from the browser of your choice, or when you already have it on your computer. Once the firmware has been downloaded, use it by clicking the “Select” button. The program will detect your selection to trigger the recovery process.
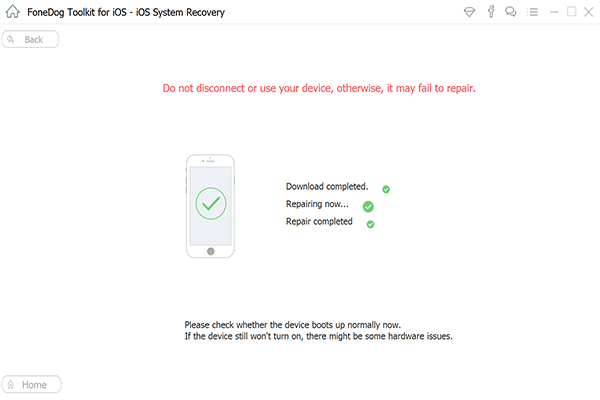
This is an automatic step – after FoneDog toolkit has downloaded the firmware package, it will automatically initiate the recovery or repair process. You’ll need to wait again for some time until the application has finished the repair. The sign that it’s already done is when your iPhone started booting up, which will show to you the Apple logo until the phone is fully turned on.

After the recovery process, you can now check your phone and verify if the stuck “Headphone Mode” issue will still persist. To do this:
Once the stuck “Headphone Mode” issue persists again, it’s important to make a quick step towards fixing it, so it won’t cause you any problems in the long run. When using your iPhone, make sure not to get it soaked with water or sweat – have it protected using a waterproof case, and prevent the headphone jack from turning into a small room of dirt, dust, lint and small stones.
In an event of damaging your iPhone due to accidental bumps or drops, it’s best to bring it immediately to an authorized Apple customer service center for checkup and repair, but if it’s a software issue, our FoneDog toolkit – iOS System Recovery can surely help you in fixing the stuck “Headphone Mode” issue once it’s up again.
Leave a Comment
Comment

Technical Expertise for PC/Website Optimization
One of my passion is to develop software of my own
I write articles to share knowledge about IT technology and some experience in developing my own software, and developing my own software is one of my passions for work.
iOS System Recovery
Repair various iOS system errors back to normal status.
Free Download Free DownloadHot Articles
 /
/
INTERESTINGDULL
/
SIMPLEDIFFICULT
Thank you! Here' re your choices:
Excellent
Rating: 4.7 / 5 (based on 83 ratings)
