FoneDog Screen Recorder
FoneDog Screen Recorder
Special Offer
Special Offer


By Gina Barrow, Last updated: September 19, 2017
“How can I fix iTunes error 4037? I recently bought a new iPhone 7 and was trying to set it up by restoring my backup from iTunes and then I encountered this iTunes Error 4037. My old phone was iPhone 5 and was fully backed up in iTunes already when I got this error. I had updated the iTunes and my Mac OS to try to fix it but still, the same error appears.”
There could be various reasons for different iTunes error codes and there are so many ways to resolve each error codes based on the signs and symptoms. These error codes can be caused by software, hardware, and other computer and network settings that have interrupted the communication to Apple’s servers. However, this iTunes error 4037 is quite rare.
This type of error is not a common error code so it is quite difficult to determine what seemed to be the root cause. In this article, we will learn how to work out and resolve iTunes error 4037 by first determining which methods can resolve this error and find out the easiest and fastest resolution.
Fix the iTunes error 4037
Part 1. How to Resolve iTunes Error 4037?Part 2. Fix iTunes Error 4037 Quickly Using FoneDog Toolkit- iOS System RecoveryPart 3. Video Guide: How do I Fix iTunes Error 4037Part 4. Conclusions
If you happen to update your iTunes to 12.6 which was just released sometime in March of 2017, then there is a great chance that you might encounter iTunes error 4037 upon restore and there could be a handful more reasons why it appeared.
Since this issue is very rare and unusual, there are no definite ways to fix this error. However, there are various troubleshooting methods that Apple gave that have proven to resolve the iTunes Error 4037 which are of course a matter of trial and error.
Here is a quick guide to help you resolve this annoying iPhone Error 4037, check the troubleshooting methods below and have a try:
Option 1. Always Check the Error Message
When you first see the pop error screen on your computer, don’t try to close or cancel it right away. Most error codes have a “More Information” button wherein you can click it open and find out what seemed to be the reason for the said error.
Option 2. Check Anti-Virus Software
If you are unable to open iTunes after displaying the iTunes error 4037 then try to check if your anti-virus is blocking the connection between iTunes and Apple’s servers. You may also want to verify your computer settings prior to changing your Anti-virus settings.
Once you have made sure your computer’s settings are correct then try to temporarily disable your anti-virus software based on its own settings. If required, try to contact your anti-virus’ customer support to change its settings
Option 3. Get iTunes Updated
As you noticed, it is always recommended to update your iTunes before updating or restoring any iDevices. You can update your iTunes by referring below:
On Mac:
On Windows:
People Also Read:
How to Fix iPhone Could Not Be Restored Error 9
Option 4. Restart iPhone and computer
There is still no other best way than to give your devices a good restart. Turn off your iPhone and the computer and then retry to restore it once they have both booted.
Option 5. Try another Computer
You can also test if the issue is still happening by using another computer.
Option 6. Check Hosts file
In order to make sure you are able to communicate to Apple’s server after updating your iTunes, then check your host's file.
For Mac:
nano /private/etc/hosts
Once the Mac has rebooted then try to restore or update your iPhone via iTunes again.
For Windows:
To reset the hosts file back to its default settings then do the following:
Option 7. Use other USB ports
At times, you may experience hardware failures and cause some iTunes error codes while updating or restoring. You can change or switch USB ports on the computer to test and determine if the issue is caused by USB problems. If you also have an extra USB cable then try to use it. Just make sure it is original or have been purchased from Apple.
Option 8. Check Wireless Connection
When doing an update or restore via iTunes, make sure you have a stable internet connection because a weak signal may cause interruptions and trigger various iTunes error codes. The best way to restore and update is when you are at home and using a wireless internet. Sit in the area with more than enough signal strength to make sure nothing will interrupt.
Option 9. Update your Computer’s Operating System
Another possible culprit for iTunes error 4037 is the computer’s operating system which seemed incompatible with iTunes. So to avoid getting this kind of error, try updating your computer’s operating system by following these:
On Mac:
For Windows 10:
For Windows 8:
On Windows:
You can enable automatic updates on your Windows PC so that it will not bother you again to do it manually and may interfere with any of your computers uses.
Any of the above-given options could fix iTunes error 4037 along the way. Simply make sure that you have followed the directions carefully. If you are still seeing this error even after doing the
If you are exhausted with all the possible solutions to fix Tunes Error 4037, then you should use FoneDog Toolkit- iOS System Recovery and surely it will fix your iPhone back to its normal state.
FoneDog Toolkit- iOS System Recovery is made solely to provide a one-stop solution to all iTunes error codes and other system issues like freezing, crashing, white screen, red screen, black screen, blue screen, and much more. It can also fix other issues like stuck white screen, recovery mode, black screen, blue screen, and red screen of death. , stuck on ‘Connect to iTunes’ screen.
Apart from its quick solutions, it does not cause further data loss upon doing a system recovery. To learn how to use FoneDog Toolkit- iOS System Recovery follow these simple guides below:
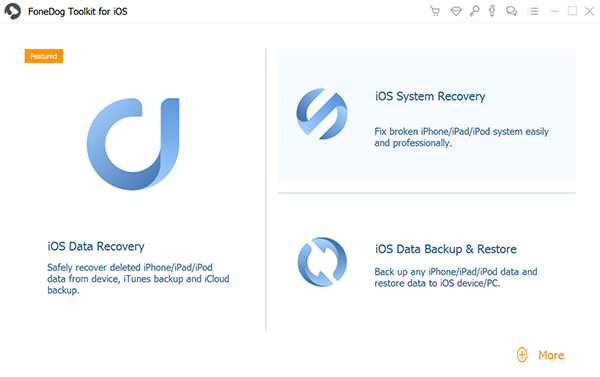
On your computer, make sure you have already downloaded FoneDog Toolkit- iOS System Recovery and have installed it. Launch the program once done installing. Go to More Tools and click on System Recovery.
Download and Launch FoneDog Toolkit- iOS System Recovery--Step1
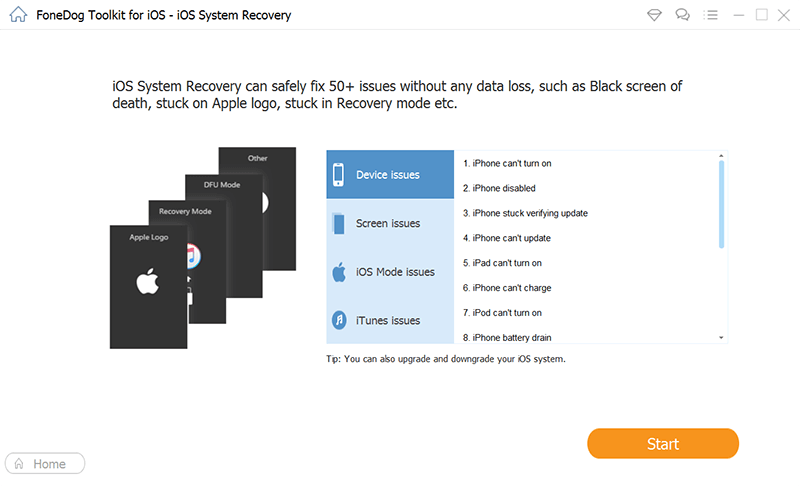
Using an original USB cable, connect the iPhone to the computer and click Start to continue.
If your iPhone has been unlocked then it will be back to its locked state.
People Also Read:
Full Guide to Fix iPhone Error 27
How to Fix iTunes Error 9006
Plug Your iPhone to the Computer--Step2
Note: All jailbroken iOS devices will be backed to its non-jail broken status
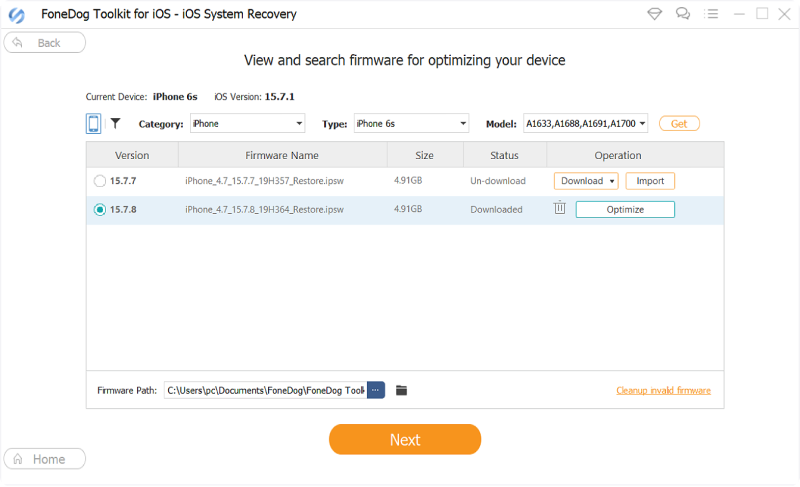
On the next screen will prompt you to supply the correct make and model of the iOS device in order to download the correct firmware package. You may refer at the back of your phone for the make and model number or you can visit Apple’s official website for correct details. Once you have entered the required information, click Repair to continue.
Download Firmware Package into iPhone Devices--Step3
The downloading, extracting, and repairing may take a while but you are just moments away from getting your iPhone fixed. Once the process is completed, your iPhone will boot back to normal.
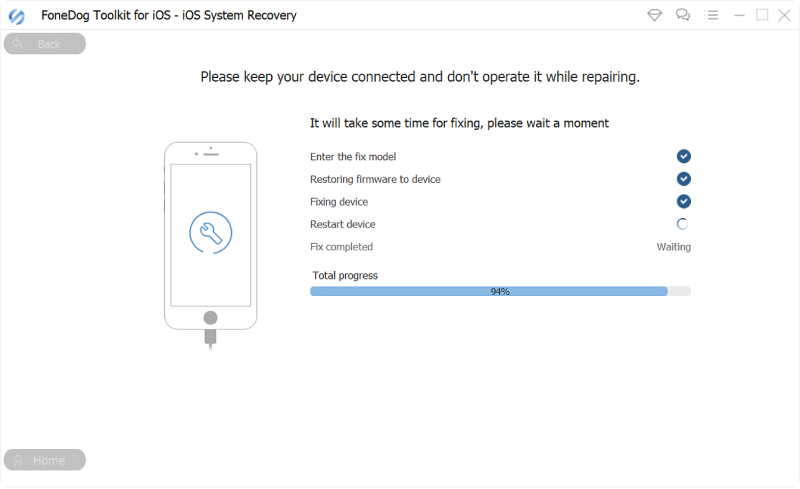
System Repair Starting--Step4
And that is how you fix iTunes error 4037 quickly using FoneDog Toolkit- iOS System Recovery. There are no other complicated methods to do; all you need is to have FoneDog Toolkit- iOS System Recovery ready on your desktop.
iTunes error 4037 is still an unknown kind of issue because it has not affected much of iOS users. The nearest possible root –cause will be the iTunes itself which might have been updated to its newer version yet still unstable so it cannot communicate properly to Apple’s servers. However before you can confirm it, you have to undergo series of tests first in order to prove what went wrong. T
here are a lot of ways to get rid of these kinds of errors but of course, it can be stressful enough. It is already a big hassle to experience iTunes error 4037 and not being able to use your phone, how much more if you are trying to find ways to fix it.
FoneDog Toolkit- iOS System Recovery made it easier to resolve this issue by having a click-through repair process. This recovery program is dedicated to helping non-technical users to get the most of their iOS devices by helping them troubleshoot on their own. FoneDog Toolkit- iOS System Recovery is safe and secure to use with no data loss during system recovery.
Leave a Comment
Comment

Technical/Creative Writer
Kitchen, my safe space; black, my favorite color
Was a Technical Specialist for a while, troubleshooting Smartphone and Software-related issues until a writing stint caught my attention.
iOS System Recovery
Repair various iOS system errors back to normal status.
Free Download Free DownloadHot Articles
 /
/
INTERESTINGDULL
/
SIMPLEDIFFICULT
Thank you! Here' re your choices:
Excellent
Rating: 4.6 / 5 (based on 92 ratings)
