FoneDog Screen Recorder
FoneDog Screen Recorder
Special Offer
Special Offer


By Nathan E. Malpass, Last updated: November 30, 2019
What is iPhone white screen issue and white screen of death and how to fix it?
So here you are happily using your iPhone or iOS device while walking down through the park. Suddenly, you bump into someone or something and drop your device. This may have been your fifth time having it fall, and while you were lucky before, this time you are not. You turn on your iPhone and notice something way different, the screen is completely white. You desperately try to press buttons to save it but to no avail.
Does this sound familiar to you?
Well, it probably would not have happened exactly this way, but it is one likely scenario where the infamous White Screen of Death would occur. Among Apple iOS device users alike, it may have happened at least once for those who were not careful. As you are here reading this, you too are probably undergoing the same situation or something similar.
So what do you do?
Well, you would not need to worry about that at all readers because we here at FoneDog have just the solutions to get your iOS device up and running once again.
Before we start, let us take a look at what exactly this error is all about.
Part 1. What is the White Screen Error?Part 2. Common Methods for Settling iPhone White Screen Death IssuePart 3. The Easiest and Ultimate Solution: Using FoneDog Toolkit - iOS System RecoveryPart 4. How to Avoid Getting a White Screen of Death Again on Your iOS DevicesPart 5. Video Guide: How to Fix the White Screen Death Issue of iPhone Devices?Part 6. Conclusion and Recommendation
The white screen error or also known by others as the White Screen of Death is exactly what it sounds like. Your screen turns completely white - almost blindingly white - and whatever you do, nothing will work. This may happen to any iOS device such as the iPhone, iPod, or the iPad. Basically, your iOS device became a bright paperweight or flashlight - until the battery dies out.
What Would Cause this to Occur?
Of course, this issue does not suddenly come out of nowhere. There are quite a few things that may have caused it to appear and we will now gladly present to you the culprits.

How to fix the white screen death of iPhone
Tips: It is noted that the white screen may occur when your iOS device drops beneath 30% battery power. It would be a good idea to let the battery drain out to less than 30% when you have experienced a drop. This way you know that you can determine if you really have a White Screen of Death situation in order to address the issue quickly.
Now that we are educated on what this annoying bright light is all about and why it occurs, let us now show you the ways we have available to fix it.
Fixing the iPhone White Screen
We now present to you several ways which you can try in order to eradicate the White Screen of Death. Please keep in mind, that if one method does not work, you can always try the next. Either one of these may be a guaranteed fix, so keep going until you get your desired result!
Method 1: Using the Three Tap Finger Method
To start you off with an easy method, which may or may not bills that are needed, is the three finger tap method.This quick fix may be useful on the off-chance that you accidentally zoomed in close onto something white or stuck on a screen that is white. While this may not always be the case, and rest assured we are not judging your common sense, it may be all that is needed.
Simply put three fingers together and then tap your screen twice. From there it should be back to normal.
Now of course, if this wasn’t the fix then for sure it is something deeper. Prepare for methods that require a bit more technique and patience.
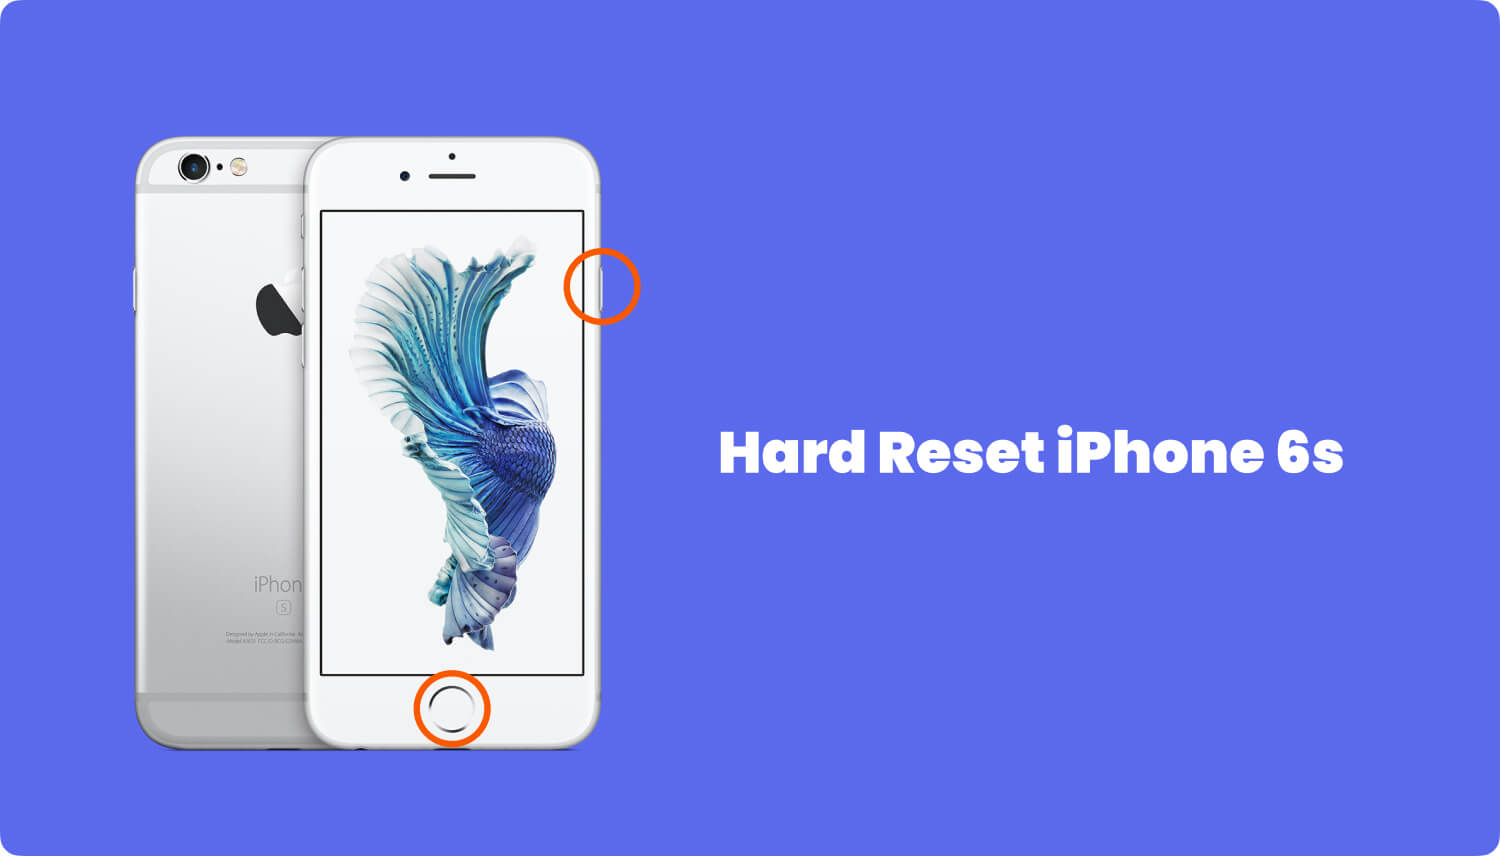
Method 2: Hard Resetting your iOS Device
This method basically requires a quick hard reset to get things back to normal. What makes a hard reset more effective than a normal reset is because you are not required to manipulate the touch screen. This would make sense because your screen is completely useless at the moment.
To start, follow another one of the set steps depending on your model.
Hard Resetting your iOS Device (Older Models)
Another method has been noted to work for many of the steps above did not work. This includes pressing and holding down the Power Button, the Home Button, and the Volume Up button.
Hard Resetting your iOS Device (Newer Models such as the iPhone 7 and iPhone 7 Plus)
Tips: After you have completed a hard reset for your iOS device, it is a good idea to turn off the auto brightness right after. To do this, simply go into your ‘Settings’ then tap ‘Display & Brightness’. Proceed to turn the ‘Auto-Brightness’ off.
Hopefully, this method had done the job, but if not, let us move on to the next one.
Method 3: Removing the Battery
This method will require a bit of know-how on hardware. We recommend this solution only if you are confident about taking your iOS device apart or have someone who can do it for you. We will provide the steps needed for an iPhone here only. Remember, if you would rather not tinker with your gadget, it is perhaps best to skip this one.
So, perhaps through a little risk you may have had your iPhone up and running again. Remember that through physical damage, such as dropping the device, the battery or parts inside may have been affected. It is through this method where you can fix and readjust anything that may seem out of place. If this method did not do the trick, let us move back to the software where our computer can help us out.
Method 4. Restoring your iOS Device through iTunes
For this method, we will be using iTunes on our computers to get rid of the white screen issue. Doing this may be quite convenient for those who were not comfortable with opening up their devices.Let us now look into the steps, shall we?
Hopefully with everything backed up you will be able to retrieve your iOS device to its normal state and most importantly, without a blinding white screen.
If in case this still did not work, we have two more options available, one of which we know is a definite cure.
Tips: Warning: This method will clear all contents and settings on your iOS device so it is advised to back up your device now via iTunes.
Method 5: Using the DFU Mode
We will now move on to a more trickier method, yet it is one that may definitely be the fix you need. This will require us to enter the DFU Mode which was embedded into our iOS devices for the times when it is absolutely necessary, such as this. This one may take some time, so with patience and timing, we can get your device back on its feet.
Before anything else, we need to prepare. Here is how.
Preparation
Precautions
If you tried Method 3 where you removed the battery, ensure everything is in good order.
How to Enter DFU Mode (iPhone 6, iPod or iPad)
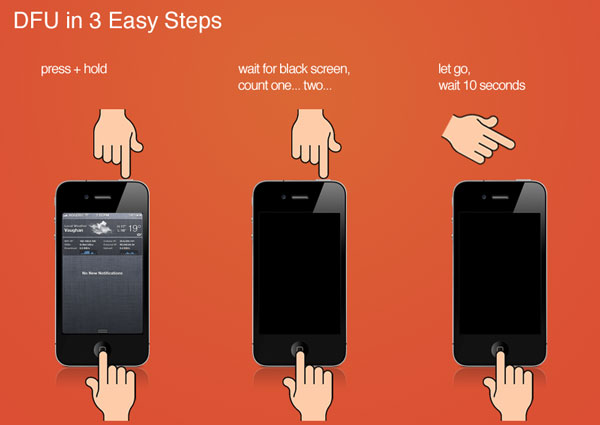
Tips: This process may take a few tries to succeed. Timing is important so proper counting or a timer is recommended.
How to Enter DFU Mode (iPhone 7, iPhone 7 Plus)
Now that you have gone through the whole process, this should have fixed the issue. While DFU Mode is the utmost final option available wouldn’t it be better if there was an easier, hassle-free option? The answer is YES, there is such option that you can definitely take advantage of.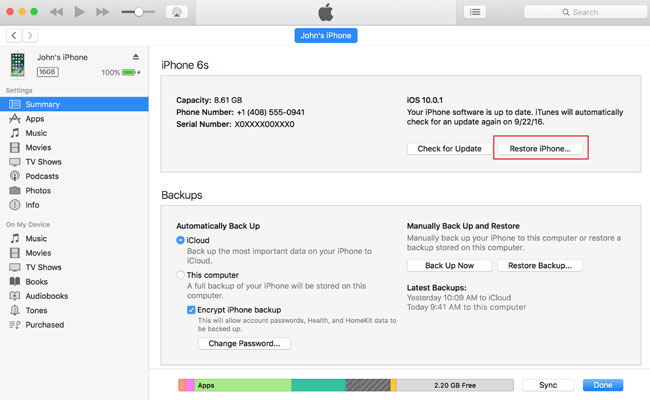
Restore iPhone on iTunes Fix the White Screen

This is where FoneDog - iOS System Recovery becomes a total no-brainer to use. It is important to also take notice that this method will NOT meddle with your data. A great advantage! Here are the steps for removing the White Screen of Death from your iOS device forever:
Download, install and launch FoneDog - iOS System Recovery. Once you have launched the program, verify that our easy-to-use interface is visible on your screen.
Plug in your iOS device to the computer via USB cable. Confirm that FoneDog toolkit was able to detect your device. Click Start to begin recovering.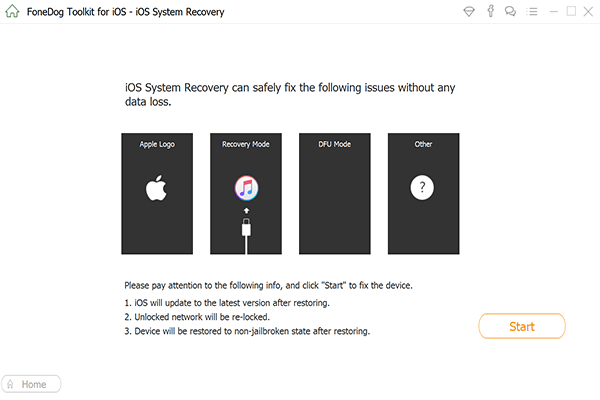 Related tutorial:
5 Ways to Fix Blue Screen Of Death in iPhone Device
In the main menu, click on ‘System Recovery’. You will now notice several other options such as ‘Data Backup & Restore’, “Viber Backup & Restore” and the like. These are for anything else you need repairs for.’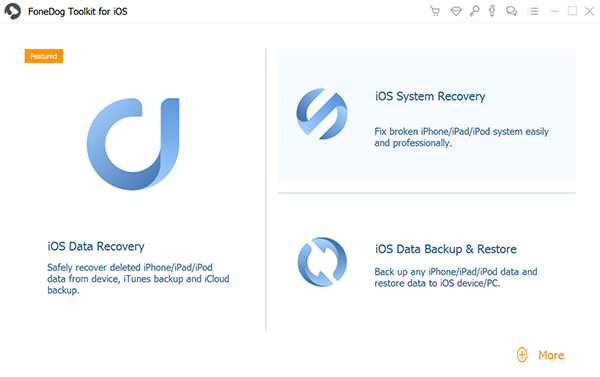
Your iOS device will once again be automatically detected. Its firmware can be updated by clicking on ‘Download’.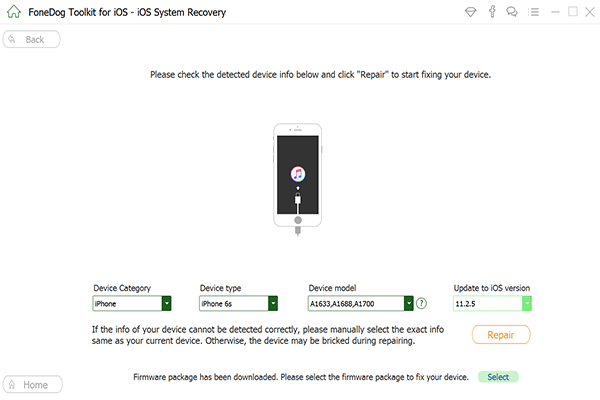
Recovery will begin immediately. As you may have noticed, all errors and the White Screen of Death are gone as it undergoes restoration! Be assured that this also means that your corrupted iTunes will have its data all restored to how it should be!
Finished! As you can see, with FoneDog - iOS System Recovery all the work is done for you. You would not need to go through the long processes anymore.Also Tutorial:
Ways to Fix Red Screen Issue in iPhone Device
Reasons for Black Screen of Death and How to Fix it
It does everything from a complete system recovery to getting your precious data back to fixing those annoying restarts. All you need is a computer or a laptop. We also made it easier than previous versions to get everything done faster!
Now that we have fully recovered and saved our iOS devices from the horrors of the White Screen of Death, we must be aware, prepare and prevent its return. Remember that while our software is guaranteed to save you even in the stickiest situations, you should definitely try not to abuse the advantage. Being a good Apple customer means that you also take care of the technologies they have given you so that they may last longer. Here, we present you tips on how to prevent a possible recurrence of this issue.
After using FoneDog - iOS System Recovery your iOS device is ready to go but it does not just end there. And you can refer the video on how to fix the problem of the white screen of death of iPhone.
If you have forgotten to back up your data, before using any of our products then please do not worry not because of the FoneDog - iOS Data Recovery has you covered. All of your data that you may have lost, will be fully restored to exactly how you had it. To make sure that all of your data won’t go missing for the next time, you may also opt to use our FoneDog - iOS Apps Backup & Restore module so everything is accessible and safe on your computer. Keep in mind that you never again would have to bring your iOS device to a repair shop where your data may potentially be at risk from prying eyes as well as having to pay huge fees. Your data is only accessible by you and you alone - as it should be.As easy as all of our software, it is always good to have a one stop program that does everything efficiently. In addition, you may have noticed several other different repair modules available - yes we are that thorough in making sure you have everything you need. You are welcome!So give our products as shot with a free trial to start off. With our user-friendly interface, immediately you will see what it is capable of and why it is well loved and received amongst our satisfied customers. We stand proudly by our product and so will you. Go on and give it a try. It is as easy as 1, 2, 3!
Leave a Comment
Comment

iPhone/Android Devices’ Maintenance Expert
Staying home, listening to music, writing tech articles
Many people asked me to repair their mobile phones so I have a lot of experience in mobile phone repair, and I know a lot about Android or Apple phones.
iOS System Recovery
Repair various iOS system errors back to normal status.
Free Download Free DownloadHot Articles
 /
/
INTERESTINGDULL
/
SIMPLEDIFFICULT
Thank you! Here' re your choices:
Excellent
Rating: 4.4 / 5 (based on 89 ratings)
